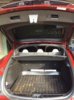
Next modification completed today. I installed lifting cables for the parcel shelf. It beats me why something so simple and basic is not included. It is a real nuisance leaving the parcel shelf up. Happened to me so many times and blocks even further the very limited view out the rear window.
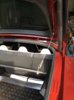
Used boating parts. Eyebolts and snap shackles, and, seriously over-the-top 2.5mm stainless steel cable. Reason was, i had some in stock, and i have a swaging tool. You need the snap shackle so you can easily disconnect to remove the parcel shelf if necessary (for tall objects for instance). The alternative, had i not had the gear would have been to use fishing trace wire and miniature swages. (you can get those at Kmart i think or any fishing store.) Braided nylon fishing line also would obviously work. As it is, it has worked out great.
Need to be real careful drilling the window surround. There is a lot of clockwork buried under there!!


")