Welcome to Tesla Motors Club
Discuss Tesla's Model S, Model 3, Model X, Model Y, Cybertruck, Roadster and More.
Register

Molded mud flaps arrived

This site may earn commission on affiliate links.
As I mentioned in my previous post awhile back, I went ahead with the rubberized eBay ones (bought on Amazon). Data point from what I got with mine:
-- No nasty smell at all
-- Definitely not a flexible as the pics show (like you're wringing it like you would a towel)
-- No instructions
-- Plenty of extra screws and clips
-- Flaps were well-packaged and no damage to the packaging box.

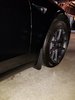
As for installation, I'll include some pics of the rears, as the front pics I took came out all blurry. I already had full PPF on my front fenders, and recently installed lower doors and rocker panel PPF myself. So the fronts could be installed, as I didn't want to install them without PPF protecting the paint underneath the flaps. I installed the right front first, and like some people had happen, when I started drilling a pilot hole, the fender plastic moved back further into the fender, causing the pilot hole to be a bit off. This caused the top of the flap to not be as flush to the car as I had hoped. What I then ended up doing was to pull the fender plastic around and out of the well a bit, to basically let it sit on the edge of the painted part of the wheel well. I then slipped a paper towel coated piece of plastic between the edge of the painted part of the fender and the back of the black plastic fender piece, as a wedge. This prevented the plastic fender from moving backwards when I drilled a new pilot hole. It worked like a charm, and now that flap is perfectly flush. Repeated this process for the other front side.

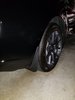
For the rears, because I didn't have any PPF on the rear bumper, I ended up cutting a piece of PPF and traced it to the same lines as the flap. I installed the PPF leaving about 1/4" inch beyond the edge of the mudflap.

They are definitely doing their job and protecting the paint on the rockers and the lower doors. Definitely an absolute mod if you care about your paint.

Pics coming soon.

Thanks,
-- Cintoman
I PPF’d just under the flaps as well, and can report similar results.
 
Here are some pics I took earlier today of my mud flaps. It might be a little tough to tell, but on the rears, I installed some PPF right where the flaps locate on the rear bumper. I extended the PPF about 1/4" beyond the flaps, so you might be able to notice the PPF line. As for the fronts, the front fenders and rockers were already PPF'd, so no need for additional here.

--Cintoman

SAM_7850.JPG
SAM_7848.JPG
SAM_7851.JPG
SAM_7852.JPG
SAM_7853.JPG
SAM_7846.JPG

SAM_7849.JPG
 
  • Like
Reactions: jebinc
My front flaps wobble a bit when I push the top of them. Probably because there's quite a gap between the top screw and the top of the mudflap. Anyone else noticed this?

The rear ones are solid as they clip around the bumper but the front ones don't have this so not as secure a fit.

What's the best way to make them more solid?
 
I added a small rectangle of double sided 3M automotive tape to the top edge of the flap inside the wheel well. This made the front mud flaps rock solid. There was too much movement on my car because the inside plastic of my wheel well is really flexible on the passenger side. The drivers side is much more stable.
 
  • Like
Reactions: jebinc and m3p_uk
I added a small rectangle of double sided 3M automotive tape to the top edge of the flap inside the wheel well. This made the front mud flaps rock solid. There was too much movement on my car because the inside plastic of my wheel well is really flexible on the passenger side. The drivers side is much more stable.
Have you got a photo please? Not sure I quite follow
 
Here are some pics I took earlier today of my mud flaps. It might be a little tough to tell, but on the rears, I installed some PPF right where the flaps locate on the rear bumper. I extended the PPF about 1/4" beyond the flaps, so you might be able to notice the PPF line. As for the fronts, the front fenders and rockers were already PPF'd, so no need for additional here.

--Cintoman

Man you aced that PPF in the rear! How'd you get your lines so precise? Nice job!
 
I added a small rectangle of double sided 3M automotive tape to the top edge of the flap inside the wheel well. This made the front mud flaps rock solid. There was too much movement on my car because the inside plastic of my wheel well is really flexible on the passenger side. The drivers side is much more stable.
Yes, many, including myself, took this path.
 
Man you aced that PPF in the rear! How'd you get your lines so precise? Nice job!

Thank you @Plug-n-Play and @jebinc. To get the PPF line exact, I put a decent size piece of PPF on the car without removing the backing. Then I test fitted the mud flap to the car. This held the PPF in place. Then, I just ran a pen around the edge of the mud flap which marked the pen on the PPF. Removed it all. So now I had the exact line of the mud flap. I then very carefully cut the PPF along the pen line. The way I initially test mounted the PPF allowed for excess so I could wrap the PPF around the leading edge of the bumper cover, which didn't really have to be perfect, because the mudflap would cover it, but me and my OCD ways wanted to get that part right too.

So now that I had the PPF trailing edge cut precisely to the shape of the rear edge of the mud flap, I had to figure out where on the bumper cover to install it. I didn't want to mess up and put it too far inwards, but at the same time, I didn't want to have an inch of PPF showing beyond the edge of the mud flap. So I again test fitted the mud flap to the car, then took some blue painter's tape and taped about 3/8" away from the edge of the flap. This gave me a good guideline for installing the PPF. I would then install it about 1/8" away from the edge of the painter's tape.

Quite a bit of work, yeah, but I wanted it to be perfect, not very noticeable, and installed correctly so it would protect the paint area underneath the mud flap.

Again, I really appreciate the compliments.

--Cintoman
 
My front flaps wobble a bit when I push the top of them. Probably because there's quite a gap between the top screw and the top of the mudflap. Anyone else noticed this?

The rear ones are solid as they clip around the bumper but the front ones don't have this so not as secure a fit.

What's the best way to make them more solid?

Ran into the same issue when I did my first front install. What I ended up doing was getting a tough piece of plastic, wrapped paper towel around it, then managed to insert that "wedge" inbetween the leading edge of the sheet metal and the fender liner. Basically popping out the fender liner a bit. I started at the top of the fender, as it was much easier to get the wedge in the gap between the liner and the metal, then slid it down to just above where the mud flap would be mounted. So basically, you now have a solid backing/support so that when you drill your pilot hole, that fender liner won't push backwards further into the wheel well. This let me precisely drill the pilot hold into the liner.

In my first attempt, when I started pushing hard with the drill, the liner pushed back and caused my hole to be in the wrong spot by just enough to make the top of the flap not flush with the sheet metal. Luckily, I did the wedge trick and was able to drill another hole only a few mm's away from the first hole. But just enough that it makes the flap nice and flush.

--Cintoman
 
  • Like
Reactions: jebinc
I thought for certain I was going to go with the ones from the Group Buy (the flat ones), but looking more at these China/eBay ones, I think I like these better. They definitely are molded better, fit better, and provide a more integrated OEM look. I might pull the trigger on these. But the only thing holding me back is that I found these:

https://www.amazon.com/dp/B07TWD1M7...&colid=JOIK1DIX35IR&ref_=lv_ov_lig_dp_it&th=1

They have them in Blue, which is my car's color. But not sure how well they'd match the DBM color. Has anyone purchased these colored ones?

--Cintoman
Don’t buy the painted ones from Amazon, awful paint job, still trying to return mine
 
Don’t buy the painted ones from Amazon, awful paint job, still trying to return mine

I ended up going with the black ones instead, as I thought about and saw how awful the paint job were on the painted ones. As well as thinking all the sand/rocks would sand blast the paint off the flaps, especially the part of the flaps that's exposed to the wheels. Really love the black eBay ones.

--Cintoman
 
Here are some pics I took earlier today of my mud flaps. It might be a little tough to tell, but on the rears, I installed some PPF right where the flaps locate on the rear bumper. I extended the PPF about 1/4" beyond the flaps, so you might be able to notice the PPF line. As for the fronts, the front fenders and rockers were already PPF'd, so no need for additional here.

--Cintoman

View attachment 458391 View attachment 458392 View attachment 458394 View attachment 458395 View attachment 458396 View attachment 458397
View attachment 458398


Are you going to paint them??

Tesla Painted splash guards.jpg
 
  • Informative
Reactions: tracksyde
I’ve had 2 sets of the plastic molded mud flaps crack and break on me. I ordered the Rally Armor ones as soon as they were available for the Model 3 a few weeks ago. Been perfect! I’ve driven over speed bumps and one of them that previously cracked the Chinese molded ones. These are very high quality flexible polyurethane and flex when they hit. Photos below. Kinda pricey but well worth it in the weather I drive in during winter:
47E8026C-1516-4265-AAA1-9785C1288B07.jpeg
221031AE-6CE6-4064-8E9C-946BB4105E9C.jpeg
5978B7C2-0C6F-40D2-8AB9-3E05C8D49684.jpeg
FB00155E-EA7E-498B-ADEE-9AAAFF9A1EE6.jpeg