


Thought I would share the results of my PPF install over the summer...
Since I’m a heavy commuter traveling about 75 miles a day and 90% of the time on the freeway my vehicles over the years seem to take a beating as a result of rocks and misc road debris. Because of the MS low and sloping hood it was a must to get some protection of some sorts on my hood and front bumper before it was too late.
In order to get this project underway I needed to repair the misc paint chips that were preexisting. I purchased a Dr Color Chip kit to aid in this effort to some limited success. First off this stuff is not an equivalent effort to a paint booth and spray gun. Deep scratches will not look new again, but it will certainly help hide blemishes that were easily detected from 5-feet away, and now one must get about 12-inches away to see the original scratch—not bad. Where this stuff really started to shine were the much small chips about the size of a pencil/pen head—almost completely eliminated those.
With that out of the way I gave the front and hood a good wipe down and started in with my PPF. For this job I choose 3M Pro Series. From my research it was more or less on par with the other main stream brands, but honestly I choose it simply for its price point—it was a fair bit cheaper via a wholesaler. This is were the fun begins...
Mind you I’ve never touch PPF before this event, but did my fair share of internet sleuthing and felt I had a pretty good understanding of the process. First off I’d say this is definitely a two man show to obtain the best results but as luck would have it I’d felt more inclined to punish myself by going it alone. Also, the film will ‘stick’ quite readily as the ambient temp rises which makes it hard to keep the film wet (outside/underside) as you work hood. You’re constantly lifting sparing and chasing the bubbles and water out from beneath the film—keep a watchful eye out for contaminates too.
For the solution I had four bottles at the read. Three of them had J&J baby shampoo and distilled water which is the slip solution. Put this on heavy and often—can’t overdue in my opinion. The other bottle had isopropyl alcohol to help setup the film quicker on the edges. Squeegees used we’re both blue and yellow...couldn’t really tell the difference between the two.
I decided to roll the edges to provide a more stealth appearance. However since I am a rookie at this there were a few flaws that I can see. I will say that almost everyone I showed couldn’t find a thing wrong, and even had a hard time telling if there was even film there to start with.
My point to the tread is to provide some confidence in others that applying a quality film is not that difficult. Don’t let the ‘Pros’ convince you only they can do it. A little research, some practice (buy some smaller sheets first) you can get some pretty good results.
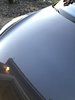
Here’s my hood right after application...if you look close enough I bet you can see the pre-existing rock chips I touched up.


Since I’m a heavy commuter traveling about 75 miles a day and 90% of the time on the freeway my vehicles over the years seem to take a beating as a result of rocks and misc road debris. Because of the MS low and sloping hood it was a must to get some protection of some sorts on my hood and front bumper before it was too late.
In order to get this project underway I needed to repair the misc paint chips that were preexisting. I purchased a Dr Color Chip kit to aid in this effort to some limited success. First off this stuff is not an equivalent effort to a paint booth and spray gun. Deep scratches will not look new again, but it will certainly help hide blemishes that were easily detected from 5-feet away, and now one must get about 12-inches away to see the original scratch—not bad. Where this stuff really started to shine were the much small chips about the size of a pencil/pen head—almost completely eliminated those.
With that out of the way I gave the front and hood a good wipe down and started in with my PPF. For this job I choose 3M Pro Series. From my research it was more or less on par with the other main stream brands, but honestly I choose it simply for its price point—it was a fair bit cheaper via a wholesaler. This is were the fun begins...
Mind you I’ve never touch PPF before this event, but did my fair share of internet sleuthing and felt I had a pretty good understanding of the process. First off I’d say this is definitely a two man show to obtain the best results but as luck would have it I’d felt more inclined to punish myself by going it alone. Also, the film will ‘stick’ quite readily as the ambient temp rises which makes it hard to keep the film wet (outside/underside) as you work hood. You’re constantly lifting sparing and chasing the bubbles and water out from beneath the film—keep a watchful eye out for contaminates too.
For the solution I had four bottles at the read. Three of them had J&J baby shampoo and distilled water which is the slip solution. Put this on heavy and often—can’t overdue in my opinion. The other bottle had isopropyl alcohol to help setup the film quicker on the edges. Squeegees used we’re both blue and yellow...couldn’t really tell the difference between the two.
I decided to roll the edges to provide a more stealth appearance. However since I am a rookie at this there were a few flaws that I can see. I will say that almost everyone I showed couldn’t find a thing wrong, and even had a hard time telling if there was even film there to start with.
My point to the tread is to provide some confidence in others that applying a quality film is not that difficult. Don’t let the ‘Pros’ convince you only they can do it. A little research, some practice (buy some smaller sheets first) you can get some pretty good results.
Here’s my hood right after application...if you look close enough I bet you can see the pre-existing rock chips I touched up.
Attachments
Last edited:

