With the help of Dborn on this thread, I installed a light bar on my Model S:

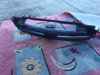
It is ultra cool and does the job for what it was installed for. Here it installed behind the grill above the radar. When it is off, it is practically invisible. Here is a picture of it turned off:

The light bar is wired to the high beam. If anyone cares to look, when you take off the dustcover of the headlight (anyone, they are behind both) you will see the xenarc bulb slotted in. Floating around that bulb are two low voltage low amperage wires actually connected together by a plastic clip. Those wires send a small current when the high beam is activated. It obviously activates a small motor controlling the lens of the light to lift them up higher - hence the term "high beam". You can hear the relay click on and off when you turn your high beams on and off. Anyway, using POSITAPS recommended to me by my good fried Dborn (which I ordered from Ebay US) I tapped into these wires so that the high beam would drive a relay that I purchased from Jaycar. That relay would act as a switch for my lightbar. The wiring was easy - the installation did not go exactly as planned. That story below.
But before I get to that story, here are some pictures of the final product:
First a view as shown by my low beam:

And here is a view shown by my high beam (light bar off):

And here is a view shown by my high beam - light bar on:

It must be said at the outset that these images do not do the light bar justice - so you have to imagine that it is actually better - because it actually is. You can get some idea by comparing the illumination on the brick wall. But suffice to say that it is so bright that you could actually read a newspaper on the road from the driver's seat about a block away... OK that bit is an exaggeration - but you get my drift. I would do it all again. Given that Tesla's light beams in Australia are so sh*t, it is highly recommended.
I had a choice to either install this light bar now, or install a new front bumper from Unplugged made to look like the new front bumpers of the currently selling Teslas. Those new bumper covers look ultra cool and Dborn has elected to go that way. But I chose the light bar project and am glad of it.
The theory behind the installation was simple. Remove the front bumper cover which is actually not that difficult. Summary is as follows:
1. Remove plastic rivets under the car;
2. Remove plastic coverings in the frunk;
3. Unscrew each screw in the wheel arches;
4. Unclip the bumper and let it come to rest on a carpet that you place in front of the vehicle.
This leaves the bumper cover connected electrically to the car but if you put the suspension on low, there is easily enough cord to put it down and twist it out of the way for you to work on the car.
We did that, and then I put Dborn to work on cutting away the ribbed plastic thing above the radar which acts as a funnel to funnel air into the radiator. I figured that was a little overkill considering that there is still sufficient air grill around the radar and the new bumper covers cover this area anyway. Dborn was 99% complete it cutting away the top of the funnel when tragedy struck. We nicked the front radiator and the car started leaking radiator fluid. God help us!
Here is a picture of the radiator with the nicks in it (gulp):

Same radiator zoomed out a little:

At this point we were frantically ringing Radiator repair guys and Tesla. At first we had arranged for a radiator repair guy to come out that afternoon and repair the radiator on site. He was quoting something like $160 an hour plus call-out fee and also said that he needs to be able to get a naked flame to the site. Sounded reasonable enough - but on later discussion, it turned out that he was only coming out to quote the job and that if it needed repairing, would have to be later on that week if not the week after. Forget that!
Meanwhile the conversations with Tesla were proving fruitful. Turns out there is a guy at St Leonards who knows everything about the car. His name is Gavin and I am told that he was flown to Fremont for education. He was a life saver. Here I was packing death, wondering how I would get a flat bed trailer to tow my car to them - and Gavin kept his cool saying things like, "Oh yeah, the radiator - that is actually a smash repair part so we have them in stock here. They are around $180 bucks plus GST". Yeah - like I was worried about the GST side of things. Anyway, we hightailed it down to Tesla and picked one up plus a couple of containers of radiator fluid.
Here is a picture of my old radiator in the new radiator box:

And here is a picture of the Tesla juice:

Anyway the changeover was relatively easy. It involved clamping the hoses in and out of the radiator at the bottom and unscrewing the radar plastic over in front of it which holds it in place. But it meant we had to remove the front tub in the frunk in order to unclip the bumper cover. This is where we learnt alot. Firstly, it is incredibly easy to remove the front tub and when you do - you expose the entire heart of the car. Inside the tub is a carpet and inside the carpet is the front tub light and push switch to open the frunk. The light and switch can be pulled slightly and then unclipped from their wires. That then enables you to easily pull out the carpet. That exposes the steel tow bar (bet you didn't know there was one) but more importantly a few screws to remove. When you remove them, the tub comes straight out and you get complete access to basically everything.
Apparently I can only upload 10 pictures... so continued in the next message:
It is ultra cool and does the job for what it was installed for. Here it installed behind the grill above the radar. When it is off, it is practically invisible. Here is a picture of it turned off:
The light bar is wired to the high beam. If anyone cares to look, when you take off the dustcover of the headlight (anyone, they are behind both) you will see the xenarc bulb slotted in. Floating around that bulb are two low voltage low amperage wires actually connected together by a plastic clip. Those wires send a small current when the high beam is activated. It obviously activates a small motor controlling the lens of the light to lift them up higher - hence the term "high beam". You can hear the relay click on and off when you turn your high beams on and off. Anyway, using POSITAPS recommended to me by my good fried Dborn (which I ordered from Ebay US) I tapped into these wires so that the high beam would drive a relay that I purchased from Jaycar. That relay would act as a switch for my lightbar. The wiring was easy - the installation did not go exactly as planned. That story below.
But before I get to that story, here are some pictures of the final product:
First a view as shown by my low beam:
And here is a view shown by my high beam (light bar off):
And here is a view shown by my high beam - light bar on:
It must be said at the outset that these images do not do the light bar justice - so you have to imagine that it is actually better - because it actually is. You can get some idea by comparing the illumination on the brick wall. But suffice to say that it is so bright that you could actually read a newspaper on the road from the driver's seat about a block away... OK that bit is an exaggeration - but you get my drift. I would do it all again. Given that Tesla's light beams in Australia are so sh*t, it is highly recommended.
I had a choice to either install this light bar now, or install a new front bumper from Unplugged made to look like the new front bumpers of the currently selling Teslas. Those new bumper covers look ultra cool and Dborn has elected to go that way. But I chose the light bar project and am glad of it.
The theory behind the installation was simple. Remove the front bumper cover which is actually not that difficult. Summary is as follows:
1. Remove plastic rivets under the car;
2. Remove plastic coverings in the frunk;
3. Unscrew each screw in the wheel arches;
4. Unclip the bumper and let it come to rest on a carpet that you place in front of the vehicle.
This leaves the bumper cover connected electrically to the car but if you put the suspension on low, there is easily enough cord to put it down and twist it out of the way for you to work on the car.
We did that, and then I put Dborn to work on cutting away the ribbed plastic thing above the radar which acts as a funnel to funnel air into the radiator. I figured that was a little overkill considering that there is still sufficient air grill around the radar and the new bumper covers cover this area anyway. Dborn was 99% complete it cutting away the top of the funnel when tragedy struck. We nicked the front radiator and the car started leaking radiator fluid. God help us!
Here is a picture of the radiator with the nicks in it (gulp):
Same radiator zoomed out a little:
At this point we were frantically ringing Radiator repair guys and Tesla. At first we had arranged for a radiator repair guy to come out that afternoon and repair the radiator on site. He was quoting something like $160 an hour plus call-out fee and also said that he needs to be able to get a naked flame to the site. Sounded reasonable enough - but on later discussion, it turned out that he was only coming out to quote the job and that if it needed repairing, would have to be later on that week if not the week after. Forget that!
Meanwhile the conversations with Tesla were proving fruitful. Turns out there is a guy at St Leonards who knows everything about the car. His name is Gavin and I am told that he was flown to Fremont for education. He was a life saver. Here I was packing death, wondering how I would get a flat bed trailer to tow my car to them - and Gavin kept his cool saying things like, "Oh yeah, the radiator - that is actually a smash repair part so we have them in stock here. They are around $180 bucks plus GST". Yeah - like I was worried about the GST side of things. Anyway, we hightailed it down to Tesla and picked one up plus a couple of containers of radiator fluid.
Here is a picture of my old radiator in the new radiator box:
And here is a picture of the Tesla juice:
Anyway the changeover was relatively easy. It involved clamping the hoses in and out of the radiator at the bottom and unscrewing the radar plastic over in front of it which holds it in place. But it meant we had to remove the front tub in the frunk in order to unclip the bumper cover. This is where we learnt alot. Firstly, it is incredibly easy to remove the front tub and when you do - you expose the entire heart of the car. Inside the tub is a carpet and inside the carpet is the front tub light and push switch to open the frunk. The light and switch can be pulled slightly and then unclipped from their wires. That then enables you to easily pull out the carpet. That exposes the steel tow bar (bet you didn't know there was one) but more importantly a few screws to remove. When you remove them, the tub comes straight out and you get complete access to basically everything.
Apparently I can only upload 10 pictures... so continued in the next message: