


Welcome to Tesla Motors Club
Discuss Tesla's Model S, Model 3, Model X, Model Y, Cybertruck, Roadster and More.
Register
Install the app
How to install the app on iOS
You can install our site as a web app on your iOS device by utilizing the Add to Home Screen feature in Safari. Please see this thread for more details on this.
Note: This feature may not be available in some browsers.
-
Want to remove ads? Register an account and login to see fewer ads, and become a Supporting Member to remove almost all ads.
You are using an out of date browser. It may not display this or other websites correctly.
You should upgrade or use an alternative browser.
You should upgrade or use an alternative browser.
berkeley_ecar
S 90D (fully loaded) delivered 18 Mar 2017
I guess I never posted -- sorry about that. This experiment was a total bust. The rings did not stay on -- in fact one flew off and broke the passenger side mirror.
Ha! Just today I noted mention in another thread of the "Evvanex rim guard:"
Motorized automatic car wash
which appears to be a commercial product quite similar to your self-invented solution (great minds think alike?):
Wheel Bands Kit for Tesla Model S
I wonder if their $119 product has problems similar to those you encountered??? I'm writing that poster to find out...
berkeley_ecar
S 90D (fully loaded) delivered 18 Mar 2017
Ha! Just today I noted mention in another thread of the "Evvanex rim guard:"
Motorized automatic car wash
which appears to be a commercial product quite similar to your self-invented solution (great minds think alike?):
Wheel Bands Kit for Tesla Model S
I wonder if their $119 product has problems similar to those you encountered??? I'm writing that poster to find out...
I heard back from @Blu Zap (who authorized me to quote him):
The EVAnnex rim guards have more than paid for themselves. I have 21's so the rims are more exposed. Definitely a safeguard. When I first got the MS it took awhile to get used to the car width to park. The rim guards helped me out from the beginning. I got the silver on silver so they blend right in. Nice color options if you want a highlight color.
So it seems you had the right basic idea, @artsci, you just needed a slightly different approach. I'm going to order an Evannex kit for my new S.berkeley_ecar
S 90D (fully loaded) delivered 18 Mar 2017
Some follow-up: one of the first things I did with my new Model S was to install the EVANNEX rim guards. As I develop my feeling for the dimensions and rear camera behavior of my car, they have already saved me from some rim scrapes. I note that there are other products claiming to do the same thing, some of them cheaper (with names like AlloyGator, RimBlades, RimPro-Tec, RIM RINGZ, Rimskins), However, I like the design of the EVANNEX product (hard plastic base that attaches to rim with 3M high performance tape, renewable plastic insert that pops into it) and am quite happy I purchased it.
.. choose wheel designs that are concave near the rim edges, and not convex - which are just inviting a hit from a curb
.. if only tires had a built-in rubber bulge-out where these bands are being fastened
.. some older cars had chrome rim-caps that pounded on around the rim, not full hubcaps.. some version of that in plastic?
..downward firing cameras that show 360 around the car on center console.. can see if you're going to hit before hitting
GatorGuy
Member
I guess I never posted -- sorry about that. This experiment was a total bust. The rings did not stay on -- in fact one flew off and broke the passenger side mirror.
I bought some of the cheap rim protectors from China which attaches to the rim with 3M tape. I thought to myself "whats the worst that could happen". Now I know.

berkeley_ecar
S 90D (fully loaded) delivered 18 Mar 2017
An update to my report of 30 Mar 2017: I remain pleased with the evannex product, having driven ~14,000 miles, including four lengthy highway trips and considerable other freeway-speed driving. No indication of detaching, and several wheel scrapes averted (although close encounters with curbs are decreasing in frequency as I develop a better feeling for the vehicle's geometry and dimensions). I dopn't think it's the use of 3M mounting tape that is a problem, as much as proper cleaning of the wheel and application of the product. Adhesion of their industrial-grade high strength tapes is quite impressive.
berkeley_ecar
S 90D (fully loaded) delivered 18 Mar 2017
None that I have observed -- but to do so, I think you'd have to drive an equivalent (large) number of miles under equivalent conditions, both with and without the rim guards installed, so I can't really answer your question.Any impact on range ?
I just applied this pretty much exactly per artsci's recipe. For our MX I used 1/2" Grainger rubber cord for our 21" Continental -- just applied to one tire for now to see how it goes. I saw a slight gap here and there so added some more glue and was then more liberal with duct tape to hold it in place. Will post photos and updates soon.
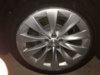
OK, got it done.
Yeah, once I carefully cleaned the tire/rim and rubber, and cut the 4 strips as precisely as I could, I got the rubber glued on. Here it is drying.

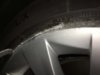
This was the area I saw had a bit of a gap while waiting for the glue to dry.


I was more liberal with the glue than artsci's "dab ever 1.5 inches" because I saw this gap and because I'm concerned that it may not stay on well after 10's of thousands of miles of driving, sometimes chilly, sometimes over 100 degrees. But, I'd say I over did it. Downside is there was some run off. You can just wipe it off with a rag when still wet, but some of the duct tape membrane tore off and remained when I was removing it.


Yeah, once I carefully cleaned the tire/rim and rubber, and cut the 4 strips as precisely as I could, I got the rubber glued on. Here it is drying.
This was the area I saw had a bit of a gap while waiting for the glue to dry.
I was more liberal with the glue than artsci's "dab ever 1.5 inches" because I saw this gap and because I'm concerned that it may not stay on well after 10's of thousands of miles of driving, sometimes chilly, sometimes over 100 degrees. But, I'd say I over did it. Downside is there was some run off. You can just wipe it off with a rag when still wet, but some of the duct tape membrane tore off and remained when I was removing it.
Attachments

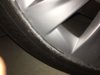
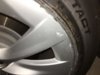
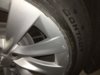
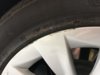
I figure that'll wear off eventually, but for now just touching it up with a Sharpie made a big difference:


Here's a shot a few feet away of the finished product...can't really see the extra dried glue and bits of duct tape innards.

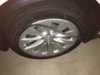
Here's a wheel I haven't touched yet for comparison:

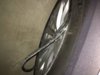
And here are some shots showing my new rubber cushions ready to protect against the next evil curb.


Here's a shot a few feet away of the finished product...can't really see the extra dried glue and bits of duct tape innards.
Here's a wheel I haven't touched yet for comparison:
And here are some shots showing my new rubber cushions ready to protect against the next evil curb.
Interesting thread, here are some thoughts.
I've had fairly good results elsewhere with E-6000. I had a need to glue a strip of countertop laminate to the edge of a polished disk of acrylic (Plexiglas). The laminate is springy and tends to pull away from the disk at the ends. I tried a lot of adhesives, all failed except the E-6000. It is tenacious. I don't know if it would work well here but it would be worth a try. It is inexpensive in the hobby section of WalMart. Someone mentioned shoe goo. I found that hardens and separates over time if the underlying material flexes. Did he say there is a flexible formulation? If so that would be worth a look.
There are descriptions here of rubber cord separation at speed causing a partially separated whip. Have you considered shorter length sections? That way if there is separation at speed, a shorter section would separate and hopefully avoid a several foot heavy rubber whip. It seems to me that the forces at speed are centrifugal, and the forces that tend to pull the cut ends apart would be relatively small. If one doesn't want to install several small pieces, it might be useful to cut partially through the rubber so if part does become unglued, the loose end would rip the remaining rubber bridge and, hopefully avoid the long rubber whip.
If initial tests are encouraging, it might be possible to cut the rubber and join with a lock type mechanical joint. Rubber is difficult to accurately cut or drill but it can be made hard and brittle if chilled with liquid nitrogen. Liquid nitrogen is cheap. You need to be careful with it but use would be well within the capability of the interested hobbyist. It might be useful to chill the end of the rubber, drill, rewarm, then glue in short pieces of small diameter rubber rejoining the larger diameter rubber but allowing a separated end to pull free at speed rather than damaging the car.
Well, this didn't work out for me.
After 2 days of just driving around town the glue started failing and the rubber was detaching.
Anyway - not a huge deal, I just pulled it off (easily). There's glue residue visible, but it's not obvious from a few feet away and I expect will disappear over time. Got a bit of glue and glued-on rubber on the edge of the rim but I think with some goo-gone or glue remover with a spudger or plastic scraper I'll be able get it off.
I'm not sure why this didn't work - i cleaned the tire thoroughly with soap and water, and then again with degreaser, and let it dry for a few hours before applying the glue (Maxi-Cure, as recommended by artsci). It seemed like I had the tire/rim super clean. I then wiped it all down again with rubbing alcohol. You could eat of that tire/rim! I even elevated the tire on a jack before applying the glue and rubber strip to make sure there was no pressure on it at all. Then I let all that dry for a few hours.
I saw some positive comments on the evannex wheel bands and they're only like $100. The install looks even easier than this DIY - reminds me of replacing a window screen - and the total cost is about the same! The Grangier rubber was over $70. I've seen other wheel band products out there for around $150 plus as well. Full disclosure - I have no financial ties with evannex.
Wheel Bands Kit for Tesla Model X
...Actually, found "Wheel Bands" kit on ebay (looks like the exact same kit) for as little as $64. You want to make sure it's both the track and insert, and that there's enough product to cover all 4 of your wheels, but looks like it.
Attachments
-
 IMG_7408.jpg320.1 KB · Views: 44
 -
 IMG_7409.jpg311.6 KB · Views: 48
 -
 IMG_7410.jpg347.1 KB · Views: 47
 -
 IMG_7411.jpg180.5 KB · Views: 40
 -
 IMG_7412.jpg277.4 KB · Views: 37
 -
 IMG_7413.jpg253.7 KB · Views: 41
 -
 IMG_7414.jpg246.7 KB · Views: 42
 -
 IMG_7416.jpg268.8 KB · Views: 41
 -
 IMG_7418.jpg299.6 KB · Views: 41
 -
 IMG_7454.jpg331.4 KB · Views: 40
Last edited:
Len905
Member
There are several types of the Maxi-Cure. Did you use this one: Bob Smith Industries BSI-135H Maxi-Cure Extra Thick Super Glue, 1 oz? How many of these 1 oz sized containers did you need to do all 4 wheels?
Similar threads
- Article
- Replies
- 0
- Views
- 2K
- Replies
- 1
- Views
- 705
- Replies
- 6
- Views
- 2K
- Replies
- 6
- Views
- 3K
- Replies
- 35
- Views
- 9K