Welcome to Tesla Motors Club
Discuss Tesla's Model S, Model 3, Model X, Model Y, Cybertruck, Roadster and More.
Register

New Official Illuminated Door sills

This site may earn commission on affiliate links.
Had tons of credit from Tesla. Said the hell with it and grabbed them. FInally, got my MYP back from XPEL Stealth wrapping yesterday, so I installed them today. Some notes:

1. The factory installed sills were extremely easy to remove in my case. Not one bend and the 3M was easy to remove. Guess I lucked out!

2. I cant open the passenger door with my left hand while filming.

3. Thats all. I suck at note-taking.


What color wrap is that? Looks great!
 
I installed the illuminated sills today. I found this installation video helpful:


A couple of tips I picked up from the video:
  1. I used gloves and nylon fishing line in a sawing movement in lieu of the pry tool provided with the new sills to remove the original sills (I did use the pry tool to lift the first corner to get the fishing line under the sill). The original sills didn't bend during the removal process and most of the adhesive was removed with the sills.
  2. I used a decal remover eraser wheel to remove the remaining adhesive residue from the original sills. This made the process less tedious than doing it by hand.
I feel a little guilty for spending on such a pricey accessory, but no regrets with the results. 👍
 
Just installed it. Extremely easy!!! I would say the most challenging part are the corners of the original plates. The middle is held down by clips which can be pried out with the red tool provided but when you get to the tips go slow and the double sided tape will peel. Each doorsill has 2 batteries. Make sure to get all the white tape left behind on the door so the new plate will sit flush. The black plastic rectangle cut outs are just a temporary stencil for the actual magnet that will stay permanent. Remove the stencil when finished and enjoy. I protected them with film from EV Wraps. The light stays on for about 10-15 seconds or until the door is closed. They look great and to me they’re worth it.
My install went fine, except that the little magnets won't stick to the underside of the door trim. That must have been treated with some kind of silicone treatment that doesn't remove with alcohol or brake cleaner (PERC). The template just fell off without trying to stick, and the magnet pulled off with the slightest touch. I have tested some of my own 3M ultra-high bond (their strongest, described as "permanent" for "outdoor." And it just falls off.

3M tells me that I need a packet of 3M adhesion promoter 06396 to prepare the surface. I'll give it a try.

Odd if I'm the only one having the problem.

On the install, on the first attempt I wasn't able to get under the metal plate, so I popped out the trim from the rear. This let me access the clips beneath to help release, but I advise against this. ON reattaching the trim, a blue connector that looked like it should press back into the hole broke off. Easily replace, but presumably it was intended to be installed in the metal hole, and have the trim slide onto it in the forward direction, then snap in the rear clip. I suggest being stubborn and getting the knife edge of the tool under the plate around the middle, then work your way out, wiggling it under the adhered ends. Give up all hope of a cool souvenir - it won't remain flat. Slow and strong to wiggle under the remaining adhesive to remove it all.

I wonder whether it's really necessary to tape down the ends, but I did. I'm confident that the batteries can last a long long time, with max 30 seconds on for every door opening event (usually much less).
 
I can note that the 3M 06396 works. it creates what seems like a "rubber cement" film in the area, and this seems to rub off if you need. It's not invisible, but under the door is not a concern. High-bond adhesive will stick reliably (so far) but the magnet will remove after bonded with some strong deliberate effort and no damage (except requiring the adhesive film to be restored and the foam tape to be replaced - buy multiples of the 06396 packets.

For tape I used 3M 4011 Exterior mounting.

The alignment was frustrating. The templates are fine to get the location, but I found that they didn't seem to be in the right place, and had trouble getting the lights to operate. A loose magnet verified that they work when positioned just right and the magnet was moved toward and away from the ideal spot. I ended up removing and trying shifting it toward the middle of the car. In the end, I set them as closed to the advised location, and they all mysteriously work fine. As if it wasn't the location being the problem, but the internal switch needed some exercise first?

In the end, even with good results (fingers crossed) this is a borderline "don't bother." Given uncertainty of battery life, headaches with install (inadequate kit lacking the adhesive prep), and cost, I'd probably just replace the sills with non-illuminated to get scratch-free in my "new" car.

I suspect that the reason this is a user-install kit is because the Service Center found it to be just as much of a pain to install, and had to charge more than the parts cost to do it.

By my stopwatch, the sills illuminate for 30 seconds.
 
Final result: INTERMITTENT. Sometimes they light up. Sometimes they don't.

Verdict: don't do it. Not ready for prime time.

I will ask if they will take them back for a refund, and order (presumably much cheaper) normal sills. I think they ought to send the standard sills for my troubles, but I'm fine paying $50 each or whatever, because the prior owner got them very scratched up.

I'd rather look at normal sills than wonder each time if my drive starts with a failure.

I note that the price is now up to $320.
 
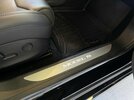
I got these as a Christmas gift from my Dad (a Model Y owner). He purchased the silver ones for me, which I suspect are designed for the model years before 2021 when the trim was silver. I was going to exchange for black like my original sills, but in looking at the online pics I noticed they matched the performance pedals and other silver accents in the interior. I think it provides a great contrast and really makes them stand out!

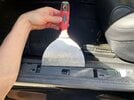
Removal of the driver side sill was super easy, required almost no pressure and left very little residue, while the passenger side was a pain and took an hour to clean off afterwards. I was able to go slow and not bend the old sills at all, regardless they won’t ever be going back on. One other thing to note, on both sides removing the old sills pulled up the paint (area equivalent to a rock chip) but they are hidden by the new sills thankfully.

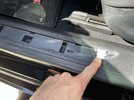
I only encountered one problem during my install. Pay really close attention when you install the magnets on the doors. One of the guides lines up towards the front of the door, and the other towards the rear. I screwed up the passenger side and had to yank the magnet, which required retaping. Both the driver and passenger sides worked flawlessly (once passenger was corrected) and I did not have to do any repositioning at all like others have mentioned.

Final note. You CAN change the batteries! The base of the unit where the tape is installed, snaps on the actual sill part with about a dozen small plastic tabs. I learned this when attempting to slightly reposition one side, the sill came up but not the tape part! In a panic and worried I broke it I snapped it back together before remembering to take a picture. Anyway battery replacement should be a simple procedure down the road, and will not require removing and reinstalling tape as some have suggested.

Anyway I’m really happy with the sills. They are high quality and look much better than the factory sills even without the lights on. The fact you can change the battery and you don’t have to mess with the car's wiring is a huge plus to me. They are pricey at $250, like most other Tesla accessories, but I’d consider them worth the cost, especially when they were purchased with someone else’s money! Excuse the dirty floor mats in the pictures.

View attachment 748818View attachment 748819
Do you mind showing us how you'd change the battery, please? You mentioned there being a dozen or so tabs. I'd like to know if it's easy to do and what it looks like once you remove it. Much appreciated!
 
Do you mind showing us how you'd change the battery, please? You mentioned there being a dozen or so tabs. I'd like to know if it's easy to do and what it looks like once you remove it. Much appreciated!
Unless you remove the entire door sill trim and go after the batteries from below, the illuminated sill is not removable without denting and destroying it, so the batteries should not be considered changeable. the good news is that my drivers side doesn't light up most of the time so the batteries will outlast my grumbling.
 
Unless you remove the entire door sill trim and go after the batteries from below, the illuminated sill is not removable without denting and destroying it, so the batteries should not be considered changeable. the good news is that my drivers side doesn't light up most of the time so the batteries will outlast my grumbling.

Per my earlier post….

Final note. You CAN change the batteries! The base of the unit where the tape is installed, snaps on the actual sill part with about a dozen small plastic tabs. I learned this when attempting to slightly reposition one side, the sill came up but not the tape part! In a panic and worried I broke it I snapped it back together before remembering to take a picture. Anyway battery replacement should be a simple procedure down the road, and will not require removing and reinstalling tape as some have suggested.

Tim
 
I note that the Tesla Online store kindly offered to take these as a return. I'm checking with Service center on cost for new unilluminated ones. If I had replaced (denting) nice ones I'd be bothered, but I needed to replace some very scratched up ones in a new to me car.
 
I just installed mine, and looks great. I got the ones sold by Tesla.

The new ones use WAY LESS tape on the tips than the original sills. I think if I ever needed to replace the batteries, it would be easy to lift them back out.

One side note- the tool that came with the kti was super dull. I'd recommend using something sharper and start in the middle.
 

Attachments

  • IMG_8214.jpeg
    IMG_8214.jpeg
    451.8 KB · Views: 222
  • IMG_8213.jpeg
    IMG_8213.jpeg
    568.4 KB · Views: 174
  • IMG_8215.jpeg
    IMG_8215.jpeg
    425.5 KB · Views: 160
End of my story is that the return was acccepted and Tesla paid for return shipping. I had new non-illuminated ones installed by the SC at a low cost I can't determine because of how they credited me for an earlier overbilling error.

I'm glad to have replaced the scratched ones with new, and don't suggest the illuminated.
 
  • Like
Reactions: Nolmt50
I installed on the Y, followed the instructions perfectly (or so i thought). Driver side worked three times and hasn't lit up since. Passenger side never worked. Thoughts? Bad batteries? Where exactly should the magnet align on the sill to activate? I double checked the instructions again and I definitely used the correct template for the magnet placement on the driver and passenger sides.