You can always upload to YouTube (and make the video unlisted there if you wish) then post the URL in this thread.I have a video of how to pull out the A Pillar trim but can't find a way to attach it here.


Welcome to Tesla Motors Club
Discuss Tesla's Model S, Model 3, Model X, Model Y, Cybertruck, Roadster and More.
Register
Install the app
How to install the app on iOS
You can install our site as a web app on your iOS device by utilizing the Add to Home Screen feature in Safari. Please see this thread for more details on this.
Note: This feature may not be available in some browsers.
-
Want to remove ads? Register an account and login to see fewer ads, and become a Supporting Member to remove almost all ads.
You are using an out of date browser. It may not display this or other websites correctly.
You should upgrade or use an alternative browser.
You should upgrade or use an alternative browser.
Plaid Radar Detector install with switched power
- Thread starter alb
- Start date
Great write-up! We did exactly this install with a Valentine1 in our Model 3 back in 2020, and it has been working out great. No issues with it powering off when the car goes to sleep, and waking back up when the car wakes up.After much reading about the difficulty of finding a switched 12v power source in the refreshed Model S Plaid, I decided to go a different route to achieve the same result.
I mounted my Escort Redline 360c with hidden wires from the cigarette lighter adapter all the way to the mirror which achieves both turning on/off with the car as well as having the mute button somewhere accessible while driving.
Hopefully this guide helps others who are interested in this solution.
Parts:
- Redline 360c radar detector, EZ Mag Mount windshield mount which comes with it and their 12-volt SmartCord which also comes in the box.
- Instructions would work for a Valentine1 or other radar detectors as well
- 2 telephone cords - MUST HAVE 4 strands in order for the mute button to work on Escort radar detectors
- I used the Valentine1 8' cord 8 ft Straight Power Cord | Valentine Radar Detector Products
- I also used the Valentine1 3.5: cord - https://store.valentine1.com/store/item.asp?i=2031
- A phone cord I already had at home didn't work, so test the connections and that power flows before going through the trouble of the install
- 2 In line couplers to connect extension power cord to SmartCord. I needed 2 because it seems one reverses the wires and the other reverses them back. Using 1 caused an error. I used Monster 140164 which were a few dollars at Ace Hardware.
- 10mm socket
- Pry tool
Wire path:
View attachment 735286
Parts:
View attachment 735255
Wiring location along windshield. Can be pushed in by hand.
View attachment 735260
The A pillar trim pulls out from the top. Be careful not to pull too far since there is a white plastic connector that has to be undone.
There is an existing track that wiring runs through which I used as well.
View attachment 735265
Once you run the wire down the A pillar, you have to remove the kick panels above the brake/accelerator. The first one pulls down since it's held on by magnets. The second has to be removed with a 10mm socket.
View attachment 735266View attachment 735267View attachment 735268
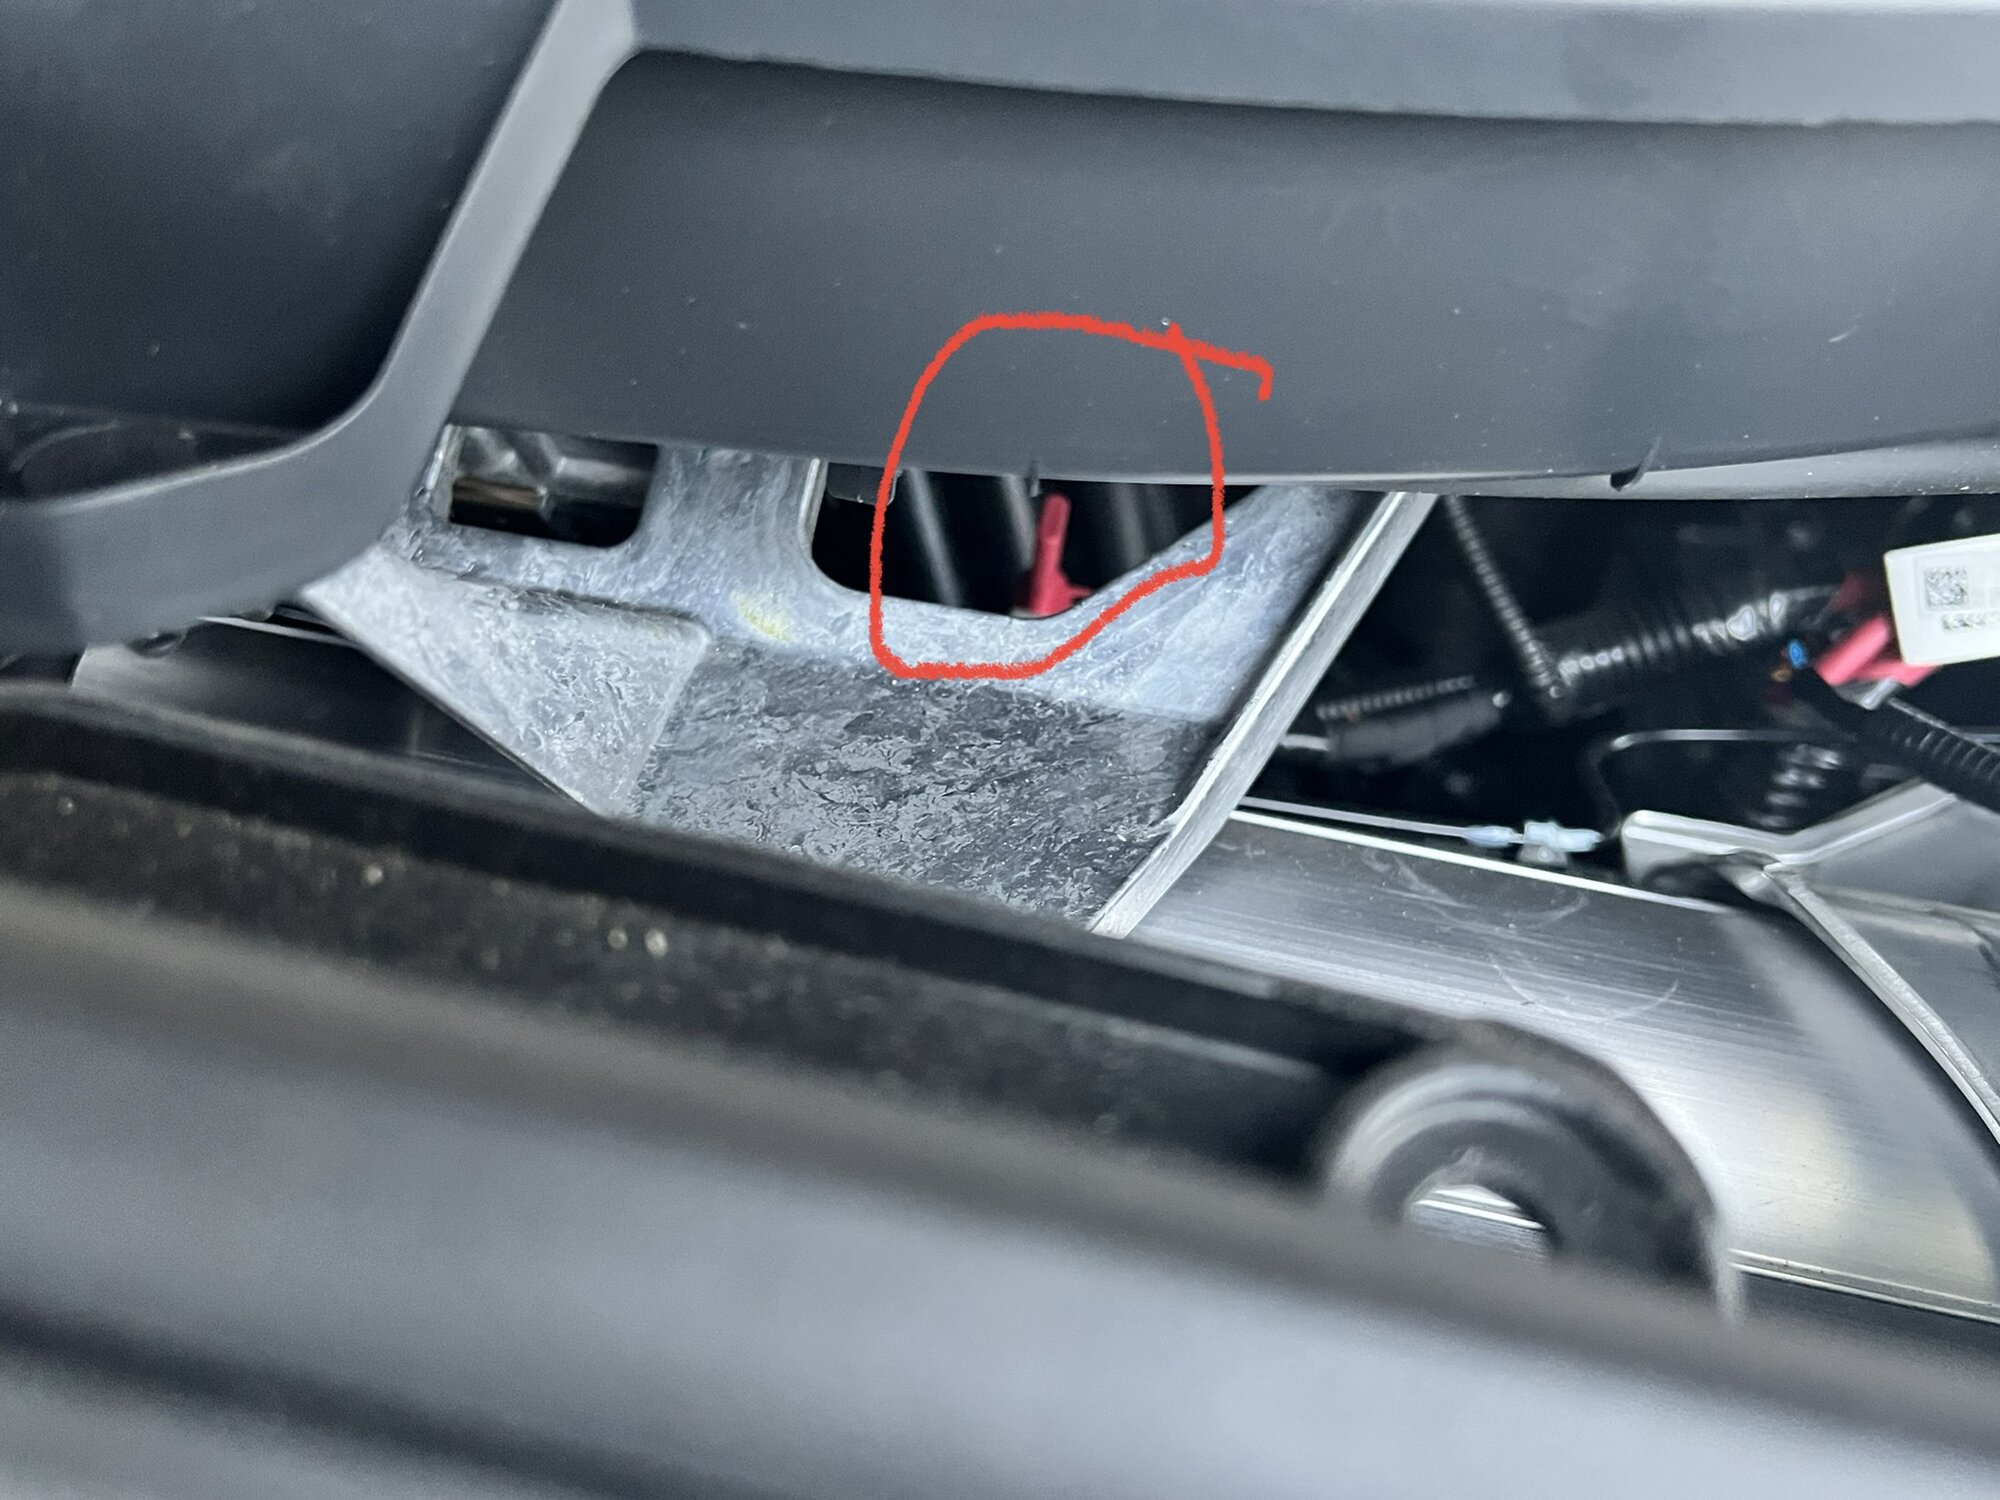
Finally fish the wire through the back of the center console with one hand inside the console and one pushing the wire through from the back. You may have to pull the center console panel to the side. Again these are attached with clips that can be pulled out.
View attachment 735269
Finally make the connections inside the center console.
View attachment 735273
Finished product!
View attachment 735278
Regarding someone else's comment about V1s being too chatty, I agree; I've disabled everything except Ka band, and it's been a much better experience, as Ka is really the only band used these days, and if you get tagged with laser, it's too late. We're running a first generation V1, by the way.
Last edited:
That's useful information.
I trust the Tesla engineers didn't forget to have some means for the main batteries to maintain the 12V. Might this not be like Sentry Mode and other vampire current draws the car is designed to handle? Pennies a day with no harm to the 12V battery?
Sentry Mode keeps the car on and running from the high voltage battery.
Alb, Thanks for taking the time to photograph and share this with the community. Received my Plaid in October, just got around to wiring the detector today after ordering the few parts you recommended. I went over the passenger side instead, for two reasons. Used to be a spot to the right of the mirror on previous model S that didn't have the windshield coating that blocked reception, not sure if that still applies. Also, I prefer to have full use of my sun visor. Install took less than 15 minutes with your guidance, just amazing. People like you are a joy to have in the community. My turn to give back next time. Sincerely appreciated.
So many posts on these forums have helped me and I feel the obligation to help others that way I'm giving as much to the community as I'm taking. Very happy to hear this was helpful for you. Who knows, maybe something you post will solve a problem I have in the future.Alb, Thanks for taking the time to photograph and share this with the community. Received my Plaid in October, just got around to wiring the detector today after ordering the few parts you recommended. I went over the passenger side instead, for two reasons. Used to be a spot to the right of the mirror on previous model S that didn't have the windshield coating that blocked reception, not sure if that still applies. Also, I prefer to have full use of my sun visor. Install took less than 15 minutes with your guidance, just amazing. People like you are a joy to have in the community. My turn to give back next time. Sincerely appreciated.
Enjoy your Plaid!
MNoonan505
Member
I can confirm the Model 3 Blend Mount worked perfectly in my 2021 MSP. I just haven't figured out the hardwire power yet, so using the coiled cable to the AUX port, ugly but works.I think that the refresh has a revised mirror such that the Blendmount for the M3/MY work.
I also used the Model 3 Blend Mount. Works great. I hardwired via an Amazon mirror tap. Super easy. Does not turn off immediately but shuts off after the car goes to sleep.
Used the mirror tap instructions here. Took 15min tops.
 teslamotorsclub.com
Used the mirror tap instructions here. Took 15min tops.
12V Access: Model S 2021 Refresh
I just lifted the phone charger tray up for easier access to the wire once i fished it out from the console and towards the footwell area. Does the phone charger tray unsnap from the front by lifting it straight up?
teslamotorsclub.com
fl_mike
New Member
For anyone interested in an alternative mounting method, I published my design on Printables.com. Search for "Tesla S Radar Detector Mount". If you don't have a 3D Printer, there are lots of services that can print it for you. I also published my designs for a socket adapter for those pesky front license plate safety screws and a wall mount for the charging wand.
I think that the refresh has a revised mirror such that the Blendmount for the M3/MY work.
I have a Plaid with a Blendmount. The Model 3 version works perfectly. Haven’t got the power tap just yet, but there is nothing to concern yourself with the mount.Nice writeup and parts list. Thank you for sharing and providing insights to the pillar process especially. I will hopefully be doing the same once my MS LR arrives fairly soon! I still have Gen1 Valentine1 and previously used blendmount products in all my past vehicles. Was fairly disappointed to learn there isn't a version that seems to work well out of the box with the Tesla tapered rear mirror stalk so may explore the suction cup idea you present. From another thread here it seems people are finding the OBD2 port on the new refresh S Plaid/LR (drivers side footwell) also seems switched and would reduce the cable run and possibly the extra adapters needed to get to glovebox. If you tried that approach, what was your experience? Just for funsies I bought a couple of parts of Amazon to test along with looking up pin-outs for V1 and 4-strand RJ11 cable. I'm not sure how this would work with the remote mute functionality that I guess is baked into the cigarette adapter piece in your pics.
OBD ll Power Adapter Wiring Harness
4-pin Modular Keystone with Screw Block for RJ11 cables
Thanks to the original poster for taking the time to post the walk-thru. I just finished installing my Uniden R7. Ordered a 12 foot power cord to the cigarette lighter for $12 on Amazon as I didn’t need the mute button.
Here’s the link if it’s helpful - it’s cheap so we’ll see how long it holds up. Escort & Beltronics Radar... https://www.amazon.com/dp/B002GEBRAK?ref=ppx_pop_mob_ap_share
Here’s the link if it’s helpful - it’s cheap so we’ll see how long it holds up. Escort & Beltronics Radar... https://www.amazon.com/dp/B002GEBRAK?ref=ppx_pop_mob_ap_share
I got the ODB2 Y-adapter (I think it's mentioned earlier in this thread) and created a wiring harness that taps the power output from it over the driver's footwell to an RJ-11 power cable. It worked great for about 3 days, now it just powers on the R7 and then it immediately shuts off. It's odd that the virtual fuses would tolerate it for a while and then decide against it, but apparently I just need to remove that and go with the cigarette lighter option. Was looking to avoid running more cable, but it looks like that's pretty much the best option. I had the wiring tucked in so nicely, too...
phaphaphooey
Member
I got this half a year ago for mounting my R7 in my Plaid and it is still going strong.Thanks to the original poster for taking the time to post the walk-thru. I just finished installing my Uniden R7. Ordered a 12 foot power cord to the cigarette lighter for $12 on Amazon as I didn’t need the mute button.
Here’s the link if it’s helpful - it’s cheap so we’ll see how long it holds up. Escort & Beltronics Radar... https://www.amazon.com/dp/B002GEBRAK?ref=ppx_pop_mob_ap_share
JaeTheDev
Active Member
After much reading about the difficulty of finding a switched 12v power source in the refreshed Model S Plaid, I decided to go a different route to achieve the same result.
I mounted my Escort Redline 360c with hidden wires from the cigarette lighter adapter all the way to the mirror which achieves both turning on/off with the car as well as having the mute button somewhere accessible while driving.
Hopefully this guide helps others who are interested in this solution.
Parts:
- Redline 360c radar detector, EZ Mag Mount windshield mount which comes with it and their 12-volt SmartCord which also comes in the box.
- Instructions would work for a Valentine1 or other radar detectors as well
- 2 telephone cords - MUST HAVE 4 strands in order for the mute button to work on Escort radar detectors
- I used the Valentine1 8' cord 8 ft Straight Power Cord | Valentine Radar Detector Products
- I also used the Valentine1 3.5: cord - https://store.valentine1.com/store/item.asp?i=2031
- A phone cord I already had at home didn't work, so test the connections and that power flows before going through the trouble of the install
- 2 In line couplers to connect extension power cord to SmartCord. I needed 2 because it seems one reverses the wires and the other reverses them back. Using 1 caused an error. I used Monster 140164 which were a few dollars at Ace Hardware.
- 10mm socket
- Pry tool
Wire path:
View attachment 735286
Parts:
View attachment 735255
Wiring location along windshield. Can be pushed in by hand.
View attachment 735260
The A pillar trim pulls out from the top. Be careful not to pull too far since there is a white plastic connector that has to be undone.
There is an existing track that wiring runs through which I used as well.
View attachment 735265
Once you run the wire down the A pillar, you have to remove the kick panels above the brake/accelerator. The first one pulls down since it's held on by magnets. The second has to be removed with a 10mm socket.
View attachment 735266View attachment 735267View attachment 735268
Finally fish the wire through the back of the center console with one hand inside the console and one pushing the wire through from the back. You may have to pull the center console panel to the side. Again these are attached with clips that can be pulled out.
View attachment 735269
Finally make the connections inside the center console.
View attachment 735273
Finished product!
View attachment 735278
Awesome write up! For the life of me, I can’t figure out where to start fishing the wire from or to, to reach inside the center console.
I do see and feel the void as shown in your image, but where should I feel for or to for the other end?
Note, I’ve been try to fish without taking panels off. I know, this is most likely my issue but I’m hoping not.
Thanks for your help!
I fished a different thicker wire starting from inside the console out the back. I first pulled open the kick panel on the left side of the center console, which made it easier to see the wire that was sticking out or the back of the console. I then taped the radar detector wire to the wire I fished and pulled it through gently. I hope that helps.
NewbyMaybe
Newby1Kenowby
When the cop doesn't turn on his radar until he sees you then how does the detector help? How many miles ahead of you will it detect?
That’s called instant on or I/O. The idea is to have a Radar Detector good enough that you detect the cop shooting at the cars in front of you.When the cop doesn't turn on his radar until he sees you then how does the detector help? How many miles ahead of you will it detect?
Always run a rabbit if you want to push the limits. No guarantees. Radar Detector just gives you better odds.
Most cops run constant on, because it’s less work.
It’s nice to know when cops are around so you stay on your best behavior
") I drive better with a radar detector. Because you get stupid/over confident without being reminded they are watching.
I drive better with a radar detector. Because you get stupid/over confident without being reminded they are watching.NewbyMaybe
Newby1Kenowby
Similar threads
- Replies
- 23
- Views
- 2K
- Replies
- 42
- Views
- 9K
- Replies
- 5
- Views
- 2K