If anyone needs supplies to do this, Ecolight makes stick on 12 volt LED lighting strips that work great. You need to splice into the existing lighting, but easy to do!
https://www.ecolightled.com/
https://www.ecolightled.com/


You can install our site as a web app on your iOS device by utilizing the Add to Home Screen feature in Safari. Please see this thread for more details on this.
Note: This feature may not be available in some browsers.
Here's an amateur version of your nice installsIt's not cool as your versions but for a non-engineer, it's a cheap, quick 10-minute install. The light shuts itself off after 30 seconds.
I got two motion sensor LED from Costco for $19.99. I added one to the frunk and one on the bottom side of parcel shelf, using only one side of velcro strip. It stick well enough to the car's
carpet.
Here is a link to a Costco motion sensing LED that is battery operated.I love your simple LED solution. Do you have a brand or Partnumber? We do not have a Costco in Belgium and I would love to three of those...
My MS does not have the LED lights on either side of the inside of the trunk.
Great job! What's really incredible is that TM expects someone to pay extra to have LED's in their trunk. That's ridiculous.
Wait... What?! Did that become an option!? Or is it lumped in with the Premium Interior Lighting package?
My MS does not have the LED lights on either side of the inside of the trunk.
I am working on adding lighting to the trunk. After acquiring some parts and reading the how-to’s on TeslaTap.com and TMC, I thought I was ready. But my MS does not have the basic LED lights that it seems others do. So, I called my local SC and asked it there was a service bulletin or announcement that explained this. A few minutes later, I got a call back. Once upon a time, the trunk lights and interior lights were part of the Tech Package, but were separated. The lights were expanded and became the Premium Interior Lighting option.
Agree with you completely. Premium lighting package is a complete rip-off at $1000. My S60 ordered long before this package appeared has these lights and I like them. I am taking delivery of my second Model S tomorrow and at $1000 this package was not even up for consideration. I would have paid $100-$150. I will find out tomorrow how many essential lights I am missing because I did not opt for a $1000 package.I am offended that Tesla would strip this out and add it to a "premium interior lighting package". First off, the lights that are there certainly are not "premium" by any means. .........This premium interior package is a huge slap in our faces.
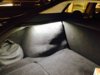
So, decided to add some lighting to my frunk and trunk. Never actually looked on the forum or anything before doing this, so, was all done on my own.
My Model S does not have existing lighting in the trunk at all. The only light in the trunk is the single LED on the hatch.
Fortunately, the wire that powers this LED is accessible in the harness that goes up the hatch. I reached it on the passenger side after removing a couple of panels near/on the C pillar. On mine it was black with a white stripe. Used a chassis ground point for negative. After confirming, I tapped this with a solderless tap and moved on.
The frunk was simple, LED was easily tapped for power.
I used some cheap LED light strips. Two in the frunk, two on each side of the trunk under the parcel shelf holder.
They turn off when the existing LEDs turn off (after a timeout or after closing... tested the frunk one by leaving my phone in it recording a video).
Here's the spoils:
View attachment 51375View attachment 51376
Both taken in otherwise near complete darkness.
Is this a DIY for someone with little experience in hotwiring a car?Wow, I like the side lights. It's like the premium lighting up front - but in the back