Welcome to Tesla Motors Club
Discuss Tesla's Model S, Model 3, Model X, Model Y, Cybertruck, Roadster and More.
Register

Pulls to the LEFT under Acceleration, pulls to the RIGHT under Regen.

This site may earn commission on affiliate links.
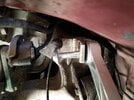
Can I ask anyone is this a concern for something to break? I had my car in to service 9 days ago for this exact issue. They said the car was out of alignment (literally the ONE driver rear tire only) they fixed the alignment and everything was fine. Until today. Now it’s swaying out the back end so badly it gives me vertigo when driving. my rear drive unit is due to be replaced as they have the parts “on order” so I really don’t want to pay them for labor to do all this crap when I know they’ll get my DU and have to drop it anyhow. No one is able to tell me if it’s ok for me to drive the car until the DU arrives.

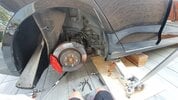
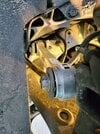
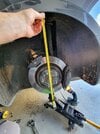
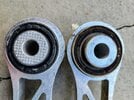
Do you have a jack at home? Lift each corner off the ground and see if there's any any slack in the wheel that would indicate a bushing is worn (put your hands at 3 and 9 o-clock and wiggle, same at 12 and 6.)
 
  • Helpful
Reactions: All In
Finally had some time to jack up the rear and look at my rear suspension. Both toe links have significant play at the wheel side. I was experiencing a floating feel when the rear end swaying a little. Also I would notice some clunking over speed bumps like something was rolling around in the frunk/trunk.
I am curious if this will solve the issue, or do several parts needs replacing other than the links and bolts. Seems like a doable fix at home, then a wheel alignment done later.
This in on a Model S 2015 85D with 97000km.
 
  • Like
Reactions: mrjedistud
WOW, that's significant. Yeah, those links are toast. IIRC you have to cut the inner bolt to remove it (not enough room otherwise), so order new toe links AND nuts/bolts/eccentric washers at the same time.

When cutting the bolt, don't back the nut all the way out so you have something to get leverage against to push that end out. Install the inner bolts backwards when you replace so you won't have to cut them next time. It's an easy job with two wrenches and a saw-zall.

After you replace the link, repeat the process and make sure your wheel bearing isn't bad too (same sort of motion).
Oh joy, the pleasures of owning a Model S. Question, will the eccentric bolt operate the same, mounted in the opposite direction? The seat the bolt head/washer combo sits in must be symmetrical from from both directions for and aft for this to work. How hardened are these bolts? Will I go through a few blades getting them out?
Hopefully the bearings are not an issue, the motion/wobble is only in one plane. Would I be looking at any other links to replace, or is this the weak one in the whole assembly? Thanks for your advice.
I hope the video wasn't too long, got to work on my editing/scripting.
Eccentric bolt will operate the same. There's one on each side, so there's really "no change" as far as they're concerned. This is what the Service Center does to replace toe arms as well, because otherwise you'd have to drop the entire rear subframe. They're manufactured with the bolts installed the 'wrong way' due to limitations with the robotics.

Should be a one-blade activity, but easier to buy two and have a spare.

Hard to say if anything else is worn out.....certainly could be, if your toe links are that fubar'd. The only other possibilities are upper and lower control arm, and you could try to move them with a crowbar to see if they are worn too.

The wheel bearing is a "hub assembly," and isn't any more difficult to replace - all of the parts you need are rentable at home depot, and I believe it's a 32mm axle nut (I'll check when I get home). But, take it one step at a time....the Toe link is definitely the biggest culprit in your dilema.
 
IIRC you have to cut the inner bolt to remove it

*not always, few weeks ago we changed a right rear toe link due to excessive play on a 2016 P90D with the knowledge that the bolt needs to be cut but with a little wiggling we managed to get the old bolt out and back in without cutting or modifying. Don't know why some cars can or can't do but obviously it saved us some time lol.

@tezcatcatl witnessed this moment of glory.
 

Attachments

  • 20210909_123649.jpg
    20210909_123649.jpg
    411.8 KB · Views: 158
*not always, few weeks ago we changed a right rear toe link due to excessive play on a 2016 P90D with the knowledge that the bolt needs to be cut but with a little wiggling we managed to get the old bolt out and back in without cutting or modifying. Don't know why some cars can or can't do but obviously it saved us some time lol.

@tezcatcatl witnessed this moment of glory.
It was indeed glorious :D
 
2015 Model S 85D
Just test drove the car after changing out both rear toe links, it feels more confident on the road with no more rear end drift.
I used two jacks, one to elevate one side of the car and the other under the wheel knuckle to control the height of the wheel assembly while installing the new link. A few things to note, I removed a few plastic clips to allow the wheel liner to move more out of the way. I also measure the wheel centre to the wheel well arch so I had an idea there the wheel assembly should sit, sans wheel, while I torqued the link in (the second jack).
As suggested, I did not need to cut the bolt, removed the exterior one first, then wiggled the interior out. When the assembly is at the correct height, there is not a lot of room to work, I could see where removing the undercover would give better access.
Finally, I went in person to collect the parts from Tesla, they said why did I not just email in advance and they would have them ready. Tesla treats the parts department like an afterthought, but I was glad they had them. Two links were 111.00 CDN (funny how we make them here, ship them south and then ship them back up to Canada again...). The new part is textured to prevent slipping, but my issue was with the wheel side developing a lot of play.
Much appreciate all the suggestions and guidance;-)
 

Attachments

  • 20211003_151159.jpg
    20211003_151159.jpg
    559 KB · Views: 106
  • 20211003_151120.jpg
    20211003_151120.jpg
    652.4 KB · Views: 93
  • 20211003_123840.jpg
    20211003_123840.jpg
    402.9 KB · Views: 99
  • 20211003_123530.jpg
    20211003_123530.jpg
    504.2 KB · Views: 95
  • 20211003_123513.jpg
    20211003_123513.jpg
    525.3 KB · Views: 108
  • Like
Reactions: xAgyex and Gtech
Incredible that the bolt can be removed without cutting, no way that would have worked on mine. See the attached picture..

Perhaps it's a model year difference, mine is a 2013.
 

Attachments

  • img_20200907_094859.jpg
    img_20200907_094859.jpg
    241.1 KB · Views: 109
Finally had some time to jack up the rear and look at my rear suspension. Both toe links have significant play at the wheel side. I was experiencing a floating feel when the rear end swaying a little. Also I would notice some clunking over speed bumps like something was rolling around in the frunk/trunk.
I am curious if this will solve the issue, or do several parts needs replacing other than the links and bolts. Seems like a doable fix at home, then a wheel alignment done later.
This in on a Model S 2015 85D with 97000km.

This video is super helpful. Thanks. I may try to tackle this issue when I swap to winter tires next month
 
Hey folks, just an update here. I thought I had fixed the issue with alignment, but not so.

I still have lateral hub movement when I apply pressure, just like others have shown. I have new toe links and bolts now, and will cut the old ones out tonight to see if it helps.

Unfortunately, I just got an alignment yesterday.....so I plan to mark the old bolt and subframe when I take them out to try to get it as close to the old position as possible, and then have a quick alignment tweak done to get it all perfecto.
 
Last edited:
Ok, toe links swapped! It was quite easy..........about 30 minutes a side, and most of that time was wiggling the inner bolts out.

I was able to get both bolts out without cutting them, but it took a little fiddling. I marked the eccentric washer a couple times so I had some reference marks to put the new toe arm in exactly the same position. I used new OEM bolts and nuts (torqued down to within an inch of their lives), and re-used the eccentric washer.

I'll go out tomorrow to see if there's an improvement in how it drives.
 

Attachments

  • IMG_1670.jpeg
    IMG_1670.jpeg
    457.2 KB · Views: 96
  • Like
Reactions: Gtech
Do you think the final tightening of the nuts should be done with the wheel height at approximately resting height? I ask, because when I did this the first time, there seem to be stress on the inner part of the link. I did not want to cause premature tearing or cracking of the rubber.
 
Do you think the final tightening of the nuts should be done with the wheel height at approximately resting height? I ask, because when I did this the first time, there seem to be stress on the inner part of the link. I did not want to cause premature tearing or cracking of the rubber.
Yes, it is imperative to load the suspension before tightening down the hardware for those rubber bushings. Tightening down the bolts with the suspension drooping will result in the bushing constantly fighting the suspension dampening system (coil spring, air bag) for suspension arm position. Ride quality suffers and the bushing tears.
Loading the suspension to normal ride height can be accomplished by simply lowering the jack (and the car) to the ground and tightening the suspension hardware then. If there isn't enough room to work like that, you can load the suspension by leaving the car up on jackstands and jacking the wheel or lower control arm upward until you see the weight of the car lift off the jackstands. You need to disconnect the sway bar or raise the wheel on the opposite side at the same time to keep the swaybar from messing with the loaded wheel suspension height.
It's important to have the suspension loaded to ride height when you're checking toe links for excessive play. The hub/knuckle must be free to rotate left to right (toe in or out). Depending on suspension design, if the suspension is unloaded and droops, there will be inward or outward rotational pressure on the knuckle which makes it impossible to find excessive play in the toe link.
Glad you mentioned that, because I cranked them down with the suspension extended. I’ll raise the car back up today and put a jack under the hub, then tighten it down at about ride height.
 
Thanks all in this thread for documenting and sharing solutions for this issue. I have the same thing going on now with a 2013 85. I think I’m going to try this repair without professional diagnosis because the repair is cheaper than the diagnostic fee, and you guys have given clear descriptions and pictures. I was worried that this would be very complicated or expensive as I have the exact pull right when accelerating and left when regenerating and makes the car rock a bit.
 
Final update - I have mostly resolved this issue.

At the end of the day, I do think my toe links had a part in this, but I also replaced my front lower fore arms and aft arms (which made the biggest difference).
The inner mount on my left front aft arm had been gouged, so the bolt actually had some play in there. That meant that the control arm moved when I applied throttle. Changing this resolved a popping noise that I occasionally heard when shifting from drive into reverse, and kept it going straight under throttle.

I have NOT replaced my front upper control arms, sway bar end links, and rear lower control arms / integral links. They all seem to be in fine shape.
 
  • Like
Reactions: CFinVancouver