Welcome to Tesla Motors Club
Discuss Tesla's Model S, Model 3, Model X, Model Y, Cybertruck, Roadster and More.
Register

Rear 'high level' brake light bleed

This site may earn commission on affiliate links.
Can you see your 'high level' brake light from inside the vehicle?

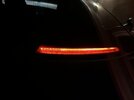
We had roof glass recently replaced and had not noticed this before. Did a brake pedal reboot and whilst waiting for it to finish, noticed that I could see our brake light in our rear view mirror.

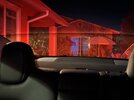
View via rear view mirror showing brake light bleed. Its actually much more noticeable than in the photo.

upload_2020-9-11_22-18-25.png
 
IIRC, someone here had a similar problem after, I think, having window tints installed, and it turned out to be damage to a foam light shield that is intended to ensure that the light unit is sealed tight to the glass.
 
i thought this was normal - i had my tints done on the day of delivery and have always seen the brake lights from inside. Perhaps they damaged this "foam". Would a visit to the SC remedy this, or no cause for concern?
 
Yes this appears on mine too - after some night driving last week I noticed in the rear view mirror. I haven't added it to my big snags list for today's SC visit but I might mention it. Not a biggie for me compared to the other issues with my car
 
For those who’s looking for a solution, here my DYI fixed for the light bleed.

1) Buy some black foam from Amazon or at your local hardware store. I recommend getting one that 5mm in thickness.
2) Measure and cut out to your desired length. I’ll post a picture of mine for those who want some reference.
3) Get double sided tape. Tape the foam from one end to the other end that’s facing the windshield. Do not remove the tape’s protective layer yet.
4) Stuffed the foam between the windshield and the trunk covers. Occasionally go outside to make sure the foam is well hidden behind the black tint of the brake light. Also make sure you do not see any of the foam inside the tail light.
5) Press the brake to confirm that no light is leaking out.
6) Carefully remove the tape’s protective layer now once you like its position. Use a thin flat surface tool to push the foam up to insure the tape and foam is pressed onto the windshield.
7) Pray that everything work out, if not just remove the foam and repeat step 3 to 6.

Good luck!!
E5743539-73EA-4CC0-8B69-DDC6B7F62F29.jpeg
 

Attachments

  • BDB50CCB-9E3C-4DCE-9435-3B84F218CD87.jpeg
    BDB50CCB-9E3C-4DCE-9435-3B84F218CD87.jpeg
    312.1 KB · Views: 48
  • D40AD8C5-3B8B-4367-85FC-8C63627DB583.jpeg
    D40AD8C5-3B8B-4367-85FC-8C63627DB583.jpeg
    854.4 KB · Views: 44
  • 250C4109-B017-44F2-9312-FAB90C238455.jpeg
    250C4109-B017-44F2-9312-FAB90C238455.jpeg
    294 KB · Views: 40
  • 0DDDCE5E-1AC3-458C-8DC9-5809FC79FDC4.jpeg
    0DDDCE5E-1AC3-458C-8DC9-5809FC79FDC4.jpeg
    118.7 KB · Views: 39
Last edited:
I'm getting the feeling that this is not normal then?

I might have a closer look to see if anything obvious ie a cowling that needs adjusting

I hate it when people don't follow up with a fix for their issue... so better late than never...

Tesla fixed ours probably using similar techniques as posted here. Too long ago to remember what was said on the 0 cost invoice, but I think it was a seal replacement and adjustment. Tesla took ownership of the issue after reporting re roof glass replacement.