Try some blue loctite next time. I noticed the factory had some on there.It worked! So my rattle was more the rear view mirror. You can replicate the issue by just tapping lightling on the black mirror housing. If it shakes/rattles a bit then you have a problem. Also, if you try to move the mirror slightly, you can tell something is off/a little loose. And the stem of the mirror seems a little loose. Followed the video instructions in the third or 4th post to remove the base housing. This was somewhat difficult, though not too terrible. You just need some kind of wedge to open it and slide it down. Once its down, tighten the screw as much as you can with t20 torx. Thats it and the mirror becomes obviously more stable. FINALLY! Thanks for all the tips everyone.


Welcome to Tesla Motors Club
Discuss Tesla's Model S, Model 3, Model X, Model Y, Cybertruck, Roadster and More.
Register
Install the app
How to install the app on iOS
You can install our site as a web app on your iOS device by utilizing the Add to Home Screen feature in Safari. Please see this thread for more details on this.
Note: This feature may not be available in some browsers.
-
Want to remove ads? Register an account and login to see fewer ads, and become a Supporting Member to remove almost all ads.
You are using an out of date browser. It may not display this or other websites correctly.
You should upgrade or use an alternative browser.
You should upgrade or use an alternative browser.
Rearview mirror housing rattle/vibrations
- Thread starter t1m1t
- Start date
robwko
New Member
What you and EKFL described is exactly what I was experiencing. I followed EKFL’s post to remove the upper and lower mirror housing and added a thin layer of foam mounting tape instead of rubber feet on the contact points. I was a little nervous about doing it myself but if you just gently use a small amount of force, the clippings will loosen and was fairly easy to pop off. I originally scheduled a service appointment (2nd time for the same issue) out for 3 weeks but I just didn’t want to wait that long and hope that the SC will get it right this time. I’ll report back after driving it for a couple of days on roads that I know causes this issue.Have same problem in My 2022 MYP. Took delivery August 20th, 2022. From day 1 on certain bumpy roads, not all, it would vibrate loudly like a humming. It would also do it when certain frequencies of bass are coming from cars around me, either from their radios or mufflers. It sounds like it is coming form the dash in the center somewhere, but after pressing on everything when its happening I stumbled on it being the plastic camera cover on the windshield that the rearview mirror attached too. I stopped it for now by pushing on it. Im sure that won't last and will be looking to fix. I feel like I will have to do it my self since I don't want to take it in if I don't have too and no one is having luck with Tesla fixing it anyway. Just started to research. Will be following this thread looking for a fix and if I come across one I will post it. Seems like a problem for 2022 MY's
gigadude
New Member
My 22 MYP has had this rattle since day #1! It’s loud enough to hear over music when driving on a rough road. So annoying!!! The service tech said it’s pretty common when he came out to replace a taillight that was scratched upon delivery. He forgot to do a signal test on the light and left without plugging it in and had to return but that’s besides the point. He tried fixing the rear view mirror housing rattle issue by pulling down on the mirror arm with all his might. Thank god he wasn’t very strong as I thought he was gonna break the mirror arm or the windshield. Im going to try and fix it myself by removing the cover and adding rubber feet at the two contact points mentioned above. I’ll go ahead and tighten down the mirror arm while I have the cover off because who knows what he loosened up with his brute force attempt. I must say though for being my first interaction with a Tesla service/repair technician I wasn’t that impressed.
Service Center replaced the housing on my rearview mirror. At first, they wouldn't since they couldn't replicate the rattle, but after one of the techs damaged the housing after he poked around it, they decided to swap out the entire housing. The rattling sound has been cut down by 99%. I hear it every now and then, but it's so minor it doesn't really bother me anymore. The trunk shelf interior c-pillar (driver side) is now rattling though... The Service Center installed them for me, but the tech didn't install the driver side c-pillar correctly which is where I thought the rattled was coming from. After they reinstalled it, it's still rattling... Hahaha oh well.
DJ Jay-V
Member
Your rattling issue is the little cable that holds the plastic part that gets removed on the rear side of the rearview mirror. Tape that string to the plastic that comes off (it's hooked to the plastic piece that comes off--tape that hook from both sides) and your rattling will be gone. The piece that's in the picture rattles and creates that annoying noise. I just taped it with electric tape and the rattling is gone now 
Attachments
DJ Jay-V
Member
Here's a less blurry pic of the piece that rattles.Your rattling issue is the little cable that holds the plastic part that gets removed on the rear side of the rearview mirror. Tape that string to the plastic that comes off (it's hooked to the plastic piece that comes off--tape that hook from both sides) and your rattling will be gone. The piece that's in the picture rattles and creates that annoying noise. I just taped it with electric tape and the rattling is gone now
Attachments
I’ve concluded that it’s just a poorly designed piece with too many plastic pieces flexing and creating rattles, buzzes etc. it’s not just that cable holder, it’s all the tabs inside the cover and the pieces that attach to the glass. our 3 does none of this but the triple camera housing is slightly diff.
robd
Member
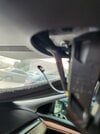
I think I have this same problem. When I touch the larger housing that faces the windshield the buzzing goes away. I tried to get the piece around the rear view mirror off but the gaps are very tight and I couldn’t get a credit card or anything in there without fear of damage. Any suggestions on something handy around the house to use?I believe I've fixed the rattle in my 22 MYP. I used this tool to pry off the lower mirror cover, but any plastic pry tool should work if its thin and strong enough. I just worked it around the until I could hear the clips pop then you can basically pull it straight down and remove.
View attachment 851450
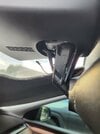
Then I removed the mirror with a T20 torx driver. The manual says you need a security T20, but you don't, there is no center "nub" on the screw itself preventing using a normal T20 torx bit. I found it easier to unclip the wire in the back once the mirror was free and I could turn it around.
View attachment 851452
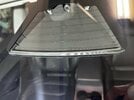
With mirror out of the way, you just need to use a pry tool to free the upper housing front two clips. They pop off pretty easily. I originally removed the entire upper housing, but that is not necessary. Getting the housing free from the head liner was the toughest part, so I recommend you don't even bother.
View attachment 851453
You just need to free it enough like the next pic shows to install some rubber feet. What I found when I removed the entire upper housing was if I tapped on the triple camera hood (thats the part the upper housing covers), it sounded very similar to when I hear the rattle or buzzing going over rough roads. Like it was vibrating against the windshield or the upper housing cover. Because of this I thought if I could add some rubber feet to the bottom of this cover, with everything back in place, it would be more securely held against either the windshield or the upper housing cover. The arrow shows where I installed the rubber feet. One on each side and one in the center.
View attachment 851461
Here is a pic of the rubber feet I had laying around. I believe they are about 1/8th inch thick.
View attachment 851465
Here is a pic of what it looks like with the rubber feet installed.
View attachment 851468
I then put the upper housing cover back in place, clips right in, and went for a drive before I put the mirror and lower cover back on. I used a section of rough rode that I could always reproduce the rattle and to my hearts content...silence.
This is a pretty easy fix as the only wire you need to disconnect is the mirror and you don't need to remove the entire upper cover, just lower it enough to install the rubber feet. I'll report back if there is any regression, but I think I may have found this rattle. Fingers crossed.

robd
Member
So I may have fixed mine as well. I was able to use an eyeglass screwdriver to create enough space to slide a card in there. The lower piece came off with some coaxing. Mirror was tight and there was loctite on the screw. I suspected I have the vibration from the camera housing as when I touched the most forward part the vibration went away. Put some felt pads and silicone pads on the plastic and first test drive on the street it always occurs on no rattle/vibration. Fingers crossed we’ll see with different temps etc.
Thanks for all the advice. At least if it reoccurs I know how to get at it.
Thanks for all the advice. At least if it reoccurs I know how to get at it.
EricZielke
New Member
Thanks for sharing the video. I was able to carefully take apart the rear view mirror and get rid of the “rattle” or “buzz” sound within about an hour or so! I just stuffed some little pieces of paper towel in the tabs of that one piece of plastic (with the felt top) that is in front of the forward facing camera.I followed this video to clean moisture blocking my front cameras (bad tint job/shop) on my 2022 MYP:
Just be patient and take your time to avoid breaking anything. Unfortunately most times I’ve noticed that Tesla service makes things worse. Use a roll of adhesive foam weather stripping to get rid of the rattles.

I used a screen retainer spline to fill in the empty pocket between the bottom of the housing case and the windshield.
Length used 7 inches
Size .120 Dia (3mm)
Gently make space from one edge of the housing to fit the tip of screen retainer spline, once the tip is in, the rest can be easily to inserted using a plastic paint scraper or a similar tool of yours.
So far, one annoying sound out of the way.


Length used 7 inches
Size .120 Dia (3mm)
Gently make space from one edge of the housing to fit the tip of screen retainer spline, once the tip is in, the rest can be easily to inserted using a plastic paint scraper or a similar tool of yours.
So far, one annoying sound out of the way.
Attachments
Thanks.I used a screen retainer spline to fill in the empty pocket between the bottom of the housing case and the windshield.
Length used 7 inches
Size .120 Dia (3mm)
Gently make space from one edge of the housing to fit the tip of screen retainer spline, once the tip is in, the rest can be easily to inserted using a plastic paint scraper or a similar tool of yours.
So far, one annoying sound out of the way.
View attachment 940405
Looks like it will work by creating the needed space between the upper and lower housings (so they will not rub each other). Did you do this without taking anything apart, or can you?
Last edited:
Thanks.
no need to take anything apart.Thanks.
Looks like it will work by creating the needed space between the upper and lower housings (so they will not rub each other). Did you do this without taking anything apart, or can you?
Looks like it will work by creating the needed space between the upper and lower housings (so they will not rub each other). Did you do this without taking anything apart, or can you?
That’s actually super smart gonna try it this weekendI used a screen retainer spline to fill in the empty pocket between the bottom of the housing case and the windshield.
Length used 7 inches
Size .120 Dia (3mm)
Gently make space from one edge of the housing to fit the tip of screen retainer spline, once the tip is in, the rest can be easily to inserted using a plastic paint scraper or a similar tool of yours.
So far, one annoying sound out of the way.
View attachment 940405
View attachment 940407
Did the same thing today and it worked thank you!!I used a screen retainer spline to fill in the empty pocket between the bottom of the housing case and the windshield.
Length used 7 inches
Size .120 Dia (3mm)
Gently make space from one edge of the housing to fit the tip of screen retainer spline, once the tip is in, the rest can be easily to inserted using a plastic paint scraper or a similar tool of yours.
So far, one annoying sound out of the way.
View attachment 940405
View attachment 940407
Similar threads
- Replies
- 8
- Views
- 1K
- Replies
- 1
- Views
- 1K