My Dual Motor Model 3 is fairly quite on a smooth road. My Dodge Durango is much quieter on all roads except for the engine noise. Here's a few easy steps that have made my Model 3 quieter and the effort is not costly or difficult.
First, using an 80mil thick self-adhesive noise and vibration dampening material, which you can buy at Amazon for far less than buying Dynamat, carefully cover the underside of the rear package shelf. Be careful to NOT cover the cut-out in the center. That opening is for airflow from the air conditioning system.
Remove the inside plastic rear trunk lid cover. It pops-off using standard auto panel removing techniques. Do it carefully so you don't break the fasteners or the plastic cover. Once removed, line as much of the inside sheet metal with the insulation material. It takes a bit of time and patience to stick the material through all the small openings. You are covering the inside surface of the trunk lid sheet metal. Once finished, carefully reinstall the plastic cover. Do Not put pressure that will transfer the force to the trunk hinges or sheet metal. You don't want to bend anything. Don't cover wires or disconnect anything by accident. There are no sensors inside the trunk lid. The backup camera is above the license plate so be careful.
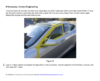
Now go the Frunk (front trunk). Carefully line just the area of the Frunk Lid with the insulation material. Do Not apply it where the weatherstriping meets the Frunk Lid. You can warp the metal if you do.
Last, remove the entire Frunk "tub". It's easier than you think. Remove the carpet. There are two bolts there. There is one bolt under each grocery bag hook. Unclip the cover over the locking mechanism and you'll find two bolts. Don't remove the thick weatherstriping. Remove the small plastic grill just ahead of the windshielf wipers. It's just help down by some plastic pegs and clips. Remove the bolt next to the filler for the windshield washer filler. Unclip the little duct that brings air to the car interior. Then, carefully lift the ends of each side panel and the entire one-piece molded tub lifts out. Wow, wait until you see all the cool stuff underneath! If you want to install a 12V power outlet, this is the time to do it. The 12V battery is right in front of you. A fused outlet is important!
If you apply the adhesive backed insulation to all the sides of the tub (the sides that are hidden when it's installed in the car) and the underside of the Frunk Carpet, you will have dampened most of the front end tire noise. I don't suggest applying the insulation to the bottom of the tub outside surface. I don't like to place a foil surface tight against the high voltage controller. Use the tittle wooden roller to carefully work all the material tight to the surfaces. You don't want anything peeling-off after you put everything back together.
The entire project will take most of a day and cost you less than $100 in material. The results I found to be worth the effort.
Enjoy!
First, using an 80mil thick self-adhesive noise and vibration dampening material, which you can buy at Amazon for far less than buying Dynamat, carefully cover the underside of the rear package shelf. Be careful to NOT cover the cut-out in the center. That opening is for airflow from the air conditioning system.
Remove the inside plastic rear trunk lid cover. It pops-off using standard auto panel removing techniques. Do it carefully so you don't break the fasteners or the plastic cover. Once removed, line as much of the inside sheet metal with the insulation material. It takes a bit of time and patience to stick the material through all the small openings. You are covering the inside surface of the trunk lid sheet metal. Once finished, carefully reinstall the plastic cover. Do Not put pressure that will transfer the force to the trunk hinges or sheet metal. You don't want to bend anything. Don't cover wires or disconnect anything by accident. There are no sensors inside the trunk lid. The backup camera is above the license plate so be careful.
Now go the Frunk (front trunk). Carefully line just the area of the Frunk Lid with the insulation material. Do Not apply it where the weatherstriping meets the Frunk Lid. You can warp the metal if you do.
Last, remove the entire Frunk "tub". It's easier than you think. Remove the carpet. There are two bolts there. There is one bolt under each grocery bag hook. Unclip the cover over the locking mechanism and you'll find two bolts. Don't remove the thick weatherstriping. Remove the small plastic grill just ahead of the windshielf wipers. It's just help down by some plastic pegs and clips. Remove the bolt next to the filler for the windshield washer filler. Unclip the little duct that brings air to the car interior. Then, carefully lift the ends of each side panel and the entire one-piece molded tub lifts out. Wow, wait until you see all the cool stuff underneath! If you want to install a 12V power outlet, this is the time to do it. The 12V battery is right in front of you. A fused outlet is important!
If you apply the adhesive backed insulation to all the sides of the tub (the sides that are hidden when it's installed in the car) and the underside of the Frunk Carpet, you will have dampened most of the front end tire noise. I don't suggest applying the insulation to the bottom of the tub outside surface. I don't like to place a foil surface tight against the high voltage controller. Use the tittle wooden roller to carefully work all the material tight to the surfaces. You don't want anything peeling-off after you put everything back together.
The entire project will take most of a day and cost you less than $100 in material. The results I found to be worth the effort.
Enjoy!