Welcome to Tesla Motors Club
Discuss Tesla's Model S, Model 3, Model X, Model Y, Cybertruck, Roadster and More.
Register

Removing a rear spoiler from PPF?

This site may earn commission on affiliate links.
Hey, everyone,
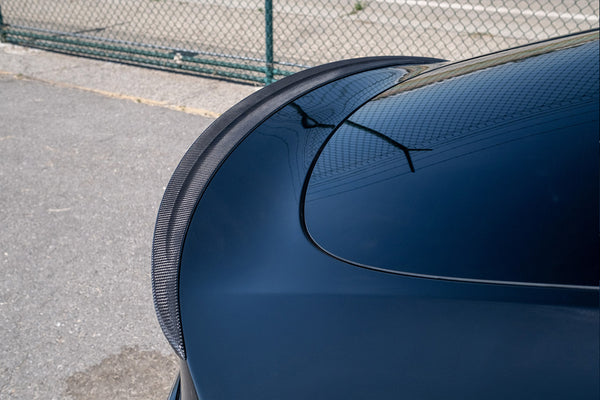
I had Xpel PPF installed on my 2018 Tesla P3D when I took delivery in Dec 2018. Six months or so later, Tesla installed the OEM rear spoiler, which was applied to the PPF-covered trunk.

Fast forward to today and, four years later, the spoiler looks pretty bad. Even though I have washed the spoiler on a weekly basis and protected it with ceramic sealants, it has faded and the "carbon-fiber" pattern has deteriorated especially near the edges.

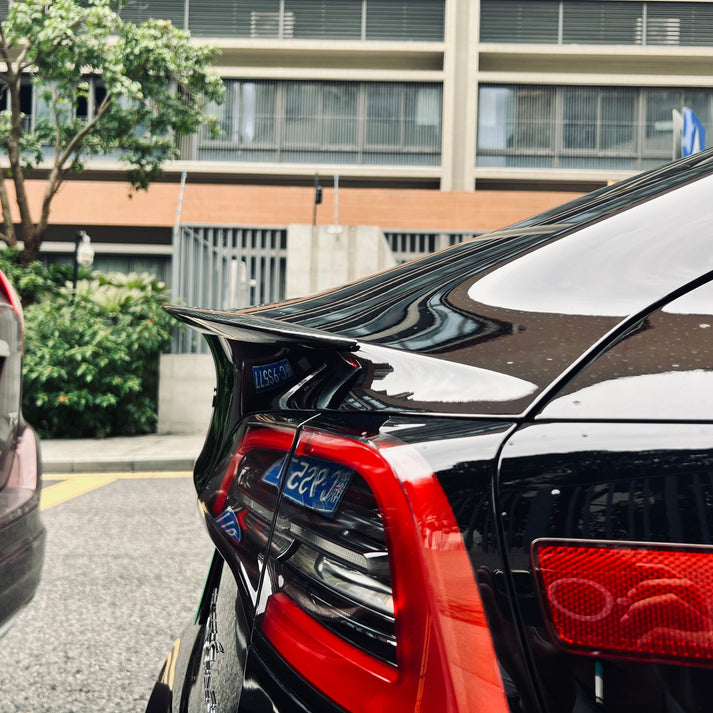
I would like to remove this spoiler and replace it with a new one.

Is it possible to remove this spoiler, using something like a thin fishing wire, without damaging the PPF? Or if I replace the spoiler, will I likely have to replace the piece of PPF underneath it?

The other option would be to leave the spoiler in place and put a vinyl wrap on it.

Suggestions are welcome!

Thank you,
Joe
 
Hi Joe, PPF will likely be damaged in the process.

I would recommend either removing the spoiler and not replacing it with anything, or removing the spoiler, replacing the PPF (before/after will show you how much its yellowed in 4 years worth of UV exopsure) and then making a call re replacing the spoiler with something (maybe flat black. gloss black or chassis color-coded).
 
Damn, Joe. Your timing is impeccable. I’m going through something very similar with my original carbon fiber rear spoiler.
The clear coat on my spoiler has started to flake off & peel away in some areas. See attached photos. Note, the white colored spots you see in these photos are the delaminated clear coat. When I scratch away/remove these spots with my fingernail, the white spots disappear… leaving behind the exposed & undamaged carbon fiber surface.

So, I ordered a new replacement spoiler (which was actually delivered today). I’m going to use the well known dental floss technique to remove the old spoiler. Based on what I’ve read/seen, it should be possible to remove the spoiler without damaging the PPF underneath. It may require some care and a little luck, but I’m confident it is possible. Will report back once I tackle this job, which won’t be until this weekend at the earliest.

635CD83B-7AEA-47C1-9CBF-87988E3FFBE8.jpeg


69B916B1-F784-46CE-B4E0-94EE48B1ADAB.jpeg
 
  • Like
Reactions: joebruin77
Just mask it off and give it a spray of satin clear coat.
Nah, I heard it wouldn’t look good if done this way. For folks who are picky/OCD with looks/finish (like me and perhaps Joe), the correct way would be to sand the entire rear spoiler and then apply a clear coat over everything.

I have plenty of disposable income, so I decided to take the easy route and just buy a new one! 👍
 
  • Like
Reactions: joebruin77
@joebruin77 As an update, I removed the old spoiler and installed the new one this afternoon.
Success!! It turned out to be a lot easier & faster than expected. Fitment on the new spoiler is perfect. Better than the original (which was installed by a professional detail shop), if I say so myself. Just under 40 minutes from start to finish, and absolutely zero damage to the PPF while removing the original spoiler.

A few comments/suggestions:
1. I used monofilament fishing line to break the seal between the double-sided tape and vehicle. Dental floss is also a good option. Nothing complicated/special about the technique. Just work the fishing line or dental floss in a back-n-forth/see-saw motion. While not necessary, you can also apply some soapy water to the fishing line to provide some extra lubrication (in case you are concerned friction from the fishing line might scuff the PPF). I went in dry with no lubrication. Hey, get your head out of there… we’re talking about detailing!! 😝 🤣
2. In my case, there was very little (almost no) adhesive/residue left on the vehicle/PPF surface after the old spoiler was removed. Don’t know if I just got lucky or if having the PPF helped prevent the adhesive/double-sided tape from bonding/sticking too tightly to the surface. So, a quick/gentle IPA wipe was all I needed to completely clean and prep the PPF surface for the new install. Also not necessary, but I decided to apply a very light/thin coat of 3M adhesion promoter to the PPF surface, before installing the new spoiler.
3. A couple of photos provided below for reference. The first photo shows the PPF surface after the old spoiler was removed. Hard to tell from this photo, but again zero scuff marks or marring of the surface from the cutting action of the fishing line. The second photo shows the new spoiler installed. As you can see, I placed painters tape at the center and at each end to ensure a perfect alignment during the install. The tape at the center is the most critical IMO, because that is where I stood and first applied pressure to the spoiler/vehicle during the start of the installation process. So, lining up the tape (on the spoiler, to the tape on the top of the trunk) made it extremely easy to get the desired/perfect alignment on the very first attempt.

I’d be happy help & answer any questions, if you decide to buy & install a new spoiler yourself. Based on your posting history, it appears you are a detailing enthusiast, just like me. If so, I think this will be a fairly easy project for you.

E6A9BFC7-65ED-4D11-94F8-3B00099BB8F1.jpeg


CF247EAF-8B11-4844-94A6-45CA6A934F0E.jpeg
 
Damn, Joe. Your timing is impeccable. I’m going through something very similar with my original carbon fiber rear spoiler.
The clear coat on my spoiler has started to flake off & peel away in some areas. See attached photos. Note, the white colored spots you see in these photos are the delaminated clear coat. When I scratch away/remove these spots with my fingernail, the white spots disappear… leaving behind the exposed & undamaged carbon fiber surface.

So, I ordered a new replacement spoiler (which was actually delivered today). I’m going to use the well known dental floss technique to remove the old spoiler. Based on what I’ve read/seen, it should be possible to remove the spoiler without damaging the PPF underneath. It may require some care and a little luck, but I’m confident it is possible. Will report back once I tackle this job, which won’t be until this weekend at the earliest.

View attachment 876979

View attachment 876980
That's an easy repair. Cut the clear on it, and tape off then spray put a couple coats of UPOL #1 on it. Must be UPOL #1. Doh, lol I guess nvm, got confused who was the OP, cuz you replaced your spoiler. Looks good btw.
 
@joebruin77 As an update, I removed the old spoiler and installed the new one this afternoon.
Success!! It turned out to be a lot easier & faster than expected. Fitment on the new spoiler is perfect. Better than the original (which was installed by a professional detail shop), if I say so myself. Just under 40 minutes from start to finish, and absolutely zero damage to the PPF while removing the original spoiler.

A few comments/suggestions:
1. I used monofilament fishing line to break the seal between the double-sided tape and vehicle. Dental floss is also a good option. Nothing complicated/special about the technique. Just work the fishing line or dental floss in a back-n-forth/see-saw motion. While not necessary, you can also apply some soapy water to the fishing line to provide some extra lubrication (in case you are concerned friction from the fishing line might scuff the PPF). I went in dry with no lubrication. Hey, get your head out of there… we’re talking about detailing!! 😝 🤣
2. In my case, there was very little (almost no) adhesive/residue left on the vehicle/PPF surface after the old spoiler was removed. Don’t know if I just got lucky or if having the PPF helped prevent the adhesive/double-sided tape from bonding/sticking too tightly to the surface. So, a quick/gentle IPA wipe was all I needed to completely clean and prep the PPF surface for the new install. Also not necessary, but I decided to apply a very light/thin coat of 3M adhesion promoter to the PPF surface, before installing the new spoiler.
3. A couple of photos provided below for reference. The first photo shows the PPF surface after the old spoiler was removed. Hard to tell from this photo, but again zero scuff marks or marring of the surface from the cutting action of the fishing line. The second photo shows the new spoiler installed. As you can see, I placed painters tape at the center and at each end to ensure a perfect alignment during the install. The tape at the center is the most critical IMO, because that is where I stood and first applied pressure to the spoiler/vehicle during the start of the installation process. So, lining up the tape (on the spoiler, to the tape on the top of the trunk) made it extremely easy to get the desired/perfect alignment on the very first attempt.

I’d be happy help & answer any questions, if you decide to buy & install a new spoiler yourself. Based on your posting history, it appears you are a detailing enthusiast, just like me. If so, I think this will be a fairly easy project for you.

View attachment 878836


View attachment 878837
Which spoiler did you buy? Can you send me the link? Looking to add one in my 2023 MY
 
Which spoiler did you buy? Can you send me the link? Looking to add one in my 2023 MY
Sure. It is the TSportline Executive spoiler. It is slightly larger than the one from Tesla and therefore has a little more presence. Personally, I think it fits and looks better on the 3 or Y, than the one from Tesla.
Offered in gloss or matte finish. I got the matte. Here is the link the spoiler for the Y:

 
If you're considering replacing your carbon fiber spoiler, we invite you to explore our selection of Tesery spoilers and find the perfect option for your Tesla Model 3. Here are some reasons why a Tesery spoiler could be a great choice for your Tesla Model 3:
  • High-Quality Materials: Tesery spoilers are crafted from premium materials, ensuring durability and longevity. Our spoilers are designed to withstand the elements and maintain their appearance over time.
  • Exact Fitment: Tesery spoilers are designed to fit your Tesla Model 3 perfectly, providing a seamless and integrated look. You won't have to worry about compatibility issues or modifications.
  • Easy Installation: Our spoilers come with detailed installation instructions and all the necessary hardware, making installation a straightforward process. You can save time and effort compared to repairing and repainting your existing spoiler.
  • Variety of Options: Tesery offers a variety of spoiler options, allowing you to choose the style and finish that best complements your vehicle. Whether you prefer a glossy carbon fiber finish or a painted finish to match your car's color, we have options to suit your preferences.
  • Enhanced Appearance: A new Tesery spoiler can enhance the appearance of your Tesla Model 3, giving it a sportier and more aggressive look. It's a great way to personalize your vehicle and make it stand out on the road.

tesery-tesla-model-3-highland-y-spoiler-performance-oem-style-dry-carbon-fiber-exterior-mods-325780.jpg