Turns out it's possible to do this yourself in your garage with one jack, but two jacks makes it better.
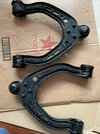
I had upper ball joint play on one side (passenger), called while checking alignment. The ball joint is part of the A-arm and not separately replaceable so I ordered 2 new A-arms, and associates hardware bolts.
These are bolt-out bolt-in replacement parts, so did the work in my garage. And since there's no adjustability of these parts there's no fear of changing your alignment.
Here are some tips / tricks I can pass on, this coming from my RWD car vintage August 2014 build, air suspension...
- observe direction of ball joint bolt, and forward bushing bolt, replace in same direction
- put suspension in "standard ride height" and make a marking with a line of where the A-arms are resting with respect to chassis. I marked the strut tower as seen from the frunk bin area, when the car was level and on the ground at this setting.
- put the car in jack mode
- 15mm wrenches and sockets for all, plus you'll need a T50 torx for the ball joint pinch bolt
- 10mm for moving the air suspension link ball connector from old arm to new arm (it doesn't come with it), pay attention to mounting direction of the ball and replicate on new arm
- frunk tub out, windshield cowl and wipers off... you need to pull the 12v battery for access in that side of car (ugh!)
- jack up car on front jack point one side at a time, and then either lower the wheel carrier onto a raised block to load up the spring, or raise the wheel carrier up with a second jack (what I did)
- leave the strut mounted as it is in the car normally
- wheel off on side you're working on. For the driver's side, undo the rear half of the wheelwell liner and let it dangle in place, you just need to reach behind it with a wrench. For passenger side, access is different, read on.
- remove the air suspension link from the A-arm but can leave other end of this link connected to the sensor arm
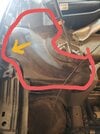
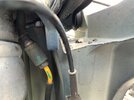
- get a flat wrench on the A-arm forward bushing bolt head, reaching in through the strut tower around the strut for access and undo the nut from where the frunk bin was
- this forward bolt back out in the strut tower behind the strut and can *just* clear obstacles in there... I used a punch to knock the bolt out from the frunk direction backward
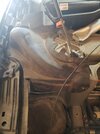
- the A-arm rear bushing bolt head is accessed by reaching behind the fender liner on the driver side.. these bolts are screwed into the frame, no nut... don't strip it! Driver side is easy out... Passenger side you must remove the 12v battery. Since the battery is out, you can reach this rear bolt head from where the battery was - instead of playing with the wheel liner on that side.
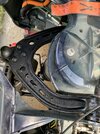
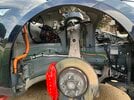
- the ball joint comes out last, it is a pinch bolt (T50/15mm), take the bolt out completely before hoping to pull the ball joint peg from the wheel carrier. Once the bolt is out the ball joint should easily be freed from the arm with a few taps.
- the wheel carrier will "flop" around a bit when the ball joint is freed... tension and pressures on the coil spring and anti-sway bar will force this arm one way or the other, be ready for that
- pull the A-arm out, move the air suspension link ball over to the new arm
- put new arm in its place,
- it is a bugger trying to get the forward bolt back up behind the strut tower to poke it forward into its hole through the new part with threads facing forward... My wife with skinny hands saved the day for me by doing this. It helps to line that hole up with the new part by using the old bolt, then pull it out... ready to receive the new bolt.
- then do the rear bushing bolt.. bushing bolts get finger tightened until suspension is leveled to standard ride height again, then get torqued down
- put the ball joint and pinch bolt back in, you can torque this on fully with car up in air. I used 35 ft/lbs.
- connect the air suspension control arm link
- wheel back torqued to spec, lower the car, do what is necessary to restore standard drive height getting the arm back to the level where you marked it. THEN torque down both bushing bolts for that arm.
- I torqued the rear bushing bolt 45 ft/lbs, scared shitless of stripping that frame nut
- torqued the front bushing bolt 50
I had upper ball joint play on one side (passenger), called while checking alignment. The ball joint is part of the A-arm and not separately replaceable so I ordered 2 new A-arms, and associates hardware bolts.
These are bolt-out bolt-in replacement parts, so did the work in my garage. And since there's no adjustability of these parts there's no fear of changing your alignment.
Here are some tips / tricks I can pass on, this coming from my RWD car vintage August 2014 build, air suspension...
- observe direction of ball joint bolt, and forward bushing bolt, replace in same direction
- put suspension in "standard ride height" and make a marking with a line of where the A-arms are resting with respect to chassis. I marked the strut tower as seen from the frunk bin area, when the car was level and on the ground at this setting.
- put the car in jack mode
- 15mm wrenches and sockets for all, plus you'll need a T50 torx for the ball joint pinch bolt
- 10mm for moving the air suspension link ball connector from old arm to new arm (it doesn't come with it), pay attention to mounting direction of the ball and replicate on new arm
- frunk tub out, windshield cowl and wipers off... you need to pull the 12v battery for access in that side of car (ugh!)
- jack up car on front jack point one side at a time, and then either lower the wheel carrier onto a raised block to load up the spring, or raise the wheel carrier up with a second jack (what I did)
- leave the strut mounted as it is in the car normally
- wheel off on side you're working on. For the driver's side, undo the rear half of the wheelwell liner and let it dangle in place, you just need to reach behind it with a wrench. For passenger side, access is different, read on.
- remove the air suspension link from the A-arm but can leave other end of this link connected to the sensor arm
- get a flat wrench on the A-arm forward bushing bolt head, reaching in through the strut tower around the strut for access and undo the nut from where the frunk bin was
- this forward bolt back out in the strut tower behind the strut and can *just* clear obstacles in there... I used a punch to knock the bolt out from the frunk direction backward
- the A-arm rear bushing bolt head is accessed by reaching behind the fender liner on the driver side.. these bolts are screwed into the frame, no nut... don't strip it! Driver side is easy out... Passenger side you must remove the 12v battery. Since the battery is out, you can reach this rear bolt head from where the battery was - instead of playing with the wheel liner on that side.
- the ball joint comes out last, it is a pinch bolt (T50/15mm), take the bolt out completely before hoping to pull the ball joint peg from the wheel carrier. Once the bolt is out the ball joint should easily be freed from the arm with a few taps.
- the wheel carrier will "flop" around a bit when the ball joint is freed... tension and pressures on the coil spring and anti-sway bar will force this arm one way or the other, be ready for that
- pull the A-arm out, move the air suspension link ball over to the new arm
- put new arm in its place,
- it is a bugger trying to get the forward bolt back up behind the strut tower to poke it forward into its hole through the new part with threads facing forward... My wife with skinny hands saved the day for me by doing this. It helps to line that hole up with the new part by using the old bolt, then pull it out... ready to receive the new bolt.
- then do the rear bushing bolt.. bushing bolts get finger tightened until suspension is leveled to standard ride height again, then get torqued down
- put the ball joint and pinch bolt back in, you can torque this on fully with car up in air. I used 35 ft/lbs.
- connect the air suspension control arm link
- wheel back torqued to spec, lower the car, do what is necessary to restore standard drive height getting the arm back to the level where you marked it. THEN torque down both bushing bolts for that arm.
- I torqued the rear bushing bolt 45 ft/lbs, scared shitless of stripping that frame nut
- torqued the front bushing bolt 50