


Welcome to Tesla Motors Club
Discuss Tesla's Model S, Model 3, Model X, Model Y, Cybertruck, Roadster and More.
Register
Install the app
How to install the app on iOS
You can install our site as a web app on your iOS device by utilizing the Add to Home Screen feature in Safari. Please see this thread for more details on this.
Note: This feature may not be available in some browsers.
-
Want to remove ads? Register an account and login to see fewer ads, and become a Supporting Member to remove almost all ads.
You are using an out of date browser. It may not display this or other websites correctly.
You should upgrade or use an alternative browser.
You should upgrade or use an alternative browser.
Replacing instrument cluster
- Thread starter Shadious
- Start date

McGillUSAF
Member
I replaced the whole assemblyHow did you get the gen 2 screen to mount to the gen 1 board? I thought they had different mounting holes. BTW, it does look way better- nice upgrade!
") screen, board, and bezel.
screen, board, and bezel.ndubes
Member
I'm having the same issue as Molinae85, tried this fix today and everything seemed to be fine but the screen isn't powering up. I can see a red light inside so it's got power. I've seated and re-seated the 2 ribbon cables 4x now. Molinae85, what did you do to get yours to work?
ndubes
Member
Phew! Ok update... I ended up just doing the hard screen reset
Do It Yourself - Model S
Which didn’t initially seem to work but then I went inside, had a beer to help with the stress over thinking I had just broken my IC, went back out to the car and voila it turned on! So either the hard reset worked, the beer (most likely), or maybe it just needs a little time to power up the first time. Try all 3 if you have an issue with it powering up right away.
How did you get the screen to sync with your car since its not the original board?I replaced the whole assembly
McGillUSAF
Member
New part firmware deployment.How did you get the screen to sync with your car since its not the original board?
Was that pushed by Tesla directly? Did you take it to the SC? So many questions, as this has been a limiting factor for others. This could also help (possibly) with an MCU swap.New part firmware deployment.
thanks!
McGillUSAF
Member
Tesla has the ability to do this OTA. It may not work for everybody... I was told this usually doesn't work and the old IC needs to be cloned to the new one.
As for the MCU I would think that this would definitely have to be brought in to get done. All the vehicles data is tethered to the MCU so if you swap it Tesla wouldn't be able to see you vehicles information. They wouldn't have any way to push the firmware & software updates OTA. This is clearly speculation and what I think. I could be wrong.
I'm trying to get Root Access to my Model S right now. Once you have Root anything is possible! This is how Jason added autopilot to his 2013 P85 along with a string of other upgrades/ modifications. Basically once you have it you can command the vehicle to pull all necessary firmware and software updates for new parts or add features that the model didn't originally come with.
I just spoke with a Tesla mobile tech who said my SC will NOT do this. I imagine it may vary from location to location or upon who you know. For me, a screen swap is the only solution and for the MCU, there is no other way unless you root it(I’m not going that route). As a side note, he said they are no longer replacing MCU 1 with MCU1, they are changing to MCU2. Not sure how true that is, but if so, YES PLEASE!!!!Tesla has the ability to do this OTA. It may not work for everybody... I was told this usually doesn't work and the old IC needs to be cloned to the new one.
As for the MCU I would think that this would definitely have to be brought in to get done. All the vehicles data is tethered to the MCU so if you swap it Tesla wouldn't be able to see you vehicles information. They wouldn't have any way to push the firmware & software updates OTA. This is clearly speculation and what I think. I could be wrong.
I'm trying to get Root Access to my Model S right now. Once you have Root anything is possible! This is how Jason added autopilot to his 2013 P85 along with a string of other upgrades/ modifications. Basically once you have it you can command the vehicle to pull all necessary firmware and software updates for new parts or add features that the model didn't originally come with.
How are you guys disconnecting the 12v before you do this? Would the "Power Off" (vs. "Car Off" status) via the MCU be enough?
Bueno
Member
I just used the Power off function in the MCU.How are you guys disconnecting the 12v before you do this? Would the "Power Off" (vs. "Car Off" status) via the MCU be enough?
Bueno
Member
I disconnected the 12 volt and turned off the MCU. Weirdly enough, the car still had power with the 12 volt disconnect... it went fine, so I must have done it right, LOL
This is because the DC to DC converter is still powering the car. Kinda like if you start a ICE car and disconnect the Neg battery terminal, the alternator will still power the car. To kill the whole car you have to disconnect the main pack.
rippah
New Member
As long as I get a GEN 2 to GEN 2, the replacement should work right? I see multiple items on ebay but the last letter is different. I don't want to open up the car to get an exact match and wait for the part as this is my only car.
1004788-00-D
1004788-00-E
1004788-00-F
Also, how long did it take you guys to replace? I'm not too handy and a bit gun shy about doing this myself, lol. Even with the videos.
Thanks!
1004788-00-D
1004788-00-E
1004788-00-F
Also, how long did it take you guys to replace? I'm not too handy and a bit gun shy about doing this myself, lol. Even with the videos.
Thanks!
The further into the alphabet, the newer the screen. I chose mine based on price and the fact that the ad stated the donor car only had 12k miles. No idea if that will extend the life of the unit, but hoping so. I took the dash apart first so I could see the part #. That took about 90 minutes working very slowly. I took out the frunk bin to disconnect the power- that could probably be done on the screen though. The clips are tough to pop off and I was afraid they would break- none broke, it takes force to remove the trim panels. To take the IC apart and put back together took another hour or so. The final setup and buttoning up took another 90 minutes. I’d set aside 4-5 hours for the first time around, obviously it will be faster the next time.
I did my swap a couple weekends ago. Huge, HUGE thanks to @Shadious and @Bueno and @FPLPowered for their work! I ended up using a Rev G from a 2017 Model X with ~32.9k miles off of eBay. I only used the panel and not the entire cluster.
My swap went pretty quick because of the ground work those guys laid, with their pics and description of that 2nd connector on the back of the Gen 2 cluster. (It has a "gated" lever that will "push" the plug out of the connector when thrown. I was somehow able to just use finger pressure and throw the lever with the other hand.)
I also studied these three videos and made combination notes on the sequence of the teardown I wanted to do. The order in the first video is not "wrong", but for example, I popped the side panel off and disconnected it before moving to the next item:
...and this gem. It's long and covers other parts of the interior, but a really good video, especially the advice on how to pull off the trim beneath the steering wheel (tug it straight back) AND advice on how to pop the decor from the right side of the steering wheel (hand tug at an angle, plus a little tool lever action):
That video isn't perfect either, but it was certainly helpful.
I also took notes on which direction the decor clips were oriented (horizontal vs. vertical) and their location for easy tool placement and popping off, especially after seeing one of the guys on Rich Rebuilds break a decor piece in a Model X Part 5 video, about 6:15 into it.


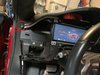
I had one speed bump I figured out before it caused damage. It was NOT in either video. On my car, and probably other older Model S, there is a single Torx 20 screw on the SIDE of the dashpad, which prevents it from easily raising to the height it should. (See below for screw location)

I did buy an "air shim" from Home Depot (Calculated Industries Model 1190). It was about $15. Did I have to use it? No, but it made the job easier. I bought two, figuring I'll need both when it comes time to deal with the MCU memory fix or if I do a decor swap. The dashpad chrome trim has a spot that is prone to flex and crease, right where it covers the left edge of the MCU chrome trim. Here's a pic from another guy who had Mobile Service out to do his MCU; note the hanging squeeze bulbs for the air shims:

BTW, I had a Rev D in my car... and it was gooey when it came out, but thankfully, not inside the dash area:

I started to clean that off the metal "cage" with rubbing alcohol... then asked "why"? I used the new clean cage from the Rev G instead! I did transfer/swap the sticker from my old one easily with a razor blade, just for the heck of it.
My Rev D motherboard was dated 2014. My 2017 Rev G replacement had a motherboard dated 2015 (didn't use it, but thought that was interesting). Hopefully all those revs in between were for the panel.
What else? I did only use the Power Off button in the MCU... but the screens did come back alive at least a couple of times during the process. I just kept hitting the Power Off when they did. I did do a couple of steering wheel MCU resets afterwards for good measure.
My swap went pretty quick because of the ground work those guys laid, with their pics and description of that 2nd connector on the back of the Gen 2 cluster. (It has a "gated" lever that will "push" the plug out of the connector when thrown. I was somehow able to just use finger pressure and throw the lever with the other hand.)
I also studied these three videos and made combination notes on the sequence of the teardown I wanted to do. The order in the first video is not "wrong", but for example, I popped the side panel off and disconnected it before moving to the next item:
...and this gem. It's long and covers other parts of the interior, but a really good video, especially the advice on how to pull off the trim beneath the steering wheel (tug it straight back) AND advice on how to pop the decor from the right side of the steering wheel (hand tug at an angle, plus a little tool lever action):
That video isn't perfect either, but it was certainly helpful.
I also took notes on which direction the decor clips were oriented (horizontal vs. vertical) and their location for easy tool placement and popping off, especially after seeing one of the guys on Rich Rebuilds break a decor piece in a Model X Part 5 video, about 6:15 into it.
I had one speed bump I figured out before it caused damage. It was NOT in either video. On my car, and probably other older Model S, there is a single Torx 20 screw on the SIDE of the dashpad, which prevents it from easily raising to the height it should. (See below for screw location)
I did buy an "air shim" from Home Depot (Calculated Industries Model 1190). It was about $15. Did I have to use it? No, but it made the job easier.
I bought two, figuring I'll need both when it comes time to deal with the MCU memory fix or if I do a decor swap. The dashpad chrome trim has a spot that is prone to flex and crease, right where it covers the left edge of the MCU chrome trim. Here's a pic from another guy who had Mobile Service out to do his MCU; note the hanging squeeze bulbs for the air shims:BTW, I had a Rev D in my car... and it was gooey when it came out, but thankfully, not inside the dash area:
I started to clean that off the metal "cage" with rubbing alcohol... then asked "why"? I used the new clean cage from the Rev G instead! I did transfer/swap the sticker from my old one easily with a razor blade, just for the heck of it.
My Rev D motherboard was dated 2014. My 2017 Rev G replacement had a motherboard dated 2015 (didn't use it, but thought that was interesting). Hopefully all those revs in between were for the panel.
What else? I did only use the Power Off button in the MCU... but the screens did come back alive at least a couple of times during the process. I just kept hitting the Power Off when they did. I did do a couple of steering wheel MCU resets afterwards for good measure.
Attachments
Last edited:
NIce additions to the thread. It would be great to have a “garage” or “how to” section with these types of threads. These types of jobs are relatively simple when you have some guidance from those who have done it before. I am worried about the MCU going next. FWIW, I believe the new screens can be purchased directly from Tesla and I think they are less expensive than the used ones on eBay.
Another observation... here is the Model X cluster I bought:

Notice that familiar shape that appears to be surrounded by black? I thought that maybe Tesla had used a black material to "mask off" the area of the panel that is not seen. Turns out that was not the case. Here is what I saw during a power on test:

No masked area; whole rectangle lights up. See how that familiar shape cuts through the battery and "Charging" words? Not cool! After removing the cluster again, I figured out that it was not a masked off area... but a simple SCREEN PROTECTOR! I used the edge of a fingernail and the edge lifted right up and came off without any problem. Cleaned the screen from that little bit of residue and good to go.
I'm not sure if Tesla puts these screen protectors on newer vehicles or if this was just somebody who had done it themselves. I do see a similar familiar shape in that MCU removal pic I posted above. I don't remember what year Model S that was. Anyways...
Notice that familiar shape that appears to be surrounded by black? I thought that maybe Tesla had used a black material to "mask off" the area of the panel that is not seen. Turns out that was not the case. Here is what I saw during a power on test:
No masked area; whole rectangle lights up. See how that familiar shape cuts through the battery and "Charging" words? Not cool! After removing the cluster again, I figured out that it was not a masked off area... but a simple SCREEN PROTECTOR! I used the edge of a fingernail and the edge lifted right up and came off without any problem. Cleaned the screen from that little bit of residue and good to go.
I'm not sure if Tesla puts these screen protectors on newer vehicles or if this was just somebody who had done it themselves. I do see a similar familiar shape in that MCU removal pic I posted above. I don't remember what year Model S that was. Anyways...
This might be a place to help flesh that idea out:...It would be great to have a “garage” or “how to” section with these types of threads...
Unofficial Tesla Service Manual
Similar threads
- Replies
- 1
- Views
- 312
- Replies
- 23
- Views
- 3K