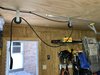
Welcome to Tesla Motors Club
Discuss Tesla's Model S, Model 3, Model X, Model Y, Cybertruck, Roadster and More.
Register
This site may earn commission on affiliate links.
Morning gang,

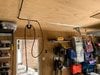
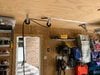
With some inspiration from others on this forum and the web, I began constructing a retractable, ceiling mount for my wall charger. I back my MY (Jospeh "Blue" Polaski) into my garage which puts my charging port close to the door going in/out of my garage. There's too much foot traffic around the vehicle and so I didn't want someone accidentally staging and messing up my charging cable and/or charging port on the vehicle. A ceiling mount, drop down version will hopefully solve that and look clean.

I drew most of my inspiration for the project from an article on Teslarati:
Retractable Tesla UMC Roof Mount

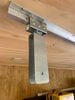
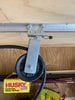
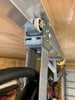
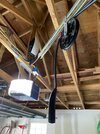
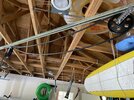
After what seems like 1000 hours of parts hunting and internet searching I gathered my parts and began construction. I used pocket/sliding door hardware for the track and wheels. Got some pulleys and misc hardware from McMaster-Carr (cool site that has a ton of stuff that can be tough to find elsewhere). If anyone is interested in recreating this or some version of it, I'd be happy to be more specific will my parts list.

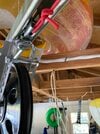
I got the majority of it installed yesterday, but ran into 1 snag. The pulley that moves on the track angles in and can twist (see pics). This boogers things up and the cable doesn't consistently retract properly. So I took that bracket back down and my plan is to weld the pulley bracket and wheel hardware together so that there can be no other outside movement. I'll post those pics once I get them welded together and back up. Wish me luck.
 

Attachments

  • IMG_0561.jpg
    IMG_0561.jpg
    281 KB · Views: 1,524
  • IMG_3702.jpg
    IMG_3702.jpg
    488 KB · Views: 1,073
  • IMG_2791.jpg
    IMG_2791.jpg
    507.4 KB · Views: 1,048
  • 61956191821__7A5C6074-7CE4-4E68-88C5-191CBFD1B9BB.JPG
    61956191821__7A5C6074-7CE4-4E68-88C5-191CBFD1B9BB.JPG
    341.9 KB · Views: 1,012
  • 61956192515__E62F4ACC-9C61-4385-9402-32A22C699512.JPG
    61956192515__E62F4ACC-9C61-4385-9402-32A22C699512.JPG
    342.8 KB · Views: 1,020
Two suggestions:
Look in sailing catalogs or your local yacht chandlery for ideas. Sailing tracks and blocks are expensive, but very robust.

I suggest a minor re-design. Using a spring to provide a constant retracting force will be a problem, and the charge cable running through a pulley is going twist and jam.
Instead use smooth-running sailing rope connected to the middle of the cable, run through small pulleys with the other end attached to a weight to provide the retracting force.
 
So, update. Rather than weld the wheel/track hardware to the pulley bracket, I went much simpler and just bolted the two together with a regular old bolt (instead of the bolt that came with the wheel hardware which is what made it twist/angle). Those 2 components are married together nicely now and there's no chance of them twisting or angling, so that's good.

New problem. I can't seem to get the spring tensioner set to the perfect setting. If you've seen the 11 second video (see below) you'll notice that she's able to easily pull the charger down and have it stay there when she wants. When she's done, she can also easily move the charger back up and out of the way. This balance is where I'm struggling. The spring balancer (same as in the video) I have is either to strong, and therefor won't allow the charger to hang freely once pulled down, OR is so weak that it won't retract the charger back up. Arrr!

 
Two suggestions:
Look in sailing catalogs or your local yacht chandlery for ideas. Sailing tracks and blocks are expensive, but very robust.

I suggest a minor re-design. Using a spring to provide a constant retracting force will be a problem, and the charge cable running through a pulley is going twist and jam.
Instead use smooth-running sailing rope connected to the middle of the cable, run through small pulleys with the other end attached to a weight to provide the retracting force.


DonaldBecker, I appreciate you taking the time to provide some input. With regards to your suggestion. I understand the idea of the weight, but have 1 reservation. When the charging port is retracted and lifted out of the way, the weight would be hanging low correct? If that's the case, I'm not a huge fan as I'm trying to keep things up and out of the way. I don't want a weight hanging down for people to run into.
 
DonaldBecker, I appreciate you taking the time to provide some input. With regards to your suggestion. I understand the idea of the weight, but have 1 reservation. When the charging port is retracted and lifted out of the way, the weight would be hanging low correct? If that's the case, I'm not a huge fan as I'm trying to keep things up and out of the way. I don't want a weight hanging down for people to run into.


I did a counterweight system similar to what was referenced -- I have the cord attached to the counterweight running parallel to the charging cord along the ceiling and down the wall alongside where the charger has been mounted. You will need room for it to travel, but it keeps it out of the way (it drops down along the wall next to a cabinet in my setup).
 
I did a counterweight system similar to what was referenced -- I have the cord attached to the counterweight running parallel to the charging cord along the ceiling and down the wall alongside where the charger has been mounted. You will need room for it to travel, but it keeps it out of the way (it drops down along the wall next to a cabinet in my setup).

The rope allows you put the counterweight in a convenient place, generally adjacent to a wall. If you use rope designed for the purpose, running through a few turning blocks (pulleys) adds very little drag. If you need drag, use low quality blocks rather than low quality line.
 
  • Like
Reactions: Rocky_H
So here's my final setup. I tossed the spring balancer and instead used a counter weight system as suggested here. I bought a 4lb fishing weight off of Amazon and that weight seems to work well.

My only complaint is that I wish the cord itself remained tight, and higher up. I don't think I can achieve the perfect picture I have in my head with my current configuration. But don't get me wrong, overall I'm pretty happy with it. It remains high enough that I won't hit my head on it which was the big goal.

All and all, I dig it. Check out the video below to see the system in action.

 
Working on a version of same using your model. I have a 2nd EV on order so I need to place the EVSE in the truss/ceiling area, and I need to 'swivel' the cable to reach both. Thank you for your inspiration. Found a 5 foot track and trolley system on Amazon:

Got some old golf cart wheels on craigslist and removed the 'tire' so it made nice pulley wheels. Adding a guide so I can pull the cable in 2 directions for 2 EV's in my garage. Will see pictures as soon as I get it up and test it.
 
Update - Amazon couldn't/wouldn't deliver so I found the (10 feet) UNistrut channel at HDepot. Good thing because it turns out 6 feet would have been too short. Tried ordering trolley from Amazon - same thing! Never delivered. Found a local unistrut dealer and they had it in stock. First round install- worked but kinda sloppy. Went back to my local hardware store - nuts & bolts section: They had metal sleeves (like bushings) I hammered into the wheel center to make it smoother and less wobbly. Also changed from flat (wobbly) perforated steel straps to angle ones. Two benefits - I was able to mount into 2 trolley holes to prevent twisting, and make side wheel supports stiffer. Serendipitously on my first test-drive, the wheel supports bent to 45 degrees as shown. Works even better. Also notice that I put a 'cable roller guide' to keep the cable from hopping out of the wheel track. Added a sleeve onto the naked hex bolt later and works even better.
 

Attachments

  • retract1.jpg
    retract1.jpg
    565 KB · Views: 996
  • retract2.jpg
    retract2.jpg
    625.3 KB · Views: 568
  • retract3.jpg
    retract3.jpg
    461.9 KB · Views: 526
  • retract4.jpg
    retract4.jpg
    511 KB · Views: 522
  • retract5.jpg
    retract5.jpg
    681.2 KB · Views: 605
  • Like
Reactions: mrwug
Update - Amazon couldn't/wouldn't deliver so I found the (10 feet) UNistrut channel at HDepot. Good thing because it turns out 6 feet would have been too short. Tried ordering trolley from Amazon - same thing! Never delivered. Found a local unistrut dealer and they had it in stock. First round install- worked but kinda sloppy. Went back to my local hardware store - nuts & bolts section: They had metal sleeves (like bushings) I hammered into the wheel center to make it smoother and less wobbly. Also changed from flat (wobbly) perforated steel straps to angle ones. Two benefits - I was able to mount into 2 trolley holes to prevent twisting, and make side wheel supports stiffer. Serendipitously on my first test-drive, the wheel supports bent to 45 degrees as shown. Works even better. Also notice that I put a 'cable roller guide' to keep the cable from hopping out of the wheel track. Added a sleeve onto the naked hex bolt later and works even better.
PS Thanks for the inspiration Aquad! All in all, a fun project but everyone might be better served ordering from McMaster-Carr as you suggested. I was worried that it would be prohibitively expensive to ship a long strut to Hawaii. Looks like you have an I-strut instead of the channel strut I used. Not sure I could find that item locally.