Welcome to Tesla Motors Club
Discuss Tesla's Model S, Model 3, Model X, Model Y, Cybertruck, Roadster and More.
Register

Retrofit CCS compatibility onto earlier (NA) Model 3 - DIY approach

This site may earn commission on affiliate links.
Status
Not open for further replies.
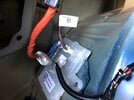
Welp, can confirm the old port doesn't have a resistor on Prox. Lame. Well, good news is, the Prox signal was split in 2 pins (copied/shorted to both) probably for this very reason (and Gen3 has 2.7k between the Prox pin and Gnd). So I just have to add the resistor that changed places, now we have 100% compliance and, in effect, this circuit should "look exactly like" a Gen4 port.

1645258774094.png

UNTESTED AS OF THIS POST. I'M PROCRASTINATING BECAUSE I FEAR ANOTHER LETDOWN 😂

So, off to tomorrow to slay the procrastination demon and face the possibility of another hopes-up/letdown. hahaha
 
Last edited:
This is what success looks like :)

8CBC63A4-EEEA-4258-A257-EF92574DB324.jpeg

2317FA16-132D-4493-9320-5308541570EF.jpeg
069383F1-5F19-4E9C-8712-784692696CC9.jpeg


Exactly as anticipated.

Sitting at an EA station now chugging down some unapproved electrons. haha.

Need to check the alignment of the overheating temperature and make sure it lines up at real 170f, but that's exactly what I expected to need to do :)

Attached bonus photo: taken before I had it quite right (my charge port harness needed some de-bodging to return to stock).

Oh -- that's worth mentioning: in sum, the ONLY things I've done here is: install Gen4 ECU, add adapter harness :) that's it! That's THE ENTIRETY of the upgrade. It just took all these pages and discoveries to get there. haha
 

Attachments

  • 1440D1CD-2D3B-4E98-9F2B-27D871E6A686.jpeg
    1440D1CD-2D3B-4E98-9F2B-27D871E6A686.jpeg
    343.1 KB · Views: 483
Last edited:
  • Like
Reactions: FalconFour
Shopping list to build exactly what I have:
Gen4 ECU: 1537264-00-B (search eBay / set a saved search / contact a Tesla service center for the best price imho)
Male-side housing: 1473413-1 TE Connectivity AMP Connectors | Connectors, Interconnects | DigiKey
Male pin crimps: 1674742-1 TE Connectivity AMP Connectors | Connectors, Interconnects | DigiKey
Female crimps: 1123343-1 TE Connectivity AMP Connectors | Connectors, Interconnects | DigiKey
Female-side housing: 1318917-1 TE Connectivity AMP Connectors | Connectors, Interconnects | DigiKey
Some wire: Amazon.com (I like the flexibility of this silicone wire, but it's just barely small enough to fit. Might want to choose something else.)
Some crimpers: Amazon.com (I used the smallest slot on these - seems to be a perfect fit)
Some resistors: Amazon.com (seems like it has all the needed values... except 2.7k. You can turn a 2.2k into a 2.7k by putting a 500ohm resistor in series with it. The 470-ohm resistor in this kit would probably be "perfect enough" for resistor tolerances. In my case I actually have this resistor kit left-over from my childhood Radio Shack 300-in-1 electronics lab kit, organized into a neat little 6-slot box by decades. Still somehow with me to this day!)
Soldering iron: Amazon.com with a D24 tip: Amazon.com
Solder: WYCTIN 60-40 Tin Lead Rosin Core Solder Wire for Electrical Soldering and DIY 0.0236 inches(0.6mm) 0.11lbs: Amazon.com: Tools & Home Improvement
Socks, pants, shirt, and underwear I wore: 😂
 
Last edited:
Knuckle skin?
Ha! Nope, just a lot of 😫 and 🥴 followed by 😁 and ☹. No skinned knuckles here. ;)

Worth noting one major looming frustration I have here: NONE of this (except maybe the 2.7k Prox resistor) is truly necessary. All the parts are in the Gen4 ECU to be compatible with the old charge port. Grounds in the same place, everything. An adjustment to firmware would provide the proper voltage->temperature mapping for the 10k thermistors, and the HV cover switch could be ignored on old ports that don't have/need one. This could all just be a firmware switch. But here we are, instead 🤷‍♂️ At least it works.

Still need to verify the high side of the temperature (it says 103f but it's really about 70f), but I can at least say the temperature does rise while charging (103f->113f while charging on CCS), and it was, as indicated, nowhere near overheating. Just need to make sure it indicates 170f when it really is 170f. The concern here is that, due to value differences, it's a much lower response (though it's reading high now, it'll read low in higher temps). So I have to make sure the critical/fault threshold still DOES line-up properly, for safety. :)
 
Last edited:
Need to check the alignment of the overheating temperature and make sure it lines up at real 170f, but that's exactly what I expected to need to do :)
So if I'm reading what you did correctly, you added a 22k resistor in series with the original circuit, right? If so, I don't think it'll ever hit 170F. Essentially the "minimum" resistance you'll have is 22k, which will probably register a fair bit lower than 170f.

Realistically I think the only way you'll be able to have a near-correct temp reading short of replacing the thermistors and pull-up resistors would be to throw in a small microcontroller that calculates the correct temperature from the existing circuit and outputs an appropriate voltage to the ECU.
 
  • Informative
Reactions: FalconFour
With the Gen4 ECU and FalconFour harness in hand, what's the installation procedure? Does it require service mode to do the install?
Service mode isn't required, but it's a fast-forward.

Reiterating that this is for early cars - potentially anything pre-Gen4 (Oct 2020) - so 2017-2020 would need this. Gen4 cars just need the swap (skip the adapter).
  1. Acquire Gen4 ECU.
  2. Wait for an update to become available and prompt to install (don't install yet).
  3. Pull the plug before you start.
  4. Swap the ECU (I think I have a capture of the service instructions around here, somewhere). Add the converter harness I cooked-up above. (be aware: it's not 100% finished yet - the 22k resistors may be a little too high).
  5. Then plug back in (finish instructions) after swap.
  6. You won't be able to drive, and the car will be running on 12v battery due to incompatible ECU software. IMMEDIATELY install the update to reflash and bring the main power back online (it'll clunk-clunk while it's updating and you're home free).
  7. Voila! CCS adapter support: enabled.
Service mode will just let you skip waiting for an update (FSD Beta blues: it was over a month since the last update for me - just came in yesterday!), and you can use "reinstall software" to do it.
 
So if I'm reading what you did correctly, you added a 22k resistor in series with the original circuit, right? If so, I don't think it'll ever hit 170F. Essentially the "minimum" resistance you'll have is 22k, which will probably register a fair bit lower than 170f.

Realistically I think the only way you'll be able to have a near-correct temp reading short of replacing the thermistors and pull-up resistors would be to throw in a small microcontroller that calculates the correct temperature from the existing circuit and outputs an appropriate voltage to the ECU.
Right, it'll never be correct with the 10k, but I want the critical level to match. So, it'll read high normally (e.g. 70f real / 130f sensed), but if it actually does heat up, it ought to "cross over" the real temp at 170f real / 170f sensed. That's what the resistors do -- and I suspect 22k is a little high.
 
Ha! Nope, just a lot of 😫 and 🥴 followed by 😁 and ☹. No skinned knuckles here. ;)

Worth noting one major looming frustration I have here: NONE of this (except maybe the 2.7k Prox resistor) is truly necessary. All the parts are in the Gen4 ECU to be compatible with the old charge port. Grounds in the same place, everything. An adjustment to firmware would provide the proper voltage->temperature mapping for the 10k thermistors, and the HV cover switch could be ignored on old ports that don't have/need one. This could all just be a firmware switch. But here we are, instead 🤷‍♂️ At least it works.

Still need to verify the high side of the temperature (it says 103f but it's really about 70f), but I can at least say the temperature does rise while charging (103f->113f while charging on CCS), and it was, as indicated, nowhere near overheating. Just need to make sure it indicates 170f when it really is 170f. The concern here is that, due to value differences, it's a much lower response (though it's reading high now, it'll read low in higher temps). So I have to make sure the critical/fault threshold still DOES line-up properly, for safety. :)
The 22K series resistor for thermistor correction seems pretty high if the circuit is the 100k thermistor (*or series-parallel for Therm3) paralleled with the 100K fixed resistance on the Gen 4 charge port. Even if the original 10K thermistor was completely shorted (so you only have the 22K series resistance), you wouldn't read any higher than 56.8C (134F) at the Gen4 input. You should be able to check for sure by just shorting the thermistor in your harness while leaving the series resistor in place (short charge port side of series resistor to ground) and check what Tes-LAX shows. You won't be able to read any higher temps than that.

*Because of the layout of the Therm3 input, the 2 legs of series thermistors in parallel are essentially the same as the single thermistor on Therm1, assuming the thermistors heat uniformly.

My calculations show more along the lines of 11k3 series resistor to crossover at about 75C (167F). A lower series resistor would hit the target temperature a bit under the actual thermistor (read as higher temp at the target temperature), higher would hit the target temperature a bit later (read at slightly lower than the target temp at the target temperature), so you can pick the next lower standard value for a safety margin.

I used a googled thermistor table so can't vouch for what actual thermistors Tesla used (my calcs used 10K type 3 in the chart but they are all within 150 ohms at the target temp).
 
  • Love
Reactions: FalconFour
My calculations show more along the lines of 11k3 series resistor to crossover at about 75C (167F)
Oh my goodness, thank you. Best way to get info out of the internet: post the wrong answer 😂

I like the idea. I'll go try it. I left plenty of wire in my adapter to clip and replace a resistor and still re-shrink-tube it.

FWIW: with the 10k just as-stock, it was reporting about low 160f measured/low 60f actual. Not enough headroom to actually charge (the slightest temp increase would prompt throttling/faults). So you're most likely bang on - it was already pretty close, but I didn't really have the data/brain-math needed to calculate anything closer to reality.
 
Service mode isn't required, but it's a fast-forward.

Reiterating that this is for early cars - potentially anything pre-Gen4 (Oct 2020) - so 2017-2020 would need this. Gen4 cars just need the swap (skip the adapter).
  1. Acquire Gen4 ECU.
  2. Wait for an update to become available and prompt to install (don't install yet).
  3. Pull the plug before you start.
  4. Swap the ECU (I think I have a capture of the service instructions around here, somewhere). Add the converter harness I cooked-up above. (be aware: it's not 100% finished yet - the 22k resistors may be a little too high).
  5. Then plug back in (finish instructions) after swap.
  6. You won't be able to drive, and the car will be running on 12v battery due to incompatible ECU software. IMMEDIATELY install the update to reflash and bring the main power back online (it'll clunk-clunk while it's updating and you're home free).
  7. Voila! CCS adapter support: enabled.
Service mode will just let you skip waiting for an update (FSD Beta blues: it was over a month since the last update for me - just came in yesterday!), and you can use "reinstall software" to do it.
Thanks, I have a 2019 M3 so just what I need to do... (pending the final resistor value) !
 
Just spent 45-odd minutes in the garage with a heat gun (on low, lol) warming everything up. Heated from the back, measured from the front. Tediously. Slowly. My god, so slowly. 😂

1645339119031.png
1645339577433.png


Conclusion:
1645339318708.png


So with that, I'm fairly confident calling this my "final answer".
1645339489323.png


Have at!

Next phase: I guess I should build a few and put 'em up on eBay for a fair few bucks, say, $40? (hey, they take like 30-odd minutes to build, hah)
 
Just spent 45-odd minutes in the garage with a heat gun (on low, lol) warming everything up. Heated from the back, measured from the front. Tediously. Slowly. My god, so slowly. 😂

View attachment 771620 View attachment 771626

Conclusion:
View attachment 771621

So with that, I'm fairly confident calling this my "final answer".
View attachment 771625

Have at!

Next phase: I guess I should build a few and put 'em up on eBay for a fair few bucks, say, $40? (hey, they take like 30-odd minutes to build, hah)
I'm really impressed with all this. Nice job building, testing and documenting. Thanks!!
 
Just spent 45-odd minutes in the garage with a heat gun (on low, lol) warming everything up. Heated from the back, measured from the front. Tediously. Slowly. My god, so slowly. 😂

View attachment 771620 View attachment 771626

Conclusion:
View attachment 771621

So with that, I'm fairly confident calling this my "final answer".
View attachment 771625

Have at!

Next phase: I guess I should build a few and put 'em up on eBay for a fair few bucks, say, $40? (hey, they take like 30-odd minutes to build, hah)
Honestly, since the (for me) one time use crimping tool is $20 a $40 price is perfectly reasonable. You've made them before and this would take me an hour or so to make even with your great directions and parts list.

If I were selling them the issue I'd be concerned with is liability. While the whole car going up in flames is always a concern I'd be more worried about it breaking some other piece of electronics. 99.9% of people aren't jerks - but 0.1% can really play havoc on your life. You can try to disclaim liability and may be successful, but that won't stop a jerk getting an attorney and again making your life difficult.

This is a perfect example of why an overseas seller on AliExpress or eBay sells this kind of stuff. I'm looking forward to building one (or buying one) if I find I've got the need for CCS charging.
 
Shopping list to build exactly what I have:
I didn't see heat shrink tubing included in your list.

Some crimpers: Amazon.com (I used the smallest slot on these - seems to be a perfect fit)
Alternative (Unless you think the crimping tool would be worth it for additional things in the future):

Since you're already using a soldering iron and solder for some of the connections, you could crimp the wires as best as possible to the male and female connector pins with needle nose pliers and then solder each (possibly somewhat loose) crimp to make a solid electrical connection. Even if you don't have needle nose pliers, they would most likely be cheaper than a crimping tool that you use only once.
 
Last edited:
Next phase: I guess I should build a few and put 'em up on eBay for a fair few bucks, say, $40?
If I were selling them the issue I'd be concerned with is liability.
I am not a lawyer, so this is not legal advice.

You might be able to avoid some liability by selling "kits". Solder and crimp all the resistors and wires but don't insert the pins into the connector housings. Also, don't include any instructions or anything indicating what the parts are intended for in the shipment.

(Again, I'm not a lawyer but) selling some soldered and crimped wires, resistors and pins along with loose connector housings might leave the liability on the person who puts the thing together and installs it.
 
Thank you for your contribution to us, and open a new approach to enable CCS for old model 3.

If my car is GEN3 (1092755-98-D), why not just replace it with EU GEN3 (1092755-82-B) ? So I don't need to deal with the mass you faced now?

Have you tested your modification with a CCS adapter from Korea Tesla? I think this adapter may be more reliable than EVHub and it is cheap (around 250 USD), should be a better choice for us.


Just spent 45-odd minutes in the garage with a heat gun (on low, lol) warming everything up. Heated from the back, measured from the front. Tediously. Slowly. My god, so slowly. 😂

View attachment 771620 View attachment 771626

Conclusion:
View attachment 771621

So with that, I'm fairly confident calling this my "final answer".
View attachment 771625

Have at!

Next phase: I guess I should build a few and put 'em up on eBay for a fair few bucks, say, $40? (hey, they take like 30-odd minutes to build, hah)
 
Status
Not open for further replies.