Wrapped up the mono-ball & ball joint installation, haven't taken the Roadster out for a test drive, targeting next weekend for that. I've been taking my electric skateboard to the meto bus station for my daily commute for a couple of months so haven't had the urgent need to use the Roadster. Its rather nice when you're doing a an in depth project on your vehicle, no need to rush so you can double/triple check and have time to design / find tools to get you through an unpredictable bind.
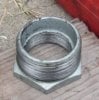
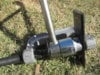
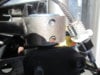
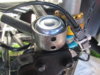
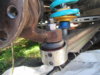
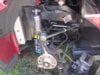
Speaking of a bind, I had rented/borrowed a standard ball joint press from the AutoZone. When I tried pressing the ball joint out, none of the rings which allow the ball joint to fall out of the arm would fit properly against the a-arm. Found a random brass ring of the right d diameter but of course lacking strength to do the job. It worked as a concept, so I ran to the hardware store searching for the right adapter. Only thing I found was a male approx 4" dark threaded piece of pipe, I think 3-4" in diameter. That worked great for pressing out the fronts but then failed or the rear, it wasn't stable at all to even begin adding significant press pressure, the pipe wall too narrow on the bottom/top, so it would just want to slide out of position and wanting to connect the a-arm which I didn't want to happen due to potential damage implications. I ran back to the hardware store, knew the diameter I was looking for, and found the one last item that would work from the hardware store. Again in the pipe section, and found a pipe flange using the same diameter of the pipe I had used, so the ID was close for the press. The bottom of the flange flared out more, and the top was smooth on the inside but then threads start. The ball joint can't fit through this diameter with threads on the inside, but the smoothed out top was the correct diameter, the depth where it was smooth was also sufficient to allow the ball joint to press and pass out of the a-arm. So that worked like a charm and with that I was on my way to completing the job. You'll also need to remove the boot from the ball joint in order to get good clean pressure down on the ball joint. I used a socket that would clear through the a-arm hole but press over the complete area of the ball joint. To do this, remove the bottom clip holding the boot onto the ball joint base. Just put a small screwdriver down under the lower boot area and gently pry up, there's a clip that comes undone and unwinds. Remove that and pull the boot out, clean it up around there from excess grease and such so you'll get a good contact for your press. Also clean very well the area around where the ball joint sat in the a-arm, you'll find dirt, grime and grease there. The ball joint needs to sit flat in there. Pics attached of the setup.
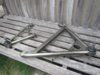
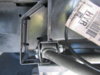
To press the ball joint into the a-arm I used two steel plates, one large one on the bottom of the press for stability, a 11/16 socket (or the pipe flange I mentioned above), I found the socket to be the most stable than the flange, and a steel plate at the top to press down. Pics attached. Also when pressing the ball joint in, make sure it goes in straight, not crooked. If it starts walking crooked, pull it out of the press and tap the bottom of the ball joint to even it out. It will naturally straighten itself. don't hit too hard to cause damage to the ball joint. It can take a couple good taps, just feel it out. When pressing the ball joint, ensure it has bottomed out and there's no gap between the face of the ball joint/rim and the a-arm lip. There are two viewing holes on the side of the a-arm, there you'll see if you have a gap or not. If any gaps with the bottom view window, keep pressing. Again feel it out, don't smooosh things. I also placed the ball joints in the freezer for a couple of hours to overnight. That way they shrink a bit, makes pressing easier. Same with the a-arm bushings upon installation. Lastly the upper rear control arm washers have ears that are for safety in the event the a-arm bolt backs out. Make sure to re-secure those ears to the bolt/nut. They're on both sides of the bolt. The torque specs (from Tesla) are 55 Nm for both the upper and lower ball joints, front and rear.
While doing this job, I clean everything while I was in there. I hosed things down, sponged, washed, and got all I could dust, grease and grime free. I also used the 303 UV protector to hit all the CV boots, toe link boots, and anything I had access that was composed of rubber.
Also I have to mention, the lower front a-arm monoball bushings will be a little too wide when fitting them into the frame of the Roadster. Common issue, those with the Elise/Exiges also hit this. You can make a bolt that spreads the frame/box where the bushing / a-arm goes in or you can file the bushing down where it's too high. I chose the latter. You don't need much clearance and try not to take off too much. Lastly its essential to be square when you file (make sure its a good file).
Monoball install problems - LotusTalk - The Lotus Cars Community
Next weekend I'll do a quick once over, take the car for a test run, and throw it up on the alignment rack. I'm curious if and how much my caster has changed. I'll most likely need to go in and reset that, I'll also try to push for the most positive camber I can accomplish.
--------