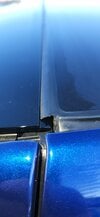
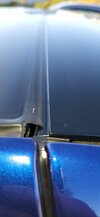
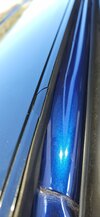
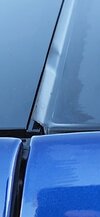
One of the many things Tesla has declined to fix saying that my vehicle is within spec. The passenger side FWD roof seal near the front collides with the center spine:
Click on thumbnails to enlarge
![i-gS6PJ2P[1].jpg i-gS6PJ2P[1].jpg](https://teslamotorsclub.com/tmc/data/attachments/826/826478-99708d347eeadf1e867d9aef8c5ba5e8.jpg)
There are two ways to fix this.
#1 is if the glass can be moved on the roof frame itself. There are 10 mount bolts in the roof frame that attach from underneath through the frame. The 10 holes are oversized and allow about 4 mm of freeplay. If you're lucky, the glass will already as far towards the spine as possible which would give you about 4 mm of movement away from the spine.
#2 if there not enough freeplay in the glass mounting holes to move the glass away from the spine, then the only option at that point is to move the roof frame itself which is far more involved and requires an 80" shop support tower, proping the FWD door completely open, and removing the primary and second struts, and then loosening the roof side primary hinge bolts and roof side secondary hinge bolts. You then need to move the roof away from the spine but at the same time the door towards the roof so that what you end up with is a roof only move without moving the horizontal position of the FWD itself.
In my case, #1 was enough.
I won't list all of the steps. Their in the factory service manual online that anyone can use. The FSM will explain disassembly and assembly of components but does not go into how to adjust components.
After removing the lower and upper garnishes, interior roof brackets, and one of the bolts above the pinched seal, I was relieved to see I was in luck.
![i-bwHgDSk[1].jpg i-bwHgDSk[1].jpg](https://teslamotorsclub.com/tmc/data/attachments/826/826481-7e6b82f5c6d19d55bff1b625047ec5cd.jpg)
So I then loosened the remaining 9 bolts and slide the window up about 4mm.
![i-v5FKcSz[1].jpg i-v5FKcSz[1].jpg](https://teslamotorsclub.com/tmc/data/attachments/826/826483-44676e3ba4359234dc19715de268481c.jpg)
Now the seal clears the spine.
Picture of the entire roof without the garnishes and brackets:
![i-LkQzqbc[1].jpg i-LkQzqbc[1].jpg](https://teslamotorsclub.com/tmc/attachments/i-lkqzqbc-1-jpg.840266/)
Click on thumbnails to enlarge
![i-gS6PJ2P[1].jpg i-gS6PJ2P[1].jpg](https://teslamotorsclub.com/tmc/data/attachments/826/826478-99708d347eeadf1e867d9aef8c5ba5e8.jpg)
There are two ways to fix this.
#1 is if the glass can be moved on the roof frame itself. There are 10 mount bolts in the roof frame that attach from underneath through the frame. The 10 holes are oversized and allow about 4 mm of freeplay. If you're lucky, the glass will already as far towards the spine as possible which would give you about 4 mm of movement away from the spine.
#2 if there not enough freeplay in the glass mounting holes to move the glass away from the spine, then the only option at that point is to move the roof frame itself which is far more involved and requires an 80" shop support tower, proping the FWD door completely open, and removing the primary and second struts, and then loosening the roof side primary hinge bolts and roof side secondary hinge bolts. You then need to move the roof away from the spine but at the same time the door towards the roof so that what you end up with is a roof only move without moving the horizontal position of the FWD itself.
In my case, #1 was enough.
I won't list all of the steps. Their in the factory service manual online that anyone can use. The FSM will explain disassembly and assembly of components but does not go into how to adjust components.
After removing the lower and upper garnishes, interior roof brackets, and one of the bolts above the pinched seal, I was relieved to see I was in luck.
![i-bwHgDSk[1].jpg i-bwHgDSk[1].jpg](https://teslamotorsclub.com/tmc/data/attachments/826/826481-7e6b82f5c6d19d55bff1b625047ec5cd.jpg)
So I then loosened the remaining 9 bolts and slide the window up about 4mm.
![i-v5FKcSz[1].jpg i-v5FKcSz[1].jpg](https://teslamotorsclub.com/tmc/data/attachments/826/826483-44676e3ba4359234dc19715de268481c.jpg)
Now the seal clears the spine.
Picture of the entire roof without the garnishes and brackets:


