NeilErdwien
Member
Wow. Someone else old enough to remember Usenet. I get blank stares when I tell people there was an Internet before there was a Web.Exactly, or post it on Usenet and then you don't even have to seed it.


You can install our site as a web app on your iOS device by utilizing the Add to Home Screen feature in Safari. Please see this thread for more details on this.
Note: This feature may not be available in some browsers.
Wow. Someone else old enough to remember Usenet. I get blank stares when I tell people there was an Internet before there was a Web.Exactly, or post it on Usenet and then you don't even have to seed it.
And if you're masochistic, put it up on Archie to find so you can Gopher a text file that brings to you an fsp site.Wow. Someone else old enough to remember Usenet. I get blank stares when I tell people there was an Internet before there was a Web.
Wow. Someone else old enough to remember Usenet. I get blank stares when I tell people there was an Internet before there was a Web.
Usenet is still very popular right now, thanks to NZB's. Much more anonymous/private/secure than torrents.
Those of you that have the service manual, take a look at what is listed under Annual Service.
Impressive if the service department really does all that is listed. I've yet to have an annual service and this makes me look forward to it.
Just curious, is there an updated DVD for the facelift Model S as yet? I know it is by and large the same but sections for removing the front fascia would obviously have changed.Annual Service
FRT No: 00019905
Note: Not all of the procedures listed here need to be performed at each Annual Service. Refer to SC-15-00-001 for a list of the procedures to perform at the relevant service interval.
Check for Alerts, Repair any Issues Found, Clear Alerts
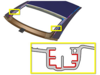
Panoramic Roof
- Connect a laptop with Toolbox to the vehicle.
- In Toolbox, select Perspectives > Predefined Perspectives > Service Default.
- Check the Currently Active Alerts, Alert History, and DTCs panels.
- After performing any necessary repairs, clear any DTCs:
- In the DTCs panel, select the "Clear DTC" radio button.
- Click the Start/Play button.
View attachment 213640
- Fully open the sliding glass.
- Use compressed air to blow out the drain hoses.
Caution: Do not exceed 25 PSI (1.7 Bar).- Wrap a clean cloth around a plastic pry tool or other thin tool, then use it to remove dirt and old grease from the 4 channels on each side of the panoramic roof.
- Apply Klübersynth noise reduction grease to the 4 channels.
Caution: Use only Klübersynth noise reduction grease, Tesla part number 1031102-00-A. Other greases can permanently damage the roof seals.- Move the sliding glass to the 30% open position.
- Remove the sliding glass (refer to procedure).
- Apply Klübersynth noise reduction grease to the sections of the tracks that were blocked by the sliding glass.
- Visually inspect the links and shoes for damage.
- Reinstall the sliding glass.
- Calibrate the panoramic roof (refer to procedure).
- Use alcohol wipes to remove any grease from the glass and appliques. Use a clean, dry cloth to remove grease from the rubber seals.
Caution: Do not use alcohol to remove grease from rubber seals. Alcohol degrades the rubber seals.View attachment 213639
Wiper Blades
Replace the wiper blades (refer to procedure).
Cabin Air Filter
Replace the particulate filter (refer to procedure).
Coolant
Drain and refill the cooling system (refer to procedure).
Steering Gear Bolts
Ensure that the bolts (x2) that secure the steering rack to the subframe are torqued to 175 Nm.
Note: Components have been removed in this graphic to aid clarity.
View attachment 213637
Hood Release Latch
RWD vehicles: Clean the secondary latch, then apply the proper lubricant (refer to procedure).
Dual Motor vehicles: Clean the latch, then apply the proper lubricant (refer to procedure).
A/C Desiccant Bag
Replace the desiccant bag (refer to procedure).
Brake Fluid
Perform the full system bleed procedure (refer to procedure).
Brake Caliper Pad Slides
Note: This is recommended for cold weather regions.
Note: Cleaning and lubricating the caliper pad slides/abutments is not included in the Annual Service price.
Note: Perform the following steps on all 4 calipers.
Transmission Fluid
- Remove the pad retaining pins and collect the anti-rattle spring.
Note: Always check that the anti-rattle clip has not been damaged. This part is easily damaged and is important to help eliminate squeaks.
Front caliper Rear caliper
View attachment 213632View attachment 213633- Use a suitable tool to gently push the pistons back into caliper.
- Remove the brake pads from the caliper.
View attachment 213634- Thoroughly clean the caliper pad slides and abutments with a hand brush (1057223-00-A) and soapy water.
Caution: If there is rust or pitting on the caliper that cannot be removed with a hand brush, replace the caliper.View attachment 213635
- Front brake caliper (refer to procedure).
- Rear brake caliper (refer to procedure).
- Apply an even layer of Silaramic lubricant (1063021-00-A) to the caliper pad slides. Remove any excess lubricant.
- Apply an even layer of copper paste between the shim and the backing plate. Remove any paste that squeezes out after installing the shim.
Caution: Ensure that the brake pads move freely.
Caution: Do not apply copper paste to the caliper, seals, or any component other than the shim and backing plate.
View attachment 213636
Drain and refill the fluid from the gearbox(es):
Tire Rotation
- Rear wheel drive (RWD) vehicles:
- Drain and refill the fluid from the large rear drive unit (refer to procedure).
- Non-Performance Dual Motor vehicles:
- Drain and refill the fluid from the front drive unit (refer to procedure).
- Drain and refill the fluid from the small rear drive unit (refer to procedure).
- Performance Dual Motor vehicles:
- Drain and refill the fluid from the front drive unit (refer to procedure).
- Drain and refill the fluid from the large rear drive unit (refer to procedure).
Thermal System Test
- Refer to the recommended tire rotation pattern for the vehicle.
- Remove the wheels and reinstall them in the appropriate positions (refer to procedure).
Suspension Fasteners
- Connect a laptop with Toolbox 2.0 or later to the vehicle.
- Navigate to Panels > Thermal > Thermal System Test.
- Click the Start/Play button.
- Follow the onscreen instructions.
Wheel Alignment Check
- Check the torque of the front suspension bolts (refer to procedure).
- Check the torque of the rear suspension bolts (refer to procedure).
Perform a wheel alignment check (refer to procedure).
Wheel Alignment Adjustment
Note: This is recommended if the wheel alignment check determines the wheel alignment is out of specification.
Note: Wheel alignment adjustment is not included in the Annual Service price.
Perform a wheel alignment adjustment (refer to procedure).
...unless i can post the link directly here i cant find the rules that say otherwise..
TERMS AND RULES:
(...)
You agree to not use the Service to: (...)
f. upload, post, email, transmit or otherwise make available any Content that infringes any patent, trademark, trade secret, copyright or other proprietary rights ("Rights") of any party. Again, this is not the place to talk about illegal downloads or how to obtain them. There are several forums on the Internet dedicated for discussing this type of material. This is not one of them.
Just to keep Doug and Danny out of hot water, I would suggest not posting it in public on TMC.
") .
. Just curious, is there an updated DVD for the facelift Model S as yet? I know it is by and large the same but sections for removing the front fascia would obviously have changed.
Same - or, hopefully by that stage Tesla have opened up access to the manuals, theory of operation and Toolbox software.Doesn't seem to be. I guess we will have to wait until someone leaks it. When they do I will have my CC ready.
Gah! Access to Toolbox is bloody expensive...Slightly bummed that there is no reference to Diagnostic mode in the service manual. It makes me wonder if "Toolbox" largely replaced it. I hope one day to be able to gain access to the Diagnostic mode in our out-of-warranty model S
Slightly bummed that there is no reference to Diagnostic mode in the service manual. It makes me wonder if "Toolbox" largely replaced it. I hope one day to be able to gain access to the Diagnostic mode in our out-of-warranty model S
Can you include some links to those documented routes?Well to access diagnostic mode from the CID you need the token. How saavy are you with electronics? Can you make your own cable? If so there is a fairly well documented route to factory mode here on the forums.