


Welcome to Tesla Motors Club
Discuss Tesla's Model S, Model 3, Model X, Model Y, Cybertruck, Roadster and More.
Register
Install the app
How to install the app on iOS
You can install our site as a web app on your iOS device by utilizing the Add to Home Screen feature in Safari. Please see this thread for more details on this.
Note: This feature may not be available in some browsers.
-
Want to remove ads? Register an account and login to see fewer ads, and become a Supporting Member to remove almost all ads.
You are using an out of date browser. It may not display this or other websites correctly.
You should upgrade or use an alternative browser.
You should upgrade or use an alternative browser.
Solved: wind noise
- Thread starter dutchchili
- Start date
-
- Tags
- wind noise
Kiprich
Member
Just ordered 2mm, 4mm, 6mm and 8mm tubing.... taking no risk with the gaps, I will close them, no matter what 
KingBozo
Member
FIXED IT!
Problem
With speeds off 70 mph and more, I experience wind noise in the A-pillar. I perceive it as a non-constant crispy sound, which depends on the wind speed and direction. Very annoying.
It occurs on both sides.
Root cause
The A-pillar is open on the front end. Air can enter from the fender as well as the windscreen area. This causes vortices in the a-pillar / sound that resonates in the a-pillar.
The A-pillar opening is partly closed a by a rubber flap. But this flap is not attached very well and may lose when opening the frunk.
Solution
Close the A-pillar opening to prevent the vortices / resonance.
In order to establish this without dismounting any parts, a sponge can be inserted from the windscreen side to close the A-pillar sufficiently the remove the noise. It appears that this solution not always eliminates the crispy sound, but the overall wind noise.
Do-it-yourself
1) by a household sponge like these
AH Schuurspons hard bestellen | ah.nl
2) use scissors to cut off a 1,5cm strip as shown below

3) cut off the green part. You don't need that.
4) Push the rubber flap away from the a-pillar opening (as shown below)
5) push the sponge into the hole. Make sure to pinge the sponge with your thumb and index finger so that it will fit through the hole and can expand once inside.
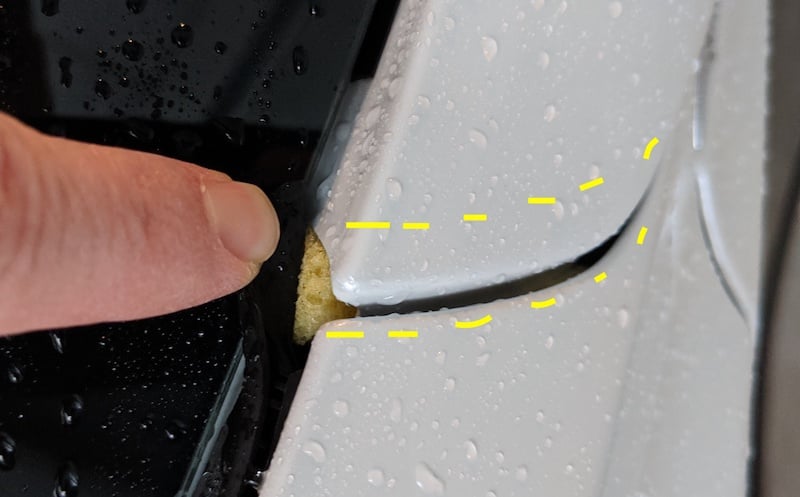
6) the end results should look like this. The yellow stipes indicate the position of the sponge. It doesn't really matter if it sticks into the fender or the A-pillar. The effect is the same. Putting it perfectly into the A-pillar will keep the sponge more dry.
6) put the rubber back in place.
7) enjoy silence
8) donate any remaining sponges to the housekeeper.
Disclaimer: a sponge may hold water, causing the a-pillar humidity to be higher than normal. This may cause rust if the a-pillar is not well protected against that.
Thanks to the root cause of the wind noise, the sponge will dry quickly with every dry drive.
LOL, this was not on my inspection list upon receiving my car, now that I looked, I do not have that black plastic insert on the passenger side. Hummm, of course there were other stuff like no back trunk lid, anyway still love the car another LOL
dale_cooper
Member
FIXED IT!
4) Push the rubber flap away from the a-pillar opening (as shown below)
5) push the sponge into the hole. Make sure to pinge the sponge with your thumb and index finger so that it will fit through the hole and can expand once inside.
6) the end results should look like this. The yellow stipes indicate the position of the sponge. It doesn't really matter if it sticks into the fender or the A-pillar. The effect is the same. Putting it perfectly into the A-pillar will keep the sponge more dry.
6) put the rubber back in place.
Fingers crossed this takes care of the wind noise that almost sounds like my window is opened ever so slightly while I'm on the highway. If so, this will be the greatest post I've found on this forum...
That said - if I'm tracking correctly, you may want to update this picture as its a tad misleading or confusing. In your picture, the part of the sponge showing, almost makes it seem that the sponge is going vertical along the apillar. Whereas, your lines indicate it should be placed horizontally, either above or below the gap (because if it shows behind the gap, the yellow gap will look a little janky).
Please advise.
dale_cooper
Member
I don't know why I don't have ability to edit my posts but I now see why the sponge doesn't track on your dotted lines....there's a lip on the apillar that will hide the appearance of the sponge. Can't wait to try this!
Magnets!
Member
I believe the picture is accurate and that his fix encompassed two things: filling the visible gap between the A pillar and front fender pieces and then also blocking the hole in the A pillar. It took me awhile looking very closely to see the hole the OP is talking about. Best seen from the front of the car with the door open and your head laying on the front fender sort of. You can also poke around with a small tool to feel the hole. Frankly, if you block the hole in the A pillar, the tubing between the body panels is probably superfluous.Fingers crossed this takes care of the wind noise that almost sounds like my window is opened ever so slightly while I'm on the highway. If so, this will be the greatest post I've found on this forum...
That said - if I'm tracking correctly, you may want to update this picture as its a tad misleading or confusing. In your picture, the part of the sponge showing, almost makes it seem that the sponge is going vertical along the apillar. Whereas, your lines indicate it should be placed horizontally, either above or below the gap (because if it shows behind the gap, the yellow gap will look a little janky).
Please advise.
As far as I can see there are no other points where water can enter that should be drained through the pillar.Is there any possibility that the hole in the A pillar is important to keep unblocked? Maybe for drainage?
By blocking the opening, water cannot enter anymore. With a sponge there is always some air transfer that can equalize humidity.
Magnets!
Member
It would be interesting to open up the A pillar from the interior so see for sure that this hole is entering where we think it is, but if it is, there is no water draining through the inside of the A pillar which houses wiring, insulation and an airbag, none of which should be getting wet. In fact, plugging this hole might prevent water from a car wash from being blown into that area or rain from being blown in there.Is there any possibility that the hole in the A pillar is important to keep unblocked? Maybe for drainage?
XLR82XS
D M C
I'm going this route.Just ordered 2mm, 4mm, 6mm and 8mm tubing.... taking no risk with the gaps, I will close them, no matter what
would be nice to compare the results with the suggested solution as the/my assumption is that tubing has less effect because it doesn't completely block the a-pillar opening.I'm going this route.
XLR82XS
D M C
FinallyGotMyM3
Member
I bought 4mm and 6mm tubing and installed it today. I managed to get 6mm tubing in (but it was difficult). The 6mm was pretty easy to get in near the windshield but very hard as you get near the door side.
But I found that the tubing fell back further into the A pillar. And I needed take another shot at it.
I did notice while doing it that the pillar really only covers the entrance to the A pillar. There is lots of space behind it which I think the sponge would fill better.
I haven’t tried it yet. Will post results on Monday after I drive to work on the highway.
really hoping this fixes it. Thank you OP for identifying a possible solution. If the tube doesn’t work I’ll try the sponge.
Kiprich
Member
Tubing done (4mm), Let's hope it will have some effect. Tomorrow wil be a test, driving to work. And if it's not working, we can always insert the sponge from the inside.
Fingers crossed!

Fingers crossed!
This is really interesting. I've seen tests on youtube with people installing noise reduction kits that only reduce the sound like 5 decibels but some of you are saying this modification reduces it like 60%?? that's a lot! I wish someone would test it with a decibel meter to see if it is that much of a difference.
Incredulocious
LEAF → RAV4EV → Model 3 → Model Y
Well... a 50% decrease would be a 3 dB reduction.This is really interesting. I've seen tests on youtube with people installing noise reduction kits that only reduce the sound like 5 decibels but some of you are saying this modification reduces it like 60%?? that's a lot! I wish someone would test it with a decibel meter to see if it is that much of a difference.
From The Decibel Scale: What Is a Decibel (dB)? Noise and Sound Units:
The relative loudness that we perceive is a subjective psychological phenomenon, not something that can be objectively measured. Most of us perceive one sound to be twice as loud as another one when they are about 10 dB apart; for instance, a 60-dB air conditioner will sound twice as loud as a 50-dB refrigerator. Yet that 10-dB difference represents a tenfold increase in intensity. A 70-dB dishwasher will sound about four times as loud as the 50-dB refrigerator, but in terms of acoustic intensity, the sound it makes is 100 times as powerful.
Well... a 50% decrease would be a 3 dB reduction.
From The Decibel Scale: What Is a Decibel (dB)? Noise and Sound Units:
Based on what number? I don't have an accurate number so try not to quote me to hard but isn't highway driving like 60 dB?
My unit of measure is binairy: annoying or not annoying.
The fix makes it Not Annoying
The fix makes it Not Annoying
Well... a 50% decrease would be a 3 dB reduction.
That's a 50% decrease in power, not a 50% decrease in the subjective perception of noise.
Similar threads
- Replies
- 21
- Views
- 4K
- Replies
- 58
- Views
- 8K
- Replies
- 469
- Views
- 109K