


Welcome to Tesla Motors Club
Discuss Tesla's Model S, Model 3, Model X, Model Y, Cybertruck, Roadster and More.
Register
Install the app
How to install the app on iOS
You can install our site as a web app on your iOS device by utilizing the Add to Home Screen feature in Safari. Please see this thread for more details on this.
Note: This feature may not be available in some browsers.
-
Want to remove ads? Register an account and login to see fewer ads, and become a Supporting Member to remove almost all ads.
You are using an out of date browser. It may not display this or other websites correctly.
You should upgrade or use an alternative browser.
You should upgrade or use an alternative browser.
Tesla Garage Deco and Tesla T
- Thread starter TEG
- Start date
-
- Tags
- Tesla Inc.
Babylonfive
Power12
Thanks for the link. I got my LED's from Costco (just for the Tesla T), but I was thinking about recessed lighting around the garage as well, these might be a good (and cheaper) option for that. Most of the grunt work is done now in the garage, so it's on to the "T" now. Had to wait for Christmas, and the arrival of a new plunge router
")
**edit** My wife was considering getting this for me for Xmas, would have been an interesting option too.
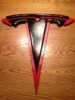
So here's my version of the Tesla T on the wall in the garage (part of a larger garage renovation that'll be finished this weekend, maybe!). The whole process went as planned, which is unusual for one of my DIY projects. I've got step by step pics if anyone cares, but it's basically 3/4" MDF cut out against a template printed on A0 paper (resulting in a T about 36" wide), routed, primed, spray painted with a metallic grey paint, then backlit using the LED strips recommended by Babylonfive (which are great - thanks for the tip!). I might still tweak the backlighting some more, the OCD part of me isn't happy that the lighting isn't quite even right down to the pointy bit.

Cool, Pete!
I wish I had a 'wall' in my garage. Or any sort of space for that matter. Way too many tools and 'stuff'
I need to go with the smaller T's

(this one is now done and on my jacket)
I wish I had a 'wall' in my garage. Or any sort of space for that matter. Way too many tools and 'stuff'
I need to go with the smaller T's
(this one is now done and on my jacket)
Last edited:
arondaniel
Il Sessanta Caricato
So here's my version of the Tesla T on the wall in the garage (part of a larger garage renovation that'll be finished this weekend, maybe!). The whole process went as planned, which is unusual for one of my DIY projects. I've got step by step pics if anyone cares, but it's basically 3/4" MDF cut out against a template printed on A0 paper (resulting in a T about 36" wide), routed, primed, spray painted with a metallic grey paint, then backlit using the LED strips recommended by Babylonfive (which are great - thanks for the tip!). I might still tweak the backlighting some more, the OCD part of me isn't happy that the lighting isn't quite even right down to the pointy bit.
View attachment 13940
Very nice! Can you post step pics please? Curious how you mounted and installed it. Did you use the router freehand?
-Aron
Sorry for the delay, I wanted to revise the way I backlit the "T" so that the lighting was a little more even. The photos are here.
As you can see, I printed off the logo I posted up thread on A0 paper, making it about 36" wide (the logo is wider than it is tall, surprisingly). I then cut it out using a jigsaw, and a circular saw for the 2 straight bits. Then I routed it, and sanded it back until I was happy with the general shape. Luckily I have more or less every power tool anyone could ever need
After than, I just spray-primed it (3 coats), then paint (5 coats), then the lights, which went through 2 iterations. For fittings I just used what I had lying around after spending about an hour in Lowes looking (and failing to find) inspiration. Basically just a few screws in the wall, sticking out, and a couple of recessed hangers on the back of the "T". Needless to say, I hit the edge of 2 studs when putting the screws in (I only ever hit a stud first time when I don't want to), so it took a bit of adjustment to get the T, and the top bit all aligned correctly.
Sorry for the delay, I wanted to revise the way I backlit the "T" so that the lighting was a little more even. The photos are here.
As you can see, I printed off the logo I posted up thread on A0 paper, making it about 36" wide (the logo is wider than it is tall, surprisingly). I then cut it out using a jigsaw, and a circular saw for the 2 straight bits. Then I routed it, and sanded it back until I was happy with the general shape. Luckily I have more or less every power tool anyone could ever need
After than, I just spray-primed it (3 coats), then paint (5 coats), then the lights, which went through 2 iterations. For fittings I just used what I had lying around after spending about an hour in Lowes looking (and failing to find) inspiration. Basically just a few screws in the wall, sticking out, and a couple of recessed hangers on the back of the "T". Needless to say, I hit the edge of 2 studs when putting the screws in (I only ever hit a stud first time when I don't want to), so it took a bit of adjustment to get the T, and the top bit all aligned correctly.
nice!!!!!!!!!!!
Looks better with the tip lit :smile:
My projector broke a couple of months ago and I haven't bought another one( S took my money!) Maybe I should just replace it with a cool 'T'
The projector's location was the only wall that would work... hmm movies, or 'T' (this would be a 'cheaper' Tesla for once)
Fittingly, it would be right next to my electric helis and over our 'bar counter' + our walls are already almost Tesla red
I've had a couple of forum members ask for their own 'Telsa T' as shown above and here, so I'm in the process of making a few of them. I'll cross-post this is in the Parts for Sale forum, but if anyone is interested, PM me. Cost is $300 delivered (US only), and is as shown in the photos - a dark metallic grey (a couple of shades darker than the Model S grey, and a bit sparklier). Note that there's a bit of work you'll need to do if you want to hide the wires, so some DIY ability is needed. In particular:
- The lights take a 12v feed (from the supplied wall wart PSU). I've put mine in the attic above the garage, and run it in the wall to exit behind the main section of the 'T'. I'd recommend doing the same, or running it up from an existing wall outlet, but still putting the wire in the wall if possible.
- The top section is connected to the main section with a small 2-core wire for power. Again, this is easily hidden in the wall, I just put a small hole behind the top section, and dangles the wire until I could grab it through the larger hole behind the main section.
- Finally, both parts hang using standard picture fittings, so if you can keep your screws level, you'll be fine. I guess the top section requires a bit of skill to get it positioned exactly right, but I didn't do anything special aside from eyeball it once the main section was up.
If all of this sounds like too much hassle, I could also mount the T on a back-board (painted in what I think is pretty close to 'Tesla red' for an additional $50. Just let me know if you want the power cable to exit straight out the back, or if you want it run in a channel on the back to exit at the top or bottom.
Note, dimensions are 30" high, by 36" wide.
Thanks, Pete
Last edited:
Botbldr45
Member
You guys have inspired me.
Now I have to decide what to paint the background and foreground (already primed).
I won't be adding the lighting.
22" wide X 24" long.
Material: MDF
View attachment 17885
Beautiful craftsmanship, looks gooooood!!
Plug Me In
Member

teslasguy
MSP P#1117
You like my RC model S ;>
I still plan to make some more
My wife is actually a metalsmith (more than a Jeweler) and an artist. She would would make frosted glasses if I needed some. There is not much out there that is better to buy than make yourself (Model S is one of them but that would be different If I had 10x more money than I care to have)
Looks like your wife does beautiful work! You two should team up and offer Tesla jewelry, etc. accessories. Maybe you can work a deal to sell through Soflauthor's web site he built for the CCI as well as other things they plan on offering. Seriously, I think there's a real market for nice Tesla jewelry.
Looks like your wife does beautiful work! You two should team up and offer Tesla jewelry, etc. accessories. Maybe you can work a deal to sell through Soflauthor's web site he built for the CCI as well as other things they plan on offering. Seriously, I think there's a real market for nice Tesla jewelry.
I was hoping to make some Tesla lapel pins, at least for the CEO's. I think there might be copyright issues with selling 'T' stuff to others though.
Can't wait for a frunk show someday :wink:
carrerascott
FUEL FTR
Attachments
Similar threads
- Replies
- 1
- Views
- 1K
- Locked
- Marketplace listing
- Replies
- 1
- Views
- 169
- Marketplace listing
- Replies
- 0
- Views
- 206
- Replies
- 0
- Views
- 70
- Marketplace listing
- Replies
- 4
- Views
- 516