I did the exact same thing. You need to visit your local SC and order them. Part no. 1472872-00-B.Where did you find new clips? I broke 2.


Welcome to Tesla Motors Club
Discuss Tesla's Model S, Model 3, Model X, Model Y, Cybertruck, Roadster and More.
Register
Install the app
How to install the app on iOS
You can install our site as a web app on your iOS device by utilizing the Add to Home Screen feature in Safari. Please see this thread for more details on this.
Note: This feature may not be available in some browsers.
-
Want to remove ads? Register an account and login to see fewer ads, and become a Supporting Member to remove almost all ads.
You are using an out of date browser. It may not display this or other websites correctly.
You should upgrade or use an alternative browser.
You should upgrade or use an alternative browser.
Tesla Offer Model 3/Y Frunk Group Buy
- Thread starter CLLACAB
- Start date
I know what you mean. I think the only way to remove it is to break it at the weak spot and drill it out. I have some on order and will update once I receive/install them.accidentally broke one of the frunk clip when putting the frunk back in. anyone have any idea how to remove the broken clip, so i can install a new clip when i get one? i even try to remove one of the clips not broken, and i can't figure it out.

TheNeck
Member
Where did you find new clips? I broke 2.
i haven't found a 3rd party to order them yet.
I did the exact same thing. You need to visit your local SC and order them. Part no. 1472872-00-B.
AWESOME thanks for the part number.
I know what you mean. I think the only way to remove it is to break it at the weak spot and drill it out. I have some on order and will update once I receive/install them.
let us know how it goes once you get them. it seems impossible to remove them without breaking them.
Flybuddy
Member
What does homelink have to do with the frunk?? Is the frunk kit set up as an additional door? Why would that be needed or wanted?
P.S. got word that mine just shipped (also got the DHL notice for Wed 2/3 delivery). It was ordered 6 hours after the code went out to everyone.
P.S. got word that mine just shipped (also got the DHL notice for Wed 2/3 delivery). It was ordered 6 hours after the code went out to everyone.
allen514
Member
accidentally broke one of the frunk clip when putting the frunk back in. anyone have any idea how to remove the broken clip, so i can install a new clip when i get one? i even try to remove one of the clips not broken, and i can't figure it out.
I noticed two clips were broken when I removed the tub, so I swap the broken one with the good ones holding the top cover so don't have the remove the tub again when I get the replacement.
Use a small pry tool behind the front of the clip (against the metal), when prying use your finger to push the clip out from behind.
Went to the SC just now to get them but they are out of stock, they are kind enough to arrange for a mobile tech to come out and replace them in couple weeks.
DaveORD
Member
Well got mine installed, 4.5 hours later. Pick tool was a must for me, 3 different screwdrivers and no way to release the struts. Finally got it via the pick tool but even then they would not release easily. 2.5 hours just to swap out the struts. Does not help when you lose the new bolt and it is not magnetic. My hands look like I've been a street brawl, knuckles all torn up, hands full of scrapes. Not for those with big mitts like me I guess.
It just fought me every step of the way. After all aligned, tested and put back together, it would not close, it would just jerk a bit and give up. Not sure what happened there, like it lost its brain about when the latch was open or closed. I had to manually move it down halfway and then it worked. You could not pay me enough to install another one of these. If I had a second Tesla, I'd be looking for somebody else to install that one.
Pro tip, buy more cable ties before starting the job, just in case. The cable ties in my kit were brittle, they would snap whenever I tried to bend then too much. Not easy to run out to HD in the middle of this job, if this is only your only vehicle.
ToutSuite
Member
For those who have installed themselves, does this look correct for the passenger side plate after being screwed on? I'm not sure it's resting on anything, and it's kind of "leaning" against the side of the fender instead of sitting flush. Feels like the screw will be doing all the work, and the plate is just kind of sitting there. Just want to be sure before I put the new strut on.
Attachments
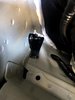
YesFor those who have installed themselves, does this look correct for the passenger side plate after being screwed on? I'm not sure it's resting on anything, and it's kind of "leaning" against the side of the fender instead of sitting flush. Feels like the screw will be doing all the work, and the plate is just kind of sitting there. Just want to be sure before I put the new strut on.
ToutSuite
Member
TinkyWinks
Member
Just got my shipping notification today (ordered on 1/21). It ended up landing in my “Junk” folder again.
52 16 57 39
BioDiesel & Electrons
So I took a few breaks along the way, but it was a solid 4 total hours for me including...
1) borrowing my wife’s forearms for the strut removal and install as mine did not fit,
2) second guessing when we agreed to install the lower ball strut mount (pass vs drivers side) ... then I found the install page,
3) mounting the TO motor/actuator to the drivers side frame - to then learn that it’s awfully snug when I reinstalled the frunk tub - though it did ultimately work.
It’s certainly a fun DIY, and I’d totally do it again in half the time.
My wife things I’m weird - and it was a silly use of money - but it makes me smile and I know I’ll use the frunk more now that I have a soft close mechanism.
So I took a few breaks along the way, but it was a solid 4 total hours for me including...
1) borrowing my wife’s forearms for the strut removal and install as mine did not fit,
2) second guessing when we agreed to install the lower ball strut mount (pass vs drivers side) ... then I found the install page,
3) mounting the TO motor/actuator to the drivers side frame - to then learn that it’s awfully snug when I reinstalled the frunk tub - though it did ultimately work.
It’s certainly a fun DIY, and I’d totally do it again in half the time.
My wife things I’m weird - and it was a silly use of money - but it makes me smile and I know I’ll use the frunk more now that I have a soft close mechanism.
It will bring more smiles as the time passes. I've caught at least a dozen other Tesla owners staring in admiration as they drool over the power frunk. All the bystanders get a kick out of it whenever I go to pick up takeout.

ToutSuite
Member
I brought my car in to show them the broken clip. They’re sending a mobile tech out to replace it.I noticed two clips were broken when I removed the tub, so I swap the broken one with the good ones holding the top cover so don't have the remove the tub again when I get the replacement.
Use a small pry tool behind the front of the clip (against the metal), when prying use your finger to push the clip out from behind.
Went to the SC just now to get them but they are out of stock, they are kind enough to arrange for a mobile tech to come out and replace them in couple weeks.
allen514
Member
I plugged the brown plug in and unplugged to move the motor and it wouldn’t go back in. The purple plastic inside the plug shifted, so had to fix that and one of my strut connector pins bent when initially plugged in.
I have the same problem with the brown connector for the motor, how did you fix the purple plastic piece? It wouldn’t seat fully but making connection, so I just zip tie it.
I pushed the lower purple section up where the lower groves are. Apparently the purple was pushed down into that slot and was blocking the plug from sliding in.I have the same problem with the brown connector for the motor, how did you fix the purple plastic piece? It wouldn’t seat fully but making connection, so I just zip tie it.
Pierre Delecto
Member
Anyone else have their frunk randomly decide to pop but not lift itself once in a while?
I've been troubleshooting this with teslaoffer for quite some time.
i haven't seen this issue. do you have an older version or did you just get yours? let us know how they end up resolving it.
I pushed the lower purple section up where the lower groves are. Apparently the purple was pushed down into that slot and was blocking the plug from sliding in.
Had this issue. Take the purple piece and place carefully over the male portion of the plug, then insert male plug (with the purple part attached) carefully into the female portion. It should then connect/secure easily/perfectly. If purple piece is stuck inside the female plug, use a pic or maybe skinny flathead and pull it out
Last edited:
allen514
Member
I pushed the lower purple section up where the lower groves are. Apparently the purple was pushed down into that slot and was blocking the plug from sliding in.
Had this issue. Take the purple piece and place carefully over the male portion of the plug, then insert male plug (with the purple part attached) carefully into the female portion. It should then connect/secure easily/perfectly. If purple piece is stuck inside the female plug, use a pic or maybe skinny flathead and pull it out
Thanks, I will try both methods.
Similar threads
- Article
- Replies
- 0
- Views
- 306
- Replies
- 0
- Views
- 425
- Replies
- 5
- Views
- 231
- Replies
- 12
- Views
- 2K
- Replies
- 140
- Views
- 4K