


Welcome to Tesla Motors Club
Discuss Tesla's Model S, Model 3, Model X, Model Y, Cybertruck, Roadster and More.
Register
Install the app
How to install the app on iOS
You can install our site as a web app on your iOS device by utilizing the Add to Home Screen feature in Safari. Please see this thread for more details on this.
Note: This feature may not be available in some browsers.
-
Want to remove ads? Register an account and login to see fewer ads, and become a Supporting Member to remove almost all ads.
You are using an out of date browser. It may not display this or other websites correctly.
You should upgrade or use an alternative browser.
You should upgrade or use an alternative browser.
Kenriko
Former Vendor
ThisIsTrue
Re-member
My daughter's 7, and you should see the work I have her doing.
Yeah, but look at you: you're kind of a Neanderthal.
HankLloydRight
No Roads
JPP
Active Member
I just finished retrofitting the current generation rear liftgate backup camera into my mid-2013 S85. I seem to recall that around the time my S was built, there was a ‘low def’ backup camera standard, and with the tech package as configured in early-mid 2013, this included a ‘high def’ camera. By my semi-trained eye, the camera quality resolution in my 2013 S is about the same as my wife’s 2015 S (…and by part numbers as noted below, likely the same old camera).
Here are some notes and observations and appropriate photos. I would not advise a ‘non-handy’ individual to try this. Also, allow plenty of time. Do not have anything pressing scheduled on the day you do this, in case you run into a snag. I did not need any specialized tools, just pliers, screwdrivers, Torx drivers, flashlight, fishing line. As noted below, my liftgate applique was/is off—for instructions on how to remove, see rick/artsci’s evappliques site and find the installation instructions.
First, I had to source the camera. My service advisor checked with his parts desk, and got this reply:

I did ask for the current generation part, and got this:

Based upon this thread and side communication with suprkar/bill and artsci/rick, I went ahead and got another service center to sell me 2 cameras (note the price relative to the old version):

Here is a photo comparing old and new cameras (note that the new camera protrudes out further than the old one). Also note that the cable length from the camera to the grommet and from the grommet to the connector is longer (both good and bad news—see below):

Here is a photo of the tags and part numbers:

If you choose to do the upgrade, you will need to remove the rear liftgate applique. If you are going to do this, think very hard about buying one of rick/artsci’s evappliques lighted applique. It is enough of a PITA to remove and reinstall the rear applique, that you might consider an ‘upgrade’. Also, for the upgrade of the applique, you will be removing the interior liftgate trim panels to make electrical conenctions, which will make fishing the new backup camera cable infinitely easier. If you are going to get a new rear applique from evappliques, then think very hard about doing the camera upgrade at the same time.
That said, I have had my rear applique off and on repeatedly. It is currently off as rick/artsci is working on a gen 3 version for me. Here is a close up shot of my old camera attached to the applique bracket (this is screwed to the liftgate and holds the camera and the applique):

Note that my applique bracket has been sliced and diced for installation of the lighted applique, so it looks very different from a ‘virgin’ rear liftgate bracket.
The camera cable is secured to the liftgate itself with a firmly molded/attached rubber grommet. The cable is run from the camera and clipped to the backside of the bracket, then loops back to make the penetration in the liftgate.
Now I turned my attention to the camera cable and connector. Here is a photo of the new current gen camera cable connector:

It has an internal ‘key’ to keep the pins lined up. The pink plastic piece appears to hold the crimped connector in the shell. It is not part of the connector lock (more later).
If you remove the left hand liftgate grab handle and look inside, you will see a mess of cables & wires. Here is a picture of the mated connected camera cable:

The cable/connector is secured to a ridge on the liftgate sheet metal with a press on bracket with little metal teeth. The cable/connector is secured with a zip tie. I pulled the cable bracket off of the liftgate to free up some cable length. The cable from the MCU is longer that my old camera cable (and is wrapped with a fiber jacket), and I got only a bit of slack to bring the connector closer to the opening. Here is the connector after disconnecting:

The secret here is to look for a small blue press-in springy locking tab on the back side of the connector (the side opposite the side with the pink attachments). You have to hold the springy release tab in while pulling apart the connector. Try this with 1 hand through the hole in the liftgate—not easy.
Before pulling out the old camera, I did connect the new camera through the grab handle hole, and confirmed that it is ‘plug and play’ and works fine. I then attached a double length of monofilament fishing line to the old camera connector to act as a pull line when installing the new camera.
(....to be continued...)
Here are some notes and observations and appropriate photos. I would not advise a ‘non-handy’ individual to try this. Also, allow plenty of time. Do not have anything pressing scheduled on the day you do this, in case you run into a snag. I did not need any specialized tools, just pliers, screwdrivers, Torx drivers, flashlight, fishing line. As noted below, my liftgate applique was/is off—for instructions on how to remove, see rick/artsci’s evappliques site and find the installation instructions.
First, I had to source the camera. My service advisor checked with his parts desk, and got this reply:
I did ask for the current generation part, and got this:
Based upon this thread and side communication with suprkar/bill and artsci/rick, I went ahead and got another service center to sell me 2 cameras (note the price relative to the old version):
Here is a photo comparing old and new cameras (note that the new camera protrudes out further than the old one). Also note that the cable length from the camera to the grommet and from the grommet to the connector is longer (both good and bad news—see below):
Here is a photo of the tags and part numbers:
If you choose to do the upgrade, you will need to remove the rear liftgate applique. If you are going to do this, think very hard about buying one of rick/artsci’s evappliques lighted applique. It is enough of a PITA to remove and reinstall the rear applique, that you might consider an ‘upgrade’. Also, for the upgrade of the applique, you will be removing the interior liftgate trim panels to make electrical conenctions, which will make fishing the new backup camera cable infinitely easier. If you are going to get a new rear applique from evappliques, then think very hard about doing the camera upgrade at the same time.
That said, I have had my rear applique off and on repeatedly. It is currently off as rick/artsci is working on a gen 3 version for me. Here is a close up shot of my old camera attached to the applique bracket (this is screwed to the liftgate and holds the camera and the applique):
Note that my applique bracket has been sliced and diced for installation of the lighted applique, so it looks very different from a ‘virgin’ rear liftgate bracket.
The camera cable is secured to the liftgate itself with a firmly molded/attached rubber grommet. The cable is run from the camera and clipped to the backside of the bracket, then loops back to make the penetration in the liftgate.
Now I turned my attention to the camera cable and connector. Here is a photo of the new current gen camera cable connector:
It has an internal ‘key’ to keep the pins lined up. The pink plastic piece appears to hold the crimped connector in the shell. It is not part of the connector lock (more later).
If you remove the left hand liftgate grab handle and look inside, you will see a mess of cables & wires. Here is a picture of the mated connected camera cable:
The cable/connector is secured to a ridge on the liftgate sheet metal with a press on bracket with little metal teeth. The cable/connector is secured with a zip tie. I pulled the cable bracket off of the liftgate to free up some cable length. The cable from the MCU is longer that my old camera cable (and is wrapped with a fiber jacket), and I got only a bit of slack to bring the connector closer to the opening. Here is the connector after disconnecting:
The secret here is to look for a small blue press-in springy locking tab on the back side of the connector (the side opposite the side with the pink attachments). You have to hold the springy release tab in while pulling apart the connector. Try this with 1 hand through the hole in the liftgate—not easy.
Before pulling out the old camera, I did connect the new camera through the grab handle hole, and confirmed that it is ‘plug and play’ and works fine. I then attached a double length of monofilament fishing line to the old camera connector to act as a pull line when installing the new camera.
(....to be continued...)
Attachments
Last edited:
JPP
Active Member
(...part 2...)
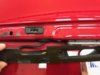
Going back outside to the applique/camera bracket, I unscrewed the Torx screws holding the bracket to the lftgate, and pulled the bracket away enough to be able to unscrew and remove the old camera (the camera itself attaches with smaller Torx screws—keep these separate from the bracket screws). This done, I next pulled out the old grommet. This was really tight and I used a pair of needle nose pliers to pull it all out (shredding it in the process). This was aided by keeping my left hand inside the liftgate at the back side of the grommet to push, and using my right hand to work at pulling out the grommet. See photo:

I pulled out the old camera and cable, being careful to not lose the fishing line pull string. I then fished in the new camera (using my fishing line pull string), and seated the grommet (really tight, used a flat bladed screwdriver to very carefully tuck the grommet into the hole). I attached the new camera to the applique bracket with the small Torx screws. I then connected the camera cable to the connector for the cable to the MCU, and of course checked to be sure that the camera worked and was oriented properly.
Note that he new camera cable is longer from camera to grommet, so I had to carefully tuck the cable into the back side of the applique/camera bracket, push the bracket back into position, and reattach it with the Torx screws.
Back inside the liftgate, I tucked the new camera cable and connectors back up into the liftgate, and pressed the clip-on cable bracket back onto the sheet metal to secure the cable and keep it from rattling. See photo:

I reinstalled the left hand grab handle into the liftgate, cleaned up, and then went to test my results.
Before pulling out the old rear liftgate camera, I got a photographic test pattern on line and printed it full res on photo quality paper. I hung it at a measured distance from the camera. My S was parked inside a garage with overhead fluorescent lighting. I lined up the test pattern as best as I could, and took a photo of my touchscreen:
.jpg")
The next photo is done the same way with the new camera:
.jpg")
I honestly cannot say that the new camera is really way better resolution than my old one, but I will see subjectively how it is on the road. Maybe the new camera will have better dynamic range or better low light performance. It does protrude further out from under the edge of the rear liftgate trim, so it will likely get even more wet and more useless in the rain (…yes, I do apply some Rain-X to it).
Hope this helps the next brave soul….
Going back outside to the applique/camera bracket, I unscrewed the Torx screws holding the bracket to the lftgate, and pulled the bracket away enough to be able to unscrew and remove the old camera (the camera itself attaches with smaller Torx screws—keep these separate from the bracket screws). This done, I next pulled out the old grommet. This was really tight and I used a pair of needle nose pliers to pull it all out (shredding it in the process). This was aided by keeping my left hand inside the liftgate at the back side of the grommet to push, and using my right hand to work at pulling out the grommet. See photo:
I pulled out the old camera and cable, being careful to not lose the fishing line pull string. I then fished in the new camera (using my fishing line pull string), and seated the grommet (really tight, used a flat bladed screwdriver to very carefully tuck the grommet into the hole). I attached the new camera to the applique bracket with the small Torx screws. I then connected the camera cable to the connector for the cable to the MCU, and of course checked to be sure that the camera worked and was oriented properly.
Note that he new camera cable is longer from camera to grommet, so I had to carefully tuck the cable into the back side of the applique/camera bracket, push the bracket back into position, and reattach it with the Torx screws.
Back inside the liftgate, I tucked the new camera cable and connectors back up into the liftgate, and pressed the clip-on cable bracket back onto the sheet metal to secure the cable and keep it from rattling. See photo:
I reinstalled the left hand grab handle into the liftgate, cleaned up, and then went to test my results.
Before pulling out the old rear liftgate camera, I got a photographic test pattern on line and printed it full res on photo quality paper. I hung it at a measured distance from the camera. My S was parked inside a garage with overhead fluorescent lighting. I lined up the test pattern as best as I could, and took a photo of my touchscreen:
The next photo is done the same way with the new camera:
I honestly cannot say that the new camera is really way better resolution than my old one, but I will see subjectively how it is on the road. Maybe the new camera will have better dynamic range or better low light performance. It does protrude further out from under the edge of the rear liftgate trim, so it will likely get even more wet and more useless in the rain (…yes, I do apply some Rain-X to it).
Hope this helps the next brave soul….
JPP
Active Member
Does anyone know how much these new cameras are yet?
see my long saga--$78 each.
Andyw2100
Well-Known Member
I would not advise a ‘non-handy’ individual to try this.
Hope this helps the next brave soul….
I really appreciate all the detail. I was considering taking this on, based on the posts (below) that made it sound so simple. But I have a feeling those guys, being so good at stuff like this, under-estimate the difficulty for those of us not similarly skilled.
So now, based on what you wrote, I can't imagine trying this.
Not too difficult. The camera is held in place by two Phillips or torx screws on the tailgate bracket. It's easy to remove them from outside the car. The next task is to unplug the camera from the cable that leads to the touchscreen. For the nimble-handed it can be done without removing any of the trim on the underside of the tailgate. You remove the snap-in plastic handle on the lower left side of the bottom of the tailgate, find the cable and connector, reach in the space, and unplug. Reverse the steps to mount the new camera. If you're not blessed with small hands removal of the lift gate trim is necessary and that's the most difficult part of the job.
It is absolutely higher resolution. You can see the small gravel in the blacktop compared to the old camera which does not show that fine detail. I did a side by side comparison with another Tesla and no doubt about it, much better picture from the new camera. Simple plug and play, don't get no better than that!!!
JPP
Active Member
I really appreciate all the detail. I was considering taking this on, based on the posts (below) that made it sound so simple. But I have a feeling those guys, being so good at stuff like this, under-estimate the difficulty for those of us not similarly skilled.
So now, based on what you wrote, I can't imagine trying this.
Well, to respond/clarify, artsci is referring to not having to remove the inside lift gate plastic trim. This is true. I was able to get my average size (...cough) hand and wrist into the hole followed by a couple of fingers from the other hand. Dexterity helps, but it is doable.
SUPRKAR is right--the camera is in fact 'plug-and-play'. Works with my old cable/connector from the MCU, and the image/picture is fine.
Artsci, for the bumper retrofit, are you going to do the headlight swap as well? I recall someone tried it, but pin-outs are different and couldn't get all the functions working correctly.
No. Since I've had the headlamps modified by Evan Patak (see this thread) I'm sticking with them. They are better than the LED lamps Tesla now offers but maybe not as au courant. But I prefer the best possible light output to current fashion
")
Yes that is what I was saying: Reservations for 2nd production run of camera switch kit now being taken
It's out for production estimates now. Our hope is to lower the cost if we can.
Last edited:
Andyw2100
Well-Known Member
I would not advise a ‘non-handy’ individual to try this.
Well, to respond/clarify, artsci is referring to not having to remove the inside lift gate plastic trim. This is true. I was able to get my average size (...cough) hand and wrist into the hole followed by a couple of fingers from the other hand. Dexterity helps, but it is doable.
SUPRKAR is right--the camera is in fact 'plug-and-play'. Works with my old cable/connector from the MCU, and the image/picture is fine.
It's just that originally, based on the earlier two posts, I thought that it would involve a couple of screws, and being able to disconnect and make the new connection with a small-handed, dexterous person sticking their hand behind some trim. It now sounds a lot more complicated than that.
When you wrote that you would not advise that a non-handy person attempt this, you were talking to me!
Any decent aftermarket accessory shop can probably change out the rear camera in under 30 - 60 minutes, and most of the time will be removing the plastic trim on the lift gate.
cynix
Member
Assuming my hand can fit so I won't have to remove the lift gate trim, does it still require removing the rear applique?Any decent aftermarket accessory shop can probably change out the rear camera in under 30 - 60 minutes, and most of the time will be removing the plastic trim on the lift gate.
lunitiks
Cool James & Black Teacher
JohnnyG
Weee!
@JPP - Really looking forward to your dynamic range and low light assessment of the new camera. Also how the new lens and further protrusion handles the weather. Great write-up!!I honestly cannot say that the new camera is really way better resolution than my old one, but I will see subjectively how it is on the road. Maybe the new camera will have better dynamic range or better low light performance. It does protrude further out from under the edge of the rear liftgate trim, so it will likely get even more wet and more useless in the rain (…yes, I do apply some Rain-X to it).
JPP
Active Member
Assuming my hand can fit so I won't have to remove the lift gate trim, does it still require removing the rear applique?
yes...
JPP
Active Member
JPP
Active Member
@JPP - Really looking forward to your dynamic range and low light assessment of the new camera. Also how the new lens and further protrusion handles the weather. Great write-up!!
OK, so after driving around yesterday afternoon and evening and this morning in clear weather (no rain), I can subjectively state that the dynamic range appears improved, low light performance appears to be marginally better, and the resolution does appear a bit better. No rain yet (...stay tuned). YMMV.
OK, so after driving around yesterday afternoon and evening and this morning in clear weather (no rain), I can subjectively state that the dynamic range appears improved, low light performance appears to be marginally better, and the resolution does appear a bit better. No rain yet (...stay tuned). YMMV.
Based on my experience, lower light level performance scales from much better to marginally better as light levels drop to total darkness. In total darkness it's about the same but in lower light conditions it can be vastly superior.
Similar threads
- Replies
- 53
- Views
- 10K
- Replies
- 5
- Views
- 2K
- Replies
- 371
- Views
- 42K
- Replies
- 19
- Views
- 1K