


Welcome to Tesla Motors Club
Discuss Tesla's Model S, Model 3, Model X, Model Y, Cybertruck, Roadster and More.
Register
Install the app
How to install the app on iOS
You can install our site as a web app on your iOS device by utilizing the Add to Home Screen feature in Safari. Please see this thread for more details on this.
Note: This feature may not be available in some browsers.
-
Want to remove ads? Register an account and login to see fewer ads, and become a Supporting Member to remove almost all ads.
You are using an out of date browser. It may not display this or other websites correctly.
You should upgrade or use an alternative browser.
You should upgrade or use an alternative browser.
Time to replace upper-control arm ball joints
- Thread starter roperld
- Start date
android04
Active Member
Roll both front windows down and drive slowly over an uneven surface with little bumps or dips. Could run over small pieces of plywood or something if you need to make an uneven surface. If you have the issue, you will hear a noise that sounds like an old, rusty box spring mattress creaking.How best to test for this?
Dag
Member
Had my driver's control arm replaced today due to the wonderful noise we all know and love. First replaced part out of warranty  . Tesla replaced with a reworked J version part.
RWK FR UPR CTRL
ARM ASSY,
LH(1044321-00-J)
Total Parts Amount 165.55
Total Labor Amount 189.00
Grand Total 354.55
. Tesla replaced with a reworked J version part.RWK FR UPR CTRL
ARM ASSY,
LH(1044321-00-J)
Total Parts Amount 165.55
Total Labor Amount 189.00
Grand Total 354.55
Victor-Y
Member
Mobile Service inspected vehicle and said this repair had to be done at service center. We have new service center opening in our city in July. The alternative is to take a 3 hour road trip to the next nearest service center.My 2019 M3 SR+ at only 33,000 km (~20,000 mi) has a loud creaky front right ball joint - have a Mobile Service appointment soon to fix it.
Rmchrger
Member
I understand if someone was within warranty still or doesn't have the ability to do this. But has anyone else thought of added zerk fittings to the ball joints? This video shows ball joints that look very similar to the model 3 upper ball joints. If your out of warranty and they are still tight but just making noise, I'd be trying some zerks. Mine are still quite at 20k (rev g) and I'm thinking of adding zerks to prevent the issue. On the other hand, tesla could then deny warranty if they still went bad...

android04
Active Member
I had my driver side FUCA replaced at 33k miles. My passenger side one is still good at 63k miles. If one of them starts making the noise again, I will probably replace them both with an aftermarket. I thought about installing grease zerks on them and taking pictures or measurements to share with people. But I only thought about doing that with the FUCAs off the car (once I've replaced them). The problem with doing this on the car is that you don't have a backup in case you mess something up. If you do try it, let us know how it goes. And it would be helpful to start a new thread about adding zerk fittings where you can share details, pictures, and/or video.I understand if someone was within warranty still or doesn't have the ability to do this. But has anyone else thought of added zerk fittings to the ball joints? This video shows ball joints that look very similar to the model 3 upper ball joints. If your out of warranty and they are still tight but just making noise, I'd be trying some zerks. Mine are still quite at 20k (rev g) and I'm thinking of adding zerks to prevent the issue. On the other hand, tesla could then deny warranty if they still went bad...
My right FUCA started squeaking on Friday; had it replaced Tuesday. The Service Center did both sides as a preventative. Replaced with the -J revision. 29,300 miles on the car. April 2019 build.
android04
Active Member
Just wanted to add that the reason why I would not drill and tap the ball joint with the FUCA on the car is because I would want to get rid of all the metal shavings/chips from the process. The best way is to disassemble the ball joint components and wash out everything.I had my driver side FUCA replaced at 33k miles. My passenger side one is still good at 63k miles. If one of them starts making the noise again, I will probably replace them both with an aftermarket. I thought about installing grease zerks on them and taking pictures or measurements to share with people. But I only thought about doing that with the FUCAs off the car (once I've replaced them). The problem with doing this on the car is that you don't have a backup in case you mess something up. If you do try it, let us know how it goes. And it would be helpful to start a new thread about adding zerk fittings where you can share details, pictures, and/or video.
Rmchrger
Member
Agreed if these were the type of ball joints that you could actually take apart and rebuild. Pretty sure these are non serviceable and non rebuildable ball joints. Best you could do is drill and tap them off the car where you might be able clean and spray out the area a bit better before installing the zerk. Definitely agree you want those chips and shavings out.
Does anybody know what this "sealing" of the control arm is suppose to do? And how it could possibly be lubricating the ball and socket area thats making the noise?
Does anybody know what this "sealing" of the control arm is suppose to do? And how it could possibly be lubricating the ball and socket area thats making the noise?
android04
Active Member
Resealing the joint would imply that they remove the rubber boot (and the spring clips that clamp it on) and re-lube the joint. Then replace the rubber boot and spring clips. You can buy replacement rubber boots to fit a few ball joint sizes at your local auto parts. They are usually for replacing a torn boot.Agreed if these were the type of ball joints that you could actually take apart and rebuild. Pretty sure these are non serviceable and non rebuildable ball joints. Best you could do is drill and tap them off the car where you might be able clean and spray out the area a bit better before installing the zerk. Definitely agree you want those chips and shavings out.
Does anybody know what this "sealing" of the control arm is suppose to do? And how it could possibly be lubricating the ball and socket area thats making the noise?
Flybyglass
Member
It took me several days as they had to get the parts. Had a loaner as I had come to the service center expecting to wait. The Electrified garage in NH has a replacement kit with instructions on adding a fitting for grease. An option is out of warranty.
Rmchrger
Member
I just came across this link that says something else about the sealing. To prevent water ingress.Resealing the joint would imply that they remove the rubber boot (and the spring clips that clamp it on) and re-lube the joint. Then replace the rubber boot and spring clips. You can buy replacement rubber boots to fit a few ball joint sizes at your local auto parts. They are usually for replacing a torn boot.
One would hope they also change the boot and relube the ball joint at the same time. Good info for all.
Tesla begins notifying Model 3 owners to proactively address upper control arm issues [Update]
Tesla has begun contacting some Model 3 owners in an effort to proactively address a common upper control arm issue.
 driveteslacanada.ca
Wow. The 4 wheel alignment cost after the potentially replacing or greasing the joint, makes me nervous at the likely cost of yet another issue where I’m averaging $800 in repairs the last 4 months. June was a quiet enjoyable month but July spiked my average again with $1700 compressor repair.It probably depends on a lot of things, but I'd say minimum of 2 hours. It took them 7 hours to do mine. Keep in mind that they also do a four wheel alignment after replacing it.
Rmchrger
Member
I was able to purchase another set of front upper control arms to experiment with and attempt to install zerk fittings. They are both rev G. He installed aftermarkets and sold the originals.
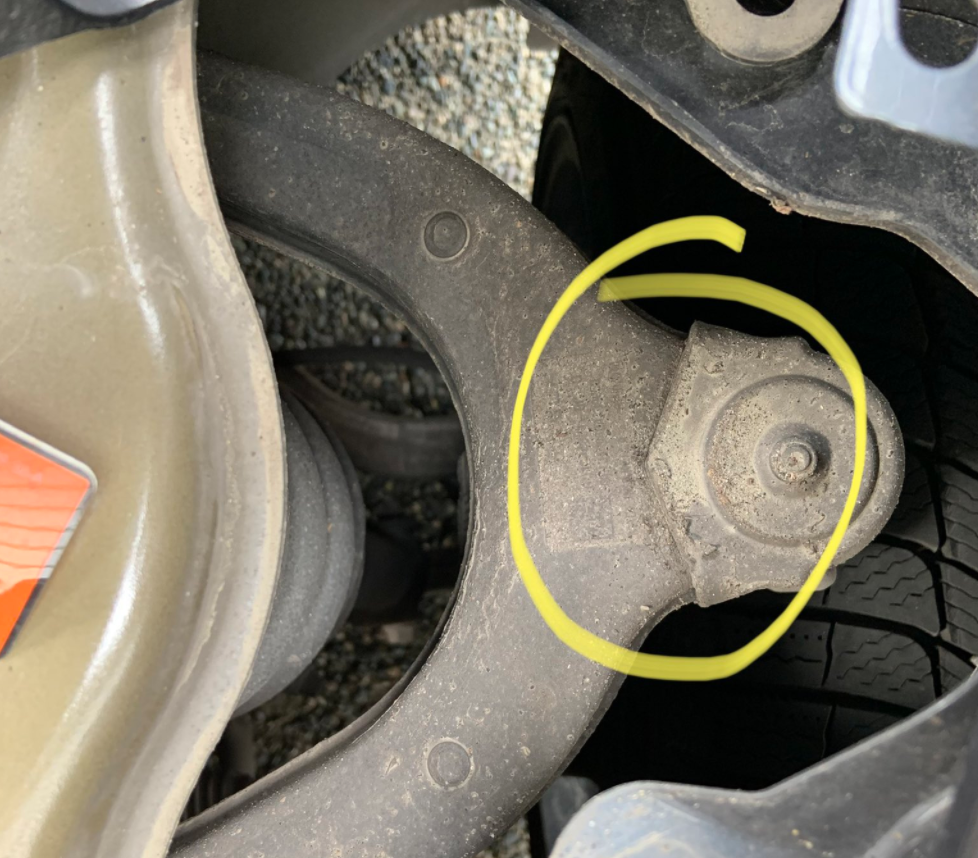
To my surprise, the top center "nub" of the ball joint is actually a plastic plug that is injected or capped/molded in place after the joint is greased. It is solid plastic all the way to ball. I drilled and tapped for a 1/4" zerk, it hits nothing but plastic all the way to the ball. I'll try to install a zerk and see if it holds up during the pressure of grease being installed. Worse case it blows the zerk out. I could step up to the larger zerk fitting and see if it hits metal.
I'm still within warranty so these would be installed if mine fail after the warranty is up.
Rmchrger
Member
Inspecting further, the whole entire top section of the ball joint is actually plastic that is capped or molded in place. I overlooked the rest of it as I was only concerned with drilling the center. The outer section may have some metal covered in plastic, I'm not sure since I'm not disruprlting that part of it. I'll update after I get the zerk installed. I'm hopeful since electrified garage had success enough to sell a kit to do this exact thing.
Rmchrger
Member
Installed the zerk in one upper arm. Used a low profile zerk and it was 10-32 not 1/4". (Late night brain fart). These zerks are a little harder to use but I feel safer not having the grease gun accidentally pulling the zerk out of the plastic. It requires a fine tip grease nozzle and direct pressure pushing on zerk not latching onto it.
These arms had max 10k on them and the ball joints were still really tight and not making any noise.
That said, it required help (thanks wife) to move the ball around in a circular motion, to get the grease past the ball. (Ya that sounds bad no pun intended) It took a bit but finally got the boot to show signs of more grease.
Happy to say the ball joint did free up a bit and rotated easier. Thats all I was looking for. Piece of mind that I can grease it when needed in the future. Just enough to lube it and not swell the boot to much.
I also sealed the inner edge with urethane sealant as noted in the above link. Why not, preventive maintenance I guess.
I feel confident I have an extra set of arms after warranty is up that should last longer than the originals. Plus cheaper than buying them new from tesla after warranty. Time will tell.
texas_star_TM3
Active Member
anyone here with a failed upper control arm with a "G" revision? I did see plenty of "F" failures but from reading through this "G" was used in assembly from spring / summer 2019 to early 2020 before they moved on to "H" and later "J" revision
anyone here with a failed upper control arm with a "G" revision? I did see plenty of "F" failures but from reading through this "G" was used in assembly from spring / summer 2019 to early 2020 before they moved on to "H" and later "J" revision
I honestly don't know -- mine was an April 2019 build (so whatever they used in early April) and went all squeak-toy on me. Was just replaced with the "J" rev.
Here is EG solution. Only $100 and if you’re DIY savvy. Good solution for people with aftermarket parts.
 shop.electrifiedgarage.com
Model 3/Y Noisey Ball Joint Repair Kit
Does your Model 3/Y make a squeaking noise when you turn the steering wheel at slow speeds or going over bumps. The ball joint in the front upper control arm is most likely the issue. This kit consists of all the parts and tools to drill and tap the top of the ball joint to install a grease...
shop.electrifiedgarage.com
Here is EG solution. Only $100 and if you’re DIY savvy. Good solution for people with aftermarket parts.
Model 3/Y Noisey Ball Joint Repair Kit
Does your Model 3/Y make a squeaking noise when you turn the steering wheel at slow speeds or going over bumps. The ball joint in the front upper control arm is most likely the issue. This kit consists of all the parts and tools to drill and tap the top of the ball joint to install a grease...
So, not to be "that guy" but I'll go ahead and be "that guy" ...
Wouldn't getting shavings from the drill/tap be a problem?
Similar threads
- Replies
- 10
- Views
- 507
- Replies
- 9
- Views
- 2K