Getting the bumper off is fairly easy, multiple videos on YouTube of bumper removal on the prior S and this one is very similar.This is awesome. I suspected all along it might bolt right on.
Strange you had to bend that flange.
Can you share some tips about getting the bumper off?
And can you explain that bar you said you took off that you didn't put back on, is that just in place of the hitch?
Do you know if the old Model X Receiver that plugs in, is the same as Raven X?
I trade my Raven X for Refresh S tomorrow if all goes well.
To bad there was no wiring. Probably no brake controller wiring up front either.
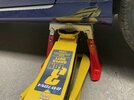
From memory (and it’s a lot easier/ probably essential if the rear of the car is raised on stands and the rear wheels removed and plastic trim tools are used to remove clips and pry trim). I used two large harbor freight jacks and a set of jack stands from Rennstand - see pics.
- First I removed the plastic pushpins holding the two rear felt wheel well liners to the body. Peeling them back from the edge of the fender next to the rear bumper allows you to access the single torx screw holding the fender to the body. These have to be removed both sides.
- Next I used a quarter drive socket to remove the multiple 10mm nuts that hold the rear undertray to the body and some plastic pushpin clips that hold the rear undertray to the one adjacent to the battery.
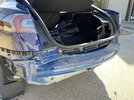
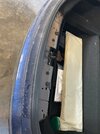
- Next - inside the rear trunk - unclip the finishing plate around the trunk catch by pulling it upwards from one end firmly. Go easy so you don’t bend it, prying it carefully away from the carpet liner.
- Then remove the trunk trim piece to the right of the large storage well (see pic). Again, this pulls away and then allows the trim in the well and adjacent to the edge of the trunk to be lifted slighty.
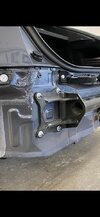
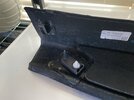
- The next job is to get to the two 10mm nuts - one each side - that hold the rear bumper to the body. They are accessed by carefully peeling back the silver rubberized adhesive sound deadening that covers a hole each side on the inside of the body shell under the rear tail lamps. It’s a bit of a fiddle to access these as the trunk trim needs to be carefully peeled back from both sides to access the sound deadening. Go easy as the sound deadening tears easily. The job is harder on the rear passenger side as the small shelf inside the trunk makes it hard to pull back the trunk trim. You’ll need a quarter inch deep socket/ drive and extension to remove the nuts as they bolt onto long threaded studs that attach the bumper to the body. Be careful that you don’t drop the nuts on removal as they will drop into a void inside the body shell. I thought I’d lost one but managed to recover it using a magnetic probe.
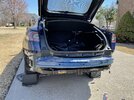
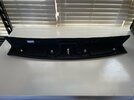
- Next - and two people will be required at each end of the bumper - gently pull the bumper away from the body. The bumper clips onto plastic carriers on the body shell. Work carefully to pry the bumper away from the body on both sides and from the rear panel on the vehicle.
- The bumper should then be able to be lifted off the body shell. Again, two people will be required to support it as it will try to twist. There’s a wiring loom attaching the sensors in the bumper to the body however I found I had sufficient length to keep this connected as long as I kept the bumper near the body on the ground. I placed a blanket on the ground to protect the bumper beforehand.
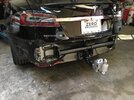
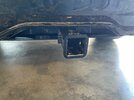
- Next steps are obvious. Can’t remember the size of the nuts but remove the 4 each side holding the crash bar to the body. When fitting the hitch I placed nylon washers I bought from Home Depot between the body and the hitch to isolate the steel hitch from the aluminum body, a precaution just in case. Torque the bolts up (settings are in here as are many of the general instructions which are similar to the new S http://www.hitchsource.com/docs/pdf/x7201 & x7202 - 2012-2016 Tesla Model S.pdf )
- Refit - generally - is the reverse. I used blu-tack to hold the nut to the socket when bolting up the bumper under the rear lights. It’s a bit of a fiddle to get the bumper lined up with the body and the undertray under the car at the same time. Patience is required ro line the fender up and clip it to the plastic mounts on the body applying pressure by knocking the bumper with the heel of your hand.
- The hitch takes the place of the rear bumper bar as cars with the hitch don’t have the bumper bar from the factory (as far as I know). On my previous S I had a Torklift hitch and we did refit the bumper bar however as I’m using the X hitch I don’t think the bumper bar will fit.
- On the receiver - again as far as I know - all X receivers fit all X hitches. In fact I suspect that all X factory hitches of all years will fit the new S but can’t be sure.
- On wiring, there was no connector I could see for a trailer brake controller. I used a Tekonsha inductive kit on my last car however the wiring was complicated by the need to run a 12v supply to the 12v battery in the front of the car. We moved a lot of interior trim to run the fused live wire inside the body and it was a length job, especially where the wire went through the firewall under the dash. One could take a 12v supply from a connector that powers the liftgate however I wanted to keep clear of interfering with factory wiring.
- On the flange on the hitch that I bent, that was to hold the brake controller loom on the X. The rear panel on the X must be taller to accommodate that bracket as theres less room on the S
Hope this short write-up helps others. It’s fiddly job but patience is the key.
Attachments
Last edited: