


Hi everyone,
Today I installed Unplugged Performance HP Shocks for 2012-2021 Model S. There is a general installation guide, but it's written for a 2012-2016 S, and there are a few steps missing for the 2016+ non-raven models that I wanted to cover for anyone else doing this upgrade.
This isn't a review - I haven't had time to drive the car and the weather's nasty, that'll come next week.
HERE is the guide that Unplugged Performance provides for Installation.
Here are the steps for the 2016.5+, you'll notice some differences from the UP installation guide. I included pictures where they're important.
NOTE: Put on some coffee and give yourself 8 hours for this. It's not hard, it's just time-consuming. In my opinion, it's rewarding to do yourself, you learn about how your car works, and you'll probably save $1200. Also, have a good set of gloves with knuckle padding - this job is a knuckle buster. A helper is nice, but this can be done by yourself. My helper went to sleep on me.

You'll also need:
- 1 jack to use to lift the hub assembly, and 1 to lift the car (or 1 jack and a jack stand)
- A standard set of sockets, long and short, up to 21mm.
- A set of TORX sockets, up to T-50
- Vice Grip
- Allen Wrenches
- Crescent Wrench
- Highly recommend an impact wrench
- Set of screw drivers
- Hammer
Obligatory do this at your own risk, I take no responsibility for anything you break.
FRONTS:
REMOVING:
DISASSEMBLY/REASSEMBLY:
This is where things are most different from the early cars. Have no fear, it's not terrible, just different.
1. Pry the retaining clip out of its slot on the top of the strut. Easiest way to do this is with a flat head screwdriver in the cut-out they provide.

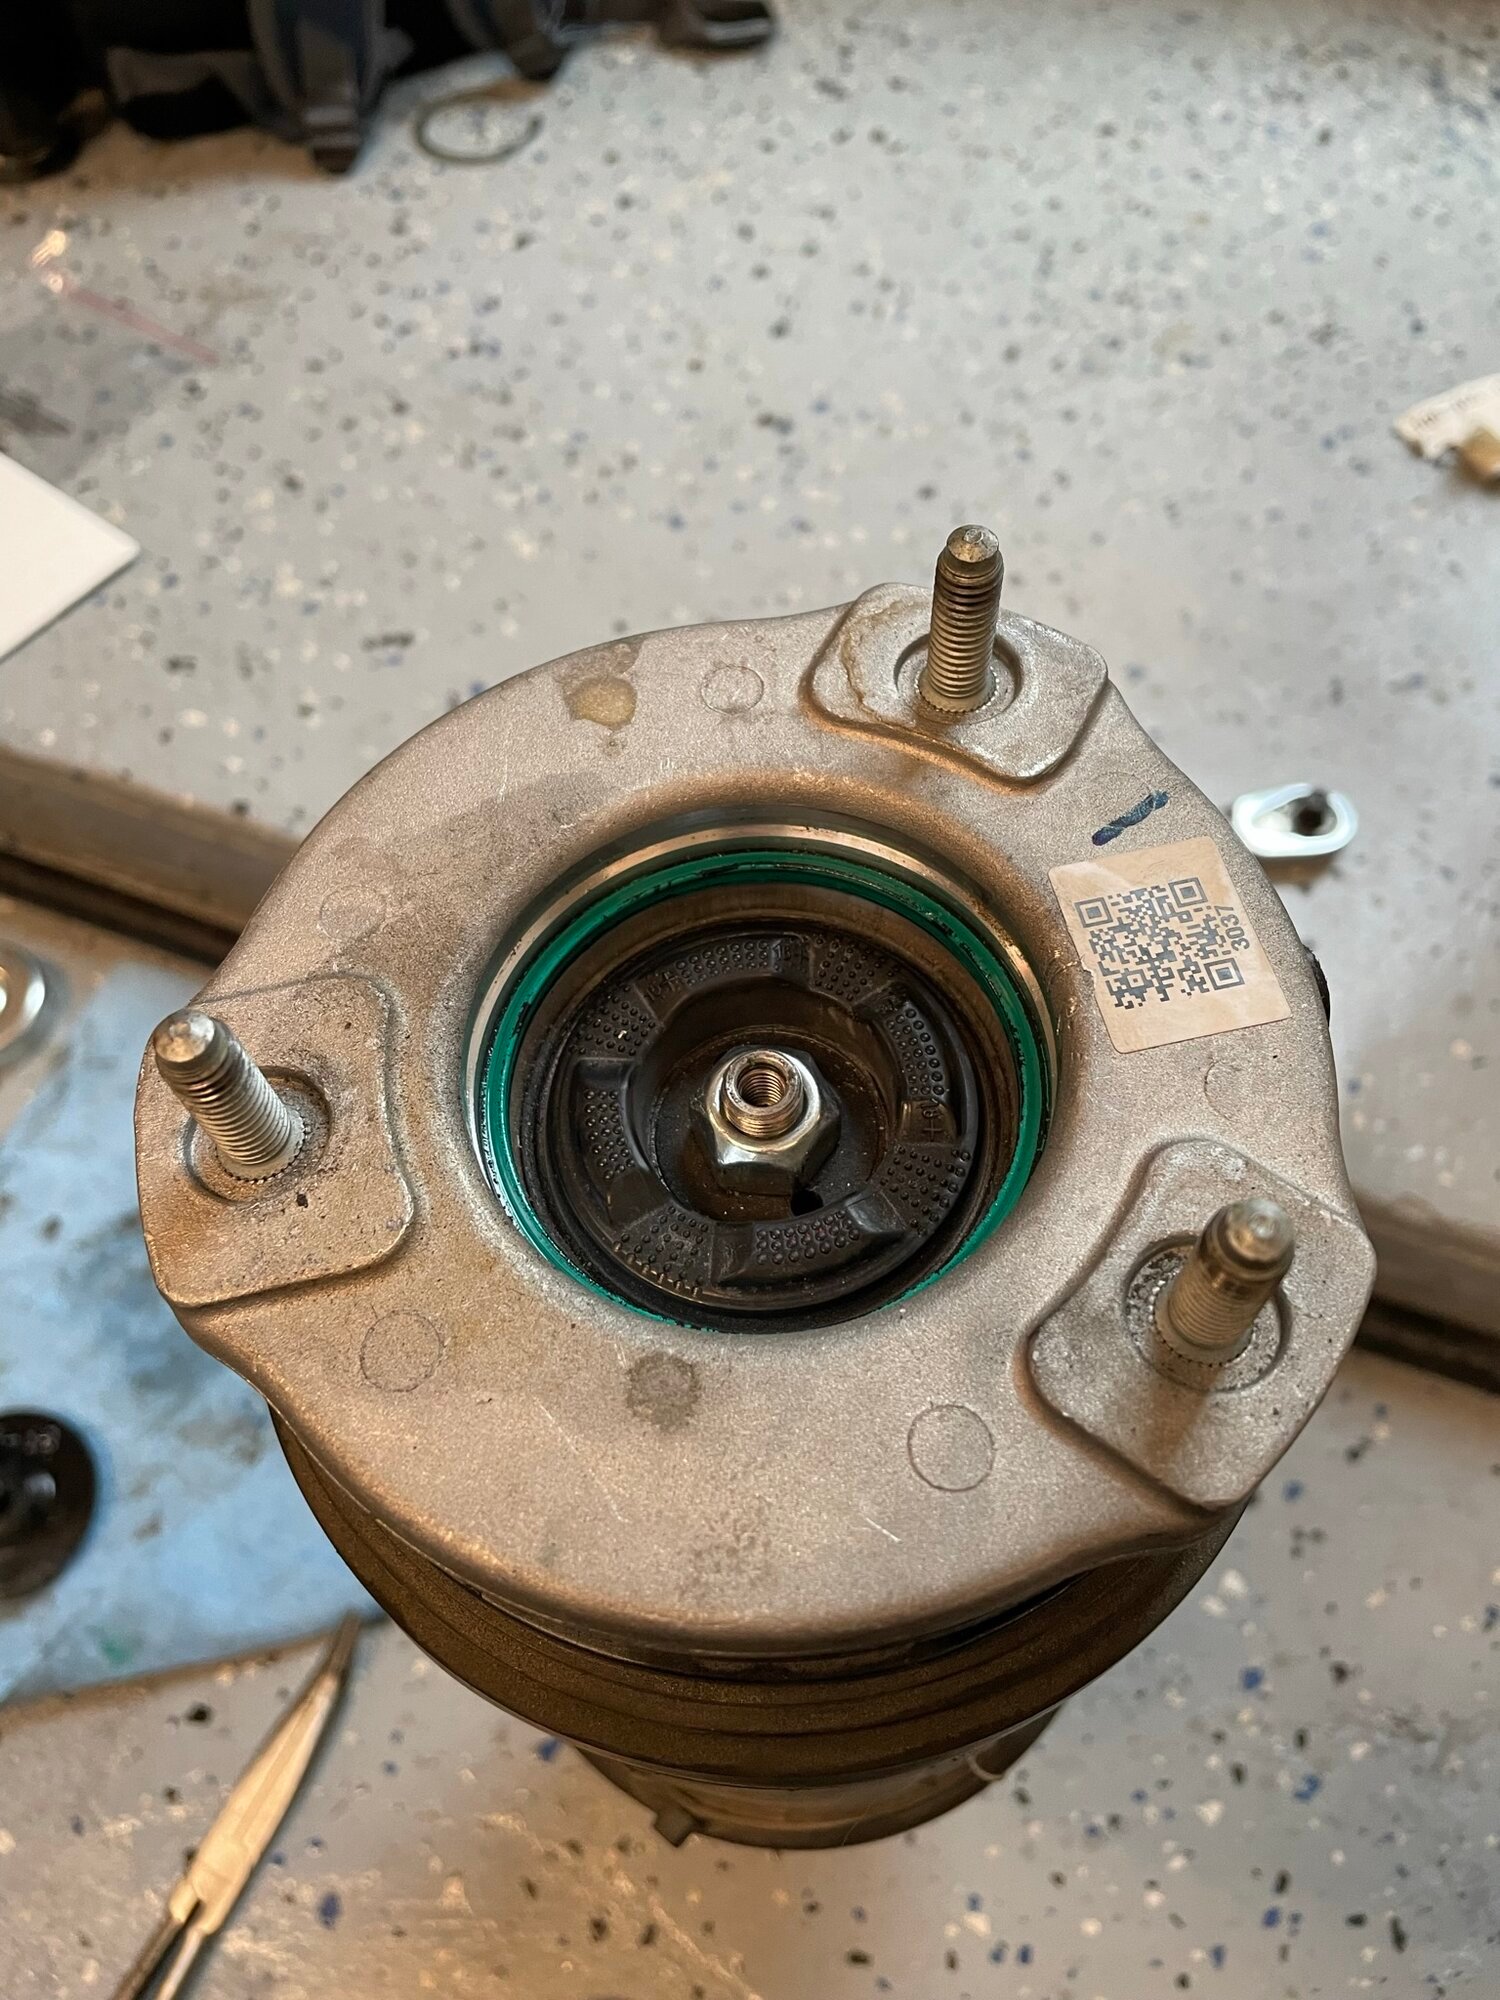
2. CAREFULLY pull the black plastic cap off of the top of the strut. A green gasket will be right below it. I CANNOT STRESS THIS ENOUGH, DO NOT DAMAGE THE GASKET. It is the upper seal for your air bag. If you damage it, your air bag will leak out, and there ARE NO REPLACEMENTS. You just have to buy another strut. See the gasket in the image below.
3. Remove the 17MM nut. You may get lucky and get it right off with an impact driver, or not. If it spins on the shaft, you can get creative with an allen key and a vice grip as below. I grip the long 17mm socket with a vice grip, and then insert the allen key through the middle. That will let you remove the nut.

4. At this point, the air bag assembly can be pulled off. Just unclip the two little plastic tabs at the bottom (being careful not to break them, though it's not the end of the world if you do), and pull it up and off by the top. It will leave the lower seat and seal behind:

5. Next, we remove the crimped-on metal cap. This is something the 12-16's don't have. It is not threaded on, it just needs to be knocked off. You can do this pretty easily with a flat head screw driver and a hammer. Just be careful not to mar the surface of the strut, because of step 6.
6. Now we need to take off that aluminum bottom seat and seal. STOP!! BEFORE YOU DO THIS, LUBRICATE THE SHAFT (ha) OF THE STRUT with some oil or silicone lubricant! Again, the gasket in this seat is your lower air bag seal. If you damage it, there are no replacements. The picture above shows the seat about halfway up the the shaft already. To get it moving, tap it lightly at about 45 degree increments with a hammer. If you've properly lubed your shaft, it will slide off.
7. Reassembly begins. Throw out the extra spacer provided by Unplugged, we don't need it. Wipe the gasket on the seat you removed to make sure it's clean, LUBE THE NEW SHAFT, and then slide the lower seat onto the UP strut.
8. The bag assembly should rest on the strut just like before. Put the top nut back on and tighten it up. YOU CANNOT USE THE ALLEN KEY METHOD ON THE UP STRUTS. It will damage the Dampner adjuster inside the shaft. Just hit it with an impact. If you run into shaft-spin issues, put a little torque on the nut by putting the socket on it and pushing axially on the driver....that'll give you enough grip to drive it down to be seated.
9. Now, set your dampner amount. Use a small allen key in the center of the strut to adjust. All the way Counter-Clockwise is soft, 4 turns Clockwise is Hard. I did mine at 50% between the two (they come set to 50%).
10. Attach the lower ribbed baffle to its seat by just pushing it on. The two little black tabs should click into place when it's all the way seated.
11. CAREFULLY pull the green gasket from the plastic cover. Clean it up, clean the seating surface, and then put it in place. Now just carefully slide the plastic cap in place on top of it.
12. Put the retaining clip back in. I found the best way to do this is to put the squared-end into the groove first, and then put a flat head screwdriver inbetween the clip and the metal cap (with the end of the screwdriver on the black cap), and then push in on the screwdriver handle to compress the clip and help it slide into place. It may take a few tries to get it in, and I recommend wearing gloves. Tap it lightly with a screwdriver and hammer once it's in place to make sure it's seated.
13. If you have an air compressor, you can blow a little bit of air into the assembly to test for leaks. If not, you'll find out soon enough.
13. That's it, you're ready to put it back in. Follow the removal steps in reverse.
14. With the strut back in, the air line re-attached, and the wheel back on, lower the car down to below where it would naturally sit on "high." Then take the car off of jack mode. You're wanting the system to identify that the side is low, and add air. At this point, the car should re-level on its own and you can stop supporting it.
----------------------------------
REARS:
The process for the rear is much the same as the front, with a few important notes:
1. Yes, you will have to remove the wheel liner. It's just a bunch of re-usable plastic clips, and you can pull it out of the way. There are two one-time-use tabs by the rear bumper that I chose not to remove, instead just pulled the liner to the side like so:

2. The 3 nuts that hold the strut in place are IN THE WHEEL ARCH, not in the trunk. Look straight up once you've removed the liner and you'll see them. The air line is up there too.
3. You may need to remove your outer upper control arm bolt (15mm) for ease of access. Maybe not.
4. YOU DO NOT NEED TO REMOVE THE PARKING BRAKE CALIPER. On the passenger side, the lower strut bolt will come out without much of a fuss, just jiggle it and you can clear the caliper. On the driver side, you will need to remove the clip for the wiring harness, but that's it....NOT the caliper itself. That clip can be stuck on pretty good....once you slide the red lock up, i just got a philips screw driver and pried between the clip and the caliper and it eventually started sliding. From there you can wiggle it off.
5. Other than that, the process is basically the same - just take your time and be methodical. If anyone comes up with any other tips or tings I missed, feel free to add them!
Today I installed Unplugged Performance HP Shocks for 2012-2021 Model S. There is a general installation guide, but it's written for a 2012-2016 S, and there are a few steps missing for the 2016+ non-raven models that I wanted to cover for anyone else doing this upgrade.
This isn't a review - I haven't had time to drive the car and the weather's nasty, that'll come next week.
HERE is the guide that Unplugged Performance provides for Installation.
Here are the steps for the 2016.5+, you'll notice some differences from the UP installation guide. I included pictures where they're important.
NOTE: Put on some coffee and give yourself 8 hours for this. It's not hard, it's just time-consuming. In my opinion, it's rewarding to do yourself, you learn about how your car works, and you'll probably save $1200. Also, have a good set of gloves with knuckle padding - this job is a knuckle buster. A helper is nice, but this can be done by yourself. My helper went to sleep on me.
You'll also need:
- 1 jack to use to lift the hub assembly, and 1 to lift the car (or 1 jack and a jack stand)
- A standard set of sockets, long and short, up to 21mm.
- A set of TORX sockets, up to T-50
- Vice Grip
- Allen Wrenches
- Crescent Wrench
- Highly recommend an impact wrench
- Set of screw drivers
- Hammer
Obligatory do this at your own risk, I take no responsibility for anything you break.
FRONTS:
REMOVING:
- Put the car in jack mode, Jack up the corner of the car, remove the wheel.
- Bleed and then remove the airline on the front strut. It is a 10mm fitting that is accessible under the hood
- Remove the brake line screw, End Link nut, and Aft Arm bolt the same as they show (fig 2 & 3). You may need a jack to lift the suspension to relieve tension on the sway bar.
- Remove the 3x13mm nuts holding the strut in from the top, at the top of the strut tower. At this point, you can wiggle the whole strut assembly out of the car.
- Separate the air strut assembly from the knuckle by using a T-50 Torx bit.
DISASSEMBLY/REASSEMBLY:
This is where things are most different from the early cars. Have no fear, it's not terrible, just different.
1. Pry the retaining clip out of its slot on the top of the strut. Easiest way to do this is with a flat head screwdriver in the cut-out they provide.
2. CAREFULLY pull the black plastic cap off of the top of the strut. A green gasket will be right below it. I CANNOT STRESS THIS ENOUGH, DO NOT DAMAGE THE GASKET. It is the upper seal for your air bag. If you damage it, your air bag will leak out, and there ARE NO REPLACEMENTS. You just have to buy another strut. See the gasket in the image below.
3. Remove the 17MM nut. You may get lucky and get it right off with an impact driver, or not. If it spins on the shaft, you can get creative with an allen key and a vice grip as below. I grip the long 17mm socket with a vice grip, and then insert the allen key through the middle. That will let you remove the nut.
4. At this point, the air bag assembly can be pulled off. Just unclip the two little plastic tabs at the bottom (being careful not to break them, though it's not the end of the world if you do), and pull it up and off by the top. It will leave the lower seat and seal behind:
5. Next, we remove the crimped-on metal cap. This is something the 12-16's don't have. It is not threaded on, it just needs to be knocked off. You can do this pretty easily with a flat head screw driver and a hammer. Just be careful not to mar the surface of the strut, because of step 6.
6. Now we need to take off that aluminum bottom seat and seal. STOP!! BEFORE YOU DO THIS, LUBRICATE THE SHAFT (ha) OF THE STRUT with some oil or silicone lubricant! Again, the gasket in this seat is your lower air bag seal. If you damage it, there are no replacements. The picture above shows the seat about halfway up the the shaft already. To get it moving, tap it lightly at about 45 degree increments with a hammer. If you've properly lubed your shaft, it will slide off.
7. Reassembly begins. Throw out the extra spacer provided by Unplugged, we don't need it. Wipe the gasket on the seat you removed to make sure it's clean, LUBE THE NEW SHAFT, and then slide the lower seat onto the UP strut.
8. The bag assembly should rest on the strut just like before. Put the top nut back on and tighten it up. YOU CANNOT USE THE ALLEN KEY METHOD ON THE UP STRUTS. It will damage the Dampner adjuster inside the shaft. Just hit it with an impact. If you run into shaft-spin issues, put a little torque on the nut by putting the socket on it and pushing axially on the driver....that'll give you enough grip to drive it down to be seated.
9. Now, set your dampner amount. Use a small allen key in the center of the strut to adjust. All the way Counter-Clockwise is soft, 4 turns Clockwise is Hard. I did mine at 50% between the two (they come set to 50%).
10. Attach the lower ribbed baffle to its seat by just pushing it on. The two little black tabs should click into place when it's all the way seated.
11. CAREFULLY pull the green gasket from the plastic cover. Clean it up, clean the seating surface, and then put it in place. Now just carefully slide the plastic cap in place on top of it.
12. Put the retaining clip back in. I found the best way to do this is to put the squared-end into the groove first, and then put a flat head screwdriver inbetween the clip and the metal cap (with the end of the screwdriver on the black cap), and then push in on the screwdriver handle to compress the clip and help it slide into place. It may take a few tries to get it in, and I recommend wearing gloves. Tap it lightly with a screwdriver and hammer once it's in place to make sure it's seated.
13. If you have an air compressor, you can blow a little bit of air into the assembly to test for leaks. If not, you'll find out soon enough.
13. That's it, you're ready to put it back in. Follow the removal steps in reverse.
14. With the strut back in, the air line re-attached, and the wheel back on, lower the car down to below where it would naturally sit on "high." Then take the car off of jack mode. You're wanting the system to identify that the side is low, and add air. At this point, the car should re-level on its own and you can stop supporting it.
----------------------------------
REARS:
The process for the rear is much the same as the front, with a few important notes:
1. Yes, you will have to remove the wheel liner. It's just a bunch of re-usable plastic clips, and you can pull it out of the way. There are two one-time-use tabs by the rear bumper that I chose not to remove, instead just pulled the liner to the side like so:
2. The 3 nuts that hold the strut in place are IN THE WHEEL ARCH, not in the trunk. Look straight up once you've removed the liner and you'll see them. The air line is up there too.
3. You may need to remove your outer upper control arm bolt (15mm) for ease of access. Maybe not.
4. YOU DO NOT NEED TO REMOVE THE PARKING BRAKE CALIPER. On the passenger side, the lower strut bolt will come out without much of a fuss, just jiggle it and you can clear the caliper. On the driver side, you will need to remove the clip for the wiring harness, but that's it....NOT the caliper itself. That clip can be stuck on pretty good....once you slide the red lock up, i just got a philips screw driver and pried between the clip and the caliper and it eventually started sliding. From there you can wiggle it off.
5. Other than that, the process is basically the same - just take your time and be methodical. If anyone comes up with any other tips or tings I missed, feel free to add them!
Attachments

Last edited:
