Welcome to Tesla Motors Club
Discuss Tesla's Model S, Model 3, Model X, Model Y, Cybertruck, Roadster and More.
Register

Upper Control Arm Creak Options

This site may earn commission on affiliate links.
What really bothers me about all this is I had the control arms replaced and everything lube and resealed in December. Now, 6 months later, creaking returns.
Yes I'm scheduled in the morning for this creak, having had the control arms replaced at 57k mi (22mo and 41k mi ago). They put the -H version on the vehicle in Aug 2020...wonder what version they're on now? This thread makes me want to cancel the appt and just go the DIY grease route since apparently Tesla hadn't yet solved this design error as of mid-2020...why should I bet $500-1000 that they have by mid-2022 particularly given your experience in December 2021?! Any idea if your 12/21 repair is still warranted by Tesla??
 
I had this issue recently, SC scheduled me about 6 weeks out (because they didn't have the parts in stock). My issue was only with front-right, but they replaced both front control arms. Fully covered by warranty at ~45K miles and ~30 months since vehicle delivery.
I took mine in for this issue in April. I originally only complained about the left front. After they looked at it, they scheduled me to bring it back in three weeks to get parts in bit they said they would be replacing both. Didn't think anything of it. I injected some engine oil as a temporary measure as it got super annoying. I did the left side and that's when I noticed the left side was also making the noise albeit at a much lower level. I ultimately ended up oiling that side as well. I used a turkey injector as the needle is rather thick and followed well. These are easy enough to get at the hardware store or at a grocery store. Worked fine as a stop gap. Has been fine ever since they replaced them.
 
Did this repair on my M3 '20 at the weekend, using the 14g needle, 10ml syringe listed further back from Amazon UK. 15 minute job, only the drivers side (UK) to do (at this point in time......) an absolute doddle although I used a trolley jack to lift the body a bit to give me more room to move under the wheelarch. Then used black automotive grade silicone sealant to seal the tiny hole left by the needle. Perfect fix, no creaking!

A couple of things I did notice, jacking the car up made a big difference to my oversize hands and the other more worrying part was that as the grease went in, water was squirting out due to the pressure of the grease going in. This water is proof the boot is not fit for purpose and I can only hope the upgraded ones Tesla are fitting under warranty now are better sealed!

I used Red Rubber Grease used for CV joints and bearings. I warmed the tin in the unseasonable warmth of the sunshine we rarely enjoy in the far north Highlands of Scotland (!) but then used an old knife to ladle the grease from the tin into the syringe body. This was far easier than trying to suck the grease up by retracting the plunger.

Also the rubber boot is pretty tough, so definitely be careful when you're inserting the needle, as has been said above, hold the needle close to the boot as you guide it in, otherwise I can see how it could snap off the end of the syringe under pressure.

All in all a 1-spanner job :)
Good info. Where exactly is the needle going in? Photos have the arrow here. Is it literally exactly here?
 

Attachments

  • 1F363E74-D4E6-41EB-80F5-F94E73E6D67B.jpeg
    1F363E74-D4E6-41EB-80F5-F94E73E6D67B.jpeg
    260.3 KB · Views: 184
After the second application of lithium grease, it appears either this is not the correct lubricant or the ball joint is too far gone. I get a few days of silence, then the creaking comes and goes intermittently. Have an appointment for 7/7, hope creak is audible on that day.
 
I took mine in for this issue in April. I originally only complained about the left front. After they looked at it, they scheduled me to bring it back in three weeks to get parts in bit they said they would be replacing both. Didn't think anything of it. I injected some engine oil as a temporary measure as it got super annoying. I did the left side and that's when I noticed the left side was also making the noise albeit at a much lower level. I ultimately ended up oiling that side as well. I used a turkey injector as the needle is rather thick and followed well. These are easy enough to get at the hardware store or at a grocery store. Worked fine as a stop gap. Has been fine ever since they replaced them.
How long did the work take for you - same day?
 
I dropped it off when they opened and had the car back before lunch.
Thanks. Just had the estimate though from Tesla. Says 2.5 hours of work and they’re doing the wiring harness/water ingress issue grease fix too which briefly took my car out of action when I got it in 2019 (think since then the short it triggers has been fixed by software but this is the physical fix). Wonder if I should ask them about the rear camera recall!
 
Good info. Where exactly is the needle going in? Photos have the arrow here. Is it literally exactly here?
Right there, yes - into the bottom fold, I held the needle all the way in and as I was pressing the plunger (takes some pressure due to the viscosity of the grease) I was slowly withdrawing the needle. I put half (roughly 5ml) on one side, then drew the needle almost all the way out, switched it to the other side of the internal bolt, then squeezed the other 5ml in.

Took the car for a 10 min run up the road and back after leaving the sealant to cure for an hour, and silence :)

I cleaned the rubber boot with general purpose brake cleaner spray before injecting the grease (to avoid an dirt being passed inside the boot from the insertion of the needle) then sprayed and cleaned again to remove any surplus grease before applying the sealant.
 
I tried the fix suggested with grease and syringes and it completely eliminate the squeaking after one drive around the neighborhood. Total cost: $30 and enough leftover to do it 8 more times before I need new needles.

I bought all from Amazon:
Syringe and needles 14Ga
Wheel Bearing Grease in a tub
J-B Weld Silicone Sealant

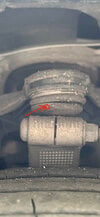
1. You can access the ball joint without removing the tire quite easily. I just cleaned the area and adjusted the rubber a little to find a good spot to inject in the area that the red arrow pointed to in the first post.
2. Take the plunger without the needle and insert into the grease tub and slowly pull straight up to fill. After you get 10 ml, screw on the needle.
3. Hold close to the needle and push into the rubber boot.
4. Slowly push the syringe until you empty the syringe. I moved the needle around a little bit to deposit it in different spots.
5. Pull the needle out and if some doesn't come oozing out, maybe inject some more.
6. Work the grease in by pushing down numerous times on the fender. I could immediately hear the squeak get quieter on each push. Once no more squeak, take it for a drive an make a lot of turns. Go through some bumpy parking lots or roads.
7. Clean grease off the area. Use the J-B Weld and blot a small amount in the area and spread with finger (I was wearing latex gloves). This should be left to cure for 24 hours.

I noticed when grease was oozing out from the hole that the original grease looked light brown and thin. It's only been a day but the problem is completely gone.
Thank you for your detailed post. I followed it precisely and wow what an easy fix...thanks to you, 10 minutes?! And that was including taking my time. I am 6'1" and was able to get to the work area with very little difficulty; propped by iPhone on the tire and fender a bit left of center to provide lighting, and still had ample space to do the work. 10mL did the job, and yes a bit oozed out when I removed the needle. I think being in Atlanta in the summer heat helped with the grease viscosity; people in colder seasons/locations may have a tougher time getting the grease to transit the needle without putting at risk the light plastic wing grips of the syringe. My biggest "issue" was that the grease tub lid didn't thread properly so a bit had leaked onto the outside of the tub...who knows if a mfr defect or an Amazon shipping defeat. Anyway, thanks again!
 
I used SIL-Glyde. https://www.google.com/aclk?sa=L&ai...ZCw8vr4AhUSFVkFHXAFDxkQ9aACKAB6BAgBEEg&adurl=

Its a silicone high temperature brake grease that is well known in the industry. This is not optimal since the other petroleum based greases can handle higher pressure. The benefit being the silicone is less likely to weaken the ball joint boot as compared to traditional grease. Been quiet since the winter now. Next step is sealing the control arm as tesla has been doing lately.
 
Just had both Front Upper Control Arms replaced by mobile service, 45 minute job in total, including my annoying questions... Fantastic technician, really knew what he was doing, and took time to explain the cause, and why the lack of need for an alignment. He did one side at a time, and only needed to use the hydraulic jack once per side to lift the car, no need for lifting the hub assembly during the process. I was initially concerned that this was a procedure best suited for a Service Center, but now understand that the Mobile Technicians are plenty qualified/equipped.

Prior to this, the control arm was "raising hell", even driving at a constant speed on a flat road. As a temporary fix, I used a syringe to inject a lithium grease/oil cocktail (for reduced viscosity) into the noisy passenger side upper control arm boot, which completely eliminated the noise in a days drive. Technician said that it would be fine to leave it as is, or replace both for $275.00 (out of warranty) - opted for the part replacement in the event the driver side developed the same issue, and for peace of mind.

For reference, I used the following large gauge syringe for grease injection, then wiped down the injection location with alcohol, then sealed it with a "smear" of RTV sealant. Drove for 30 days without the noise returning. Technician stated that he had not heard of this fix, and that he could not detect any symptoms of wear by pushing on the fender.
 
Last edited:
This just started happening to me, and the parts won't be available for about a week. Should be under warranty for me. But my question is - how safe is the car to drive in the meantime? Sounds like hell.
Mine did this, it was bad for about a month before I got it fixed, its warrantied I think there was also a recall about it.

Point is, I drove 200km a day for a month just fine, annoying but fine.
 
Just had both Front Upper Control Arms replaced by mobile service, 45 minute job in total, including my annoying questions... Fantastic technician, really knew what he was doing, and took time to explain the cause, and why the lack of need for an alignment. He did one side at a time, and only needed to use the hydraulic jack once per side to lift the car, no need for lifting the hub assembly during the process. I was initially concerned that this was a procedure best suited for a Service Center, but now understand that the Mobile Technicians are plenty qualified/equipped.

Prior to this, the control arm was "raising hell", even driving at a constant speed on a flat road. As a temporary fix, I used a syringe to inject a lithium grease/oil cocktail (for reduced viscosity) into the noisy passenger side upper control arm boot, which completely eliminated the noise in a days drive. Technician said that it would be fine to leave it as is, or replace both for $275.00 (out of warranty) - opted for the part replacement in the event the driver side developed the same issue, and for peace of mind.

For reference, I used the following large gauge syringe for grease injection, then wiped down the injection location with alcohol, then sealed it with a "smear" of RTV sealant. Drove for 30 days without the noise returning. Technician stated that he had not heard of this fix, and that he could not detect any symptoms of wear by pushing on the fender.
The biggest news here is you were only charged $275 to replace both. That's unreal; the going rate has been ~$500ea.