


Introduction
I find the requirement for a separate USB drive for music and the v9 dashcam feature to be annoying. Without some type of work-around, that would use both USB ports in the front of the car, leaving you with no USB port for phone charging. It's been reported that you can partition the USB drive into two separate partitions and make a single USB drive work for both dashcam and music, but this is not the easiest thing to do on Windows.
I've tested a lot of configurations over the past 2 days and I think I've finally come up with a method that works reliably. This procedure shows you how to take a USB drive and partition it into 2 partitions so that you can use the drive for both music playback as well as the dashcam feature in version 9.
Like others, I've also had the issue where the dashcam will work at first, then the USB drive appears to become corrupted and the dashcam will no longer record. I believe this method gets around this problem as well. I have not had the dashcam stop recording when the drive is prepared like this.
Tools Required
Your USB drive probably comes already formatted with the NTFS file system. The Tesla will not read this file system so we have to delete it and create the partitions we want.
1. Insert your new USB drive in the computer and open Windows Explorer (Windows Key + E). Find the drive letter that your USB drive appears on. On my computer, it appeared on drive I:, on yours it's likely to be a different drive letter. Right-click the drive and go to Properties. You should see something like this:
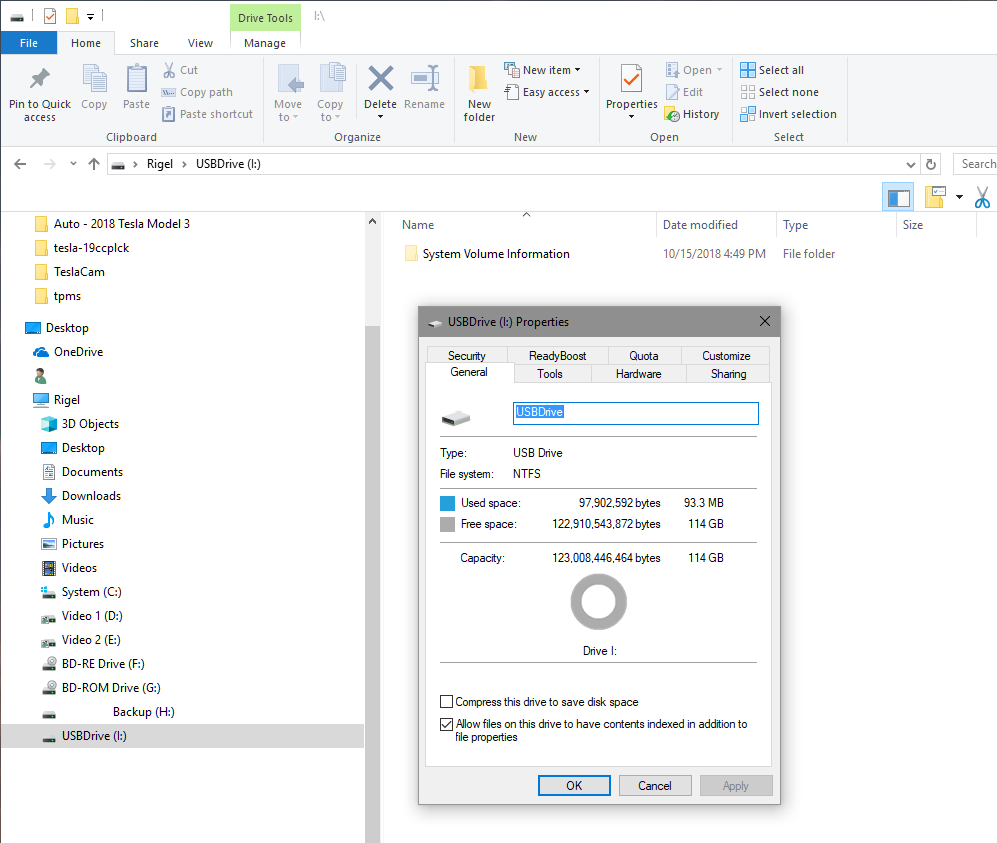
My 128GB drive is formatted as NTFS. We need to delete this so we can make our two FAT32 partitions.
2. Click the magnifying glass next to your Windows start menu, and search for "Computer Management", like this:
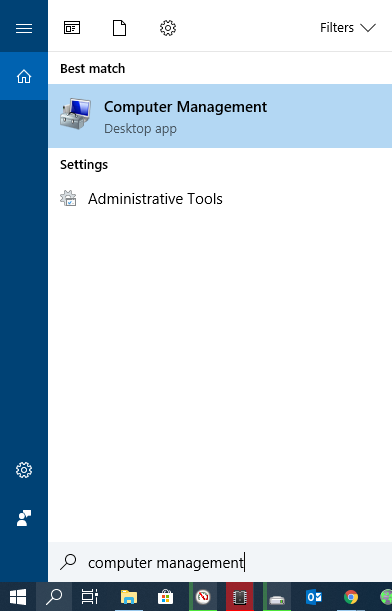
Click the Computer Management icon to run the Computer Management application.
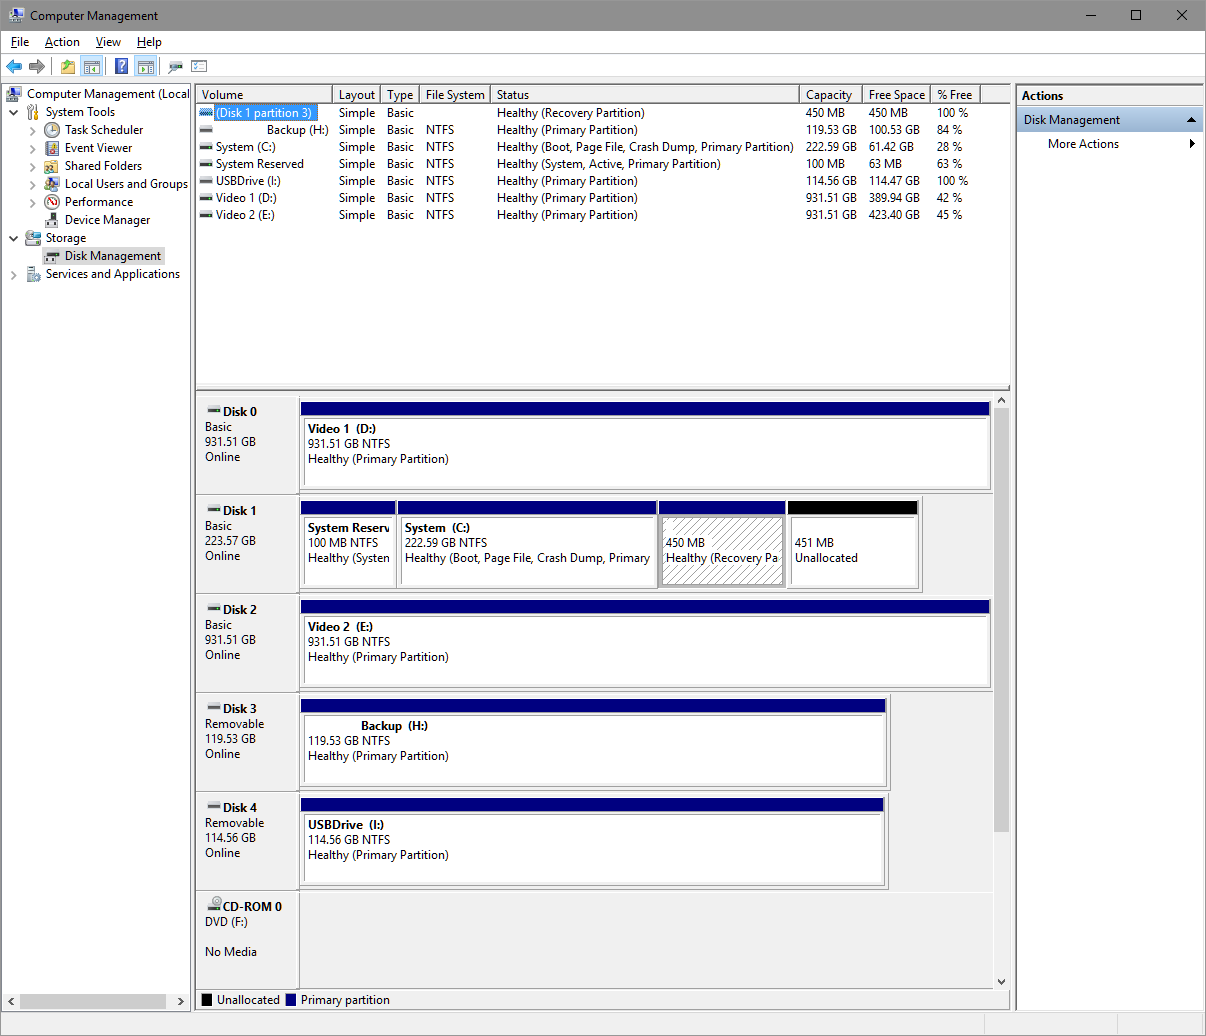
3. In the left colum, expand the Storage node, then click on Disk Management. You will see a list of all of your drives and the partitions they contain. It will look something like this. My USB drive is listed as Disk 4, with the partition labeled as drive I:, but on your computer it's likely to be a different drive letter and different drive number.
4. Make sure you do the following on the correct drive. Right-click the USB drive partition and click Delete Volume.
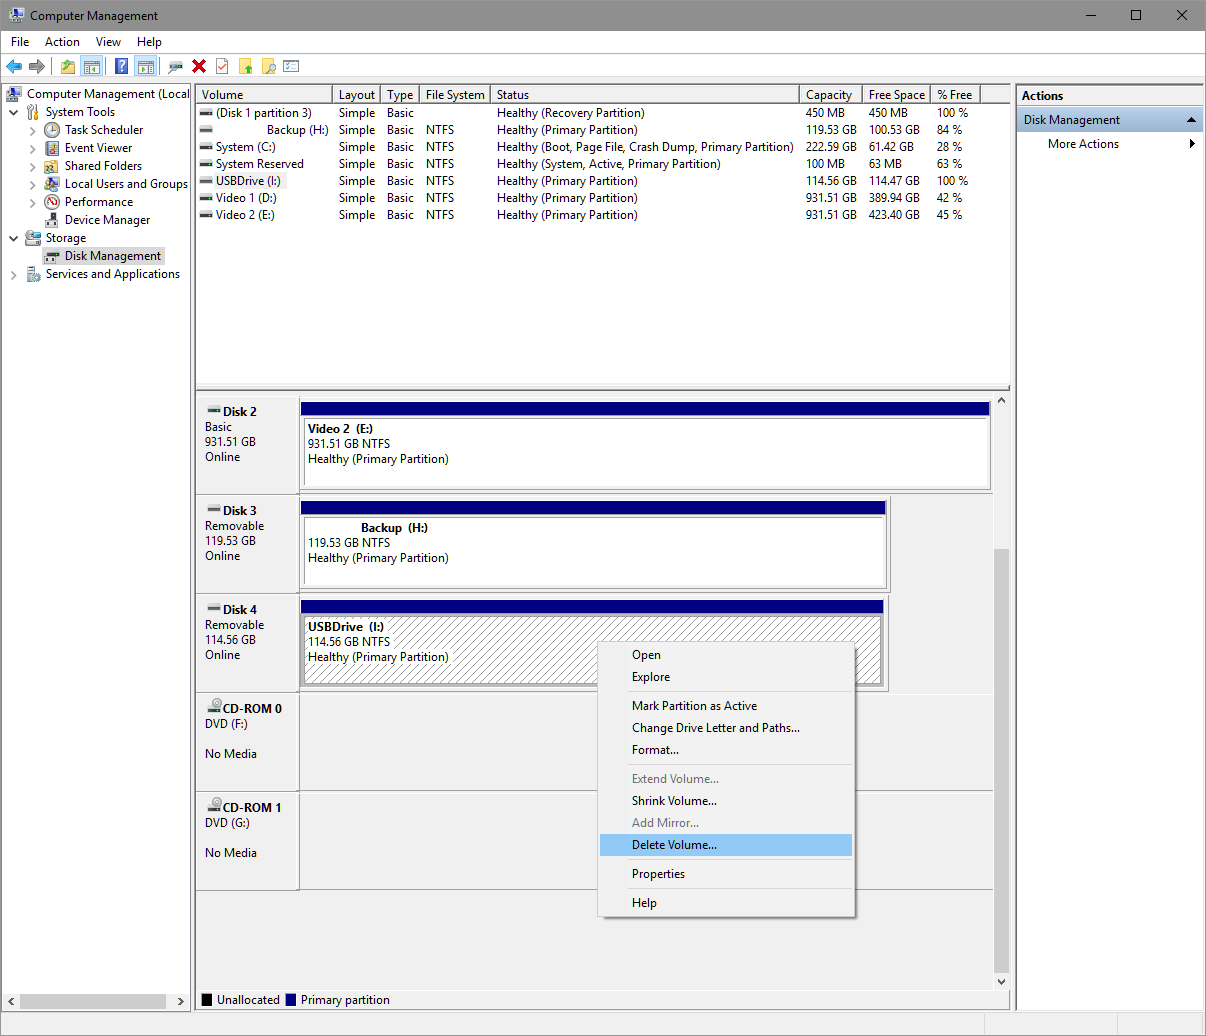
You will be asked to confirm that you want to delete the partition. Look again and make sure you're deleting the USB drive's partition, then click OK.
5. You will now have a blank USB drive with no partition on it. Note that mine is listed as Disk 4, yours is likely to be a different drive number.
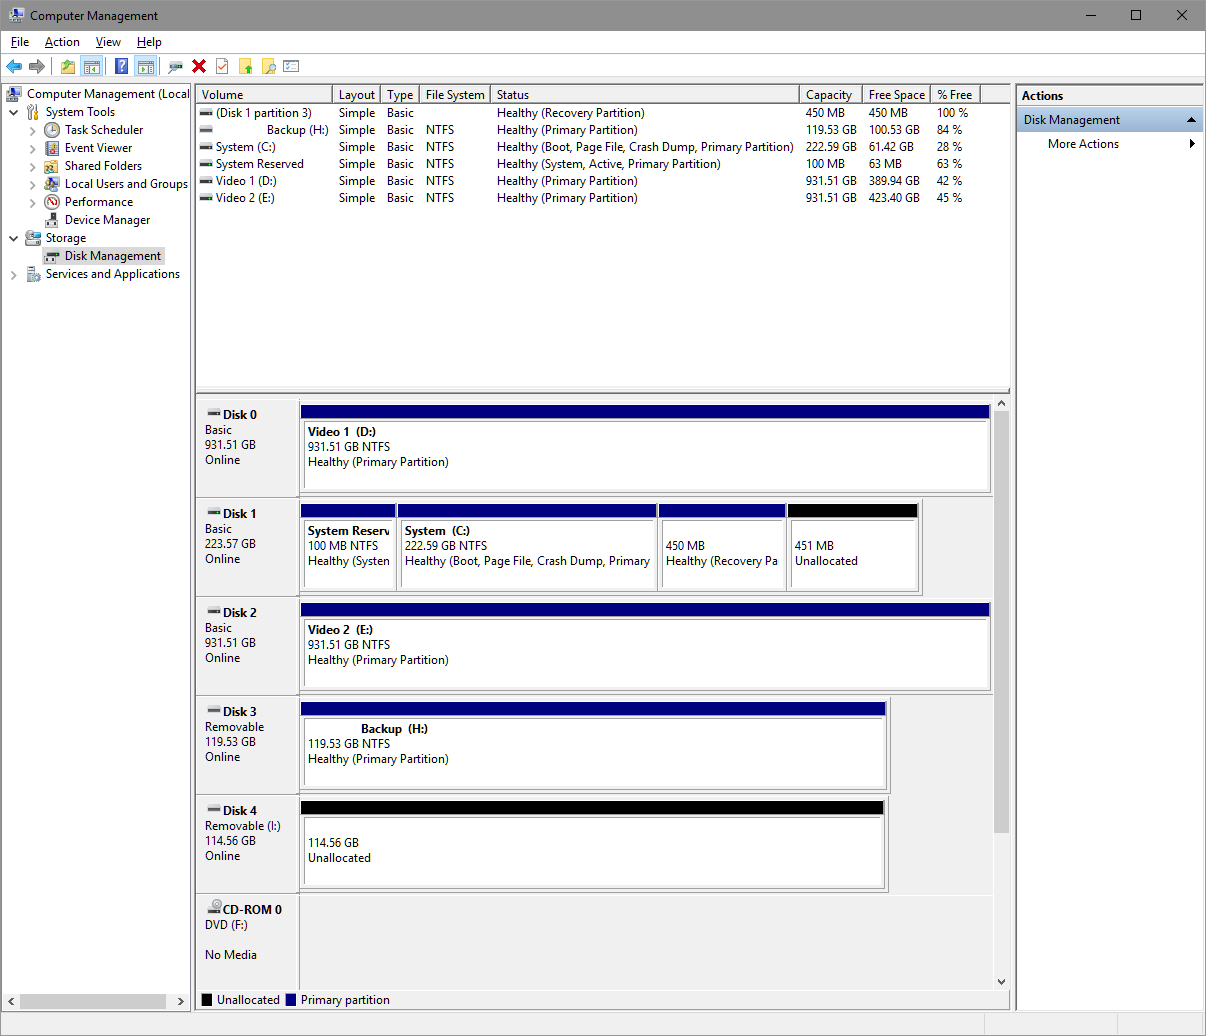
Note the size of your USB drive, as this will help you identify the USB drive in the next steps. My USB drive is showing as 114 GB.
Close Computer Management at this point, we will run it again later, but it cannot be open during the next steps.
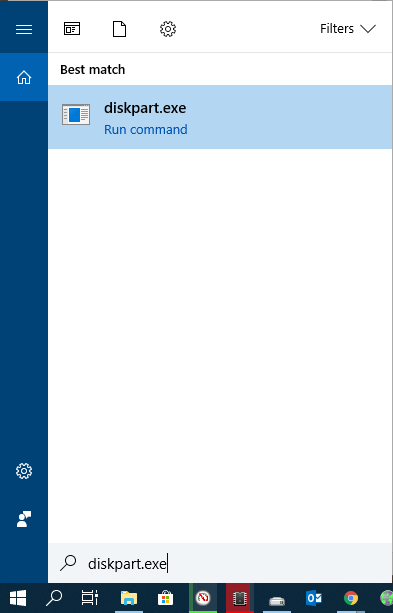
6. Click the magnifying glass next to your Windows start menu, and search for "diskpart.exe", like this:
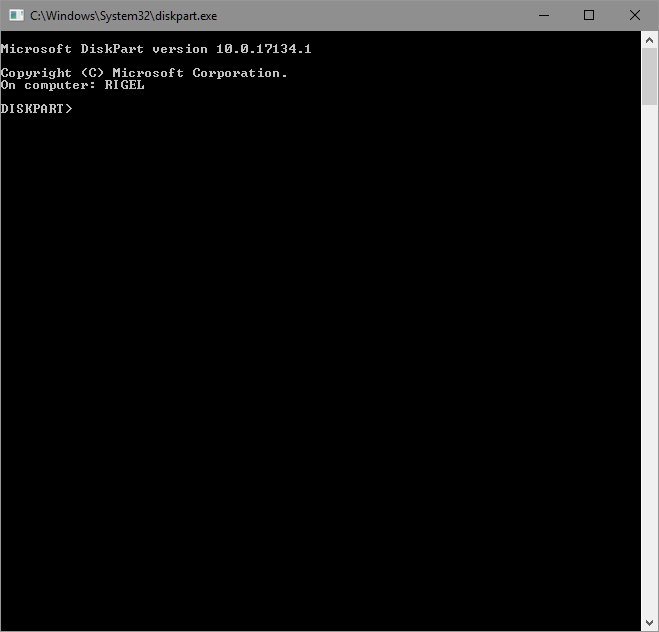
Run the diskpart.exe utility by clicking on the icon. Diskpart will ask you for Admin privileges when it launches.
7. Diskpart is a command-line utility that runs in a command window. It will look like this:
We will be using the diskpart utility to create our partitions. We cannot use Computer Management to do it because Computer Management will force us to format the partitions at the time of their creation, and the only options will be NTFS or exFAT.
8. Enter the following commands, exactly as shown, into the diskpart command window, one at a time, hitting Enter at the end of each line. Replace the "#" sign in the second line with the disk number of your USB drive. You can see the disk number in the output of the "list disk" command from the first line. On my computer, my USB drive was disk 4. Yours will probably be different. Look for the size of the USB drive that you noted at the end of step 5 (mine was 114 GB), this will help you identify the disk number.
Once you have entered these commands, you'll have some output in your command window that looks like this:
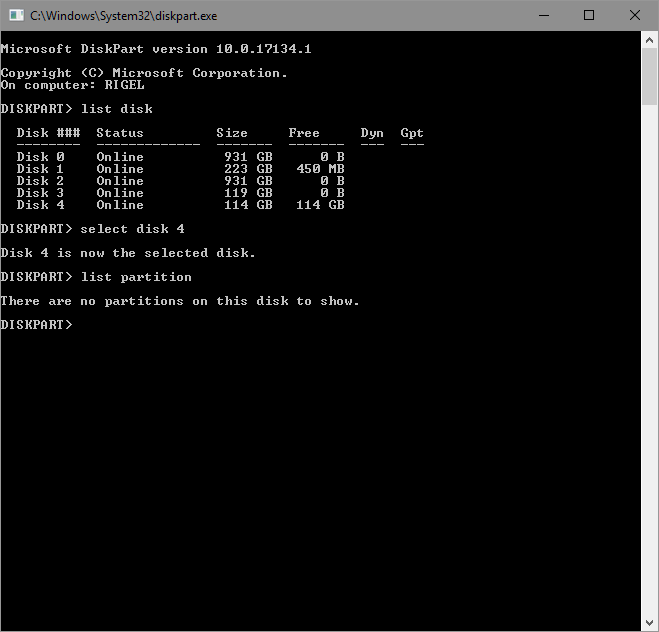
You can see here that the output from the list disk command shows my USB drive as disk 4, which is the same disk number that Computer Management showed. I then selected this disk with the select disk command, then listed its partitions with the list partition command. It correctly shows that there are no partitions on this disk.
9. We will now create the partitions we need on the USB drive. We will be creating a 16GB partition for the Tesla dashcam functionality, then a 2nd partition that uses the remainder of the USB drive for music. Enter the following commands, exactly as shown, into the diskpart window, one at a time, hitting Enter at the end of each line:
Once complete, you'll have output in your command window that looks like this:
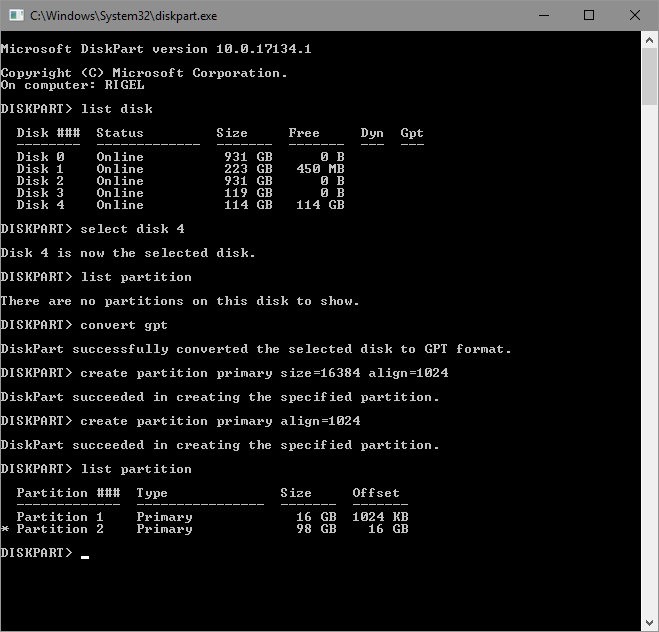
You can see that two partitions have now been created.
Close the diskpart command window by typing:
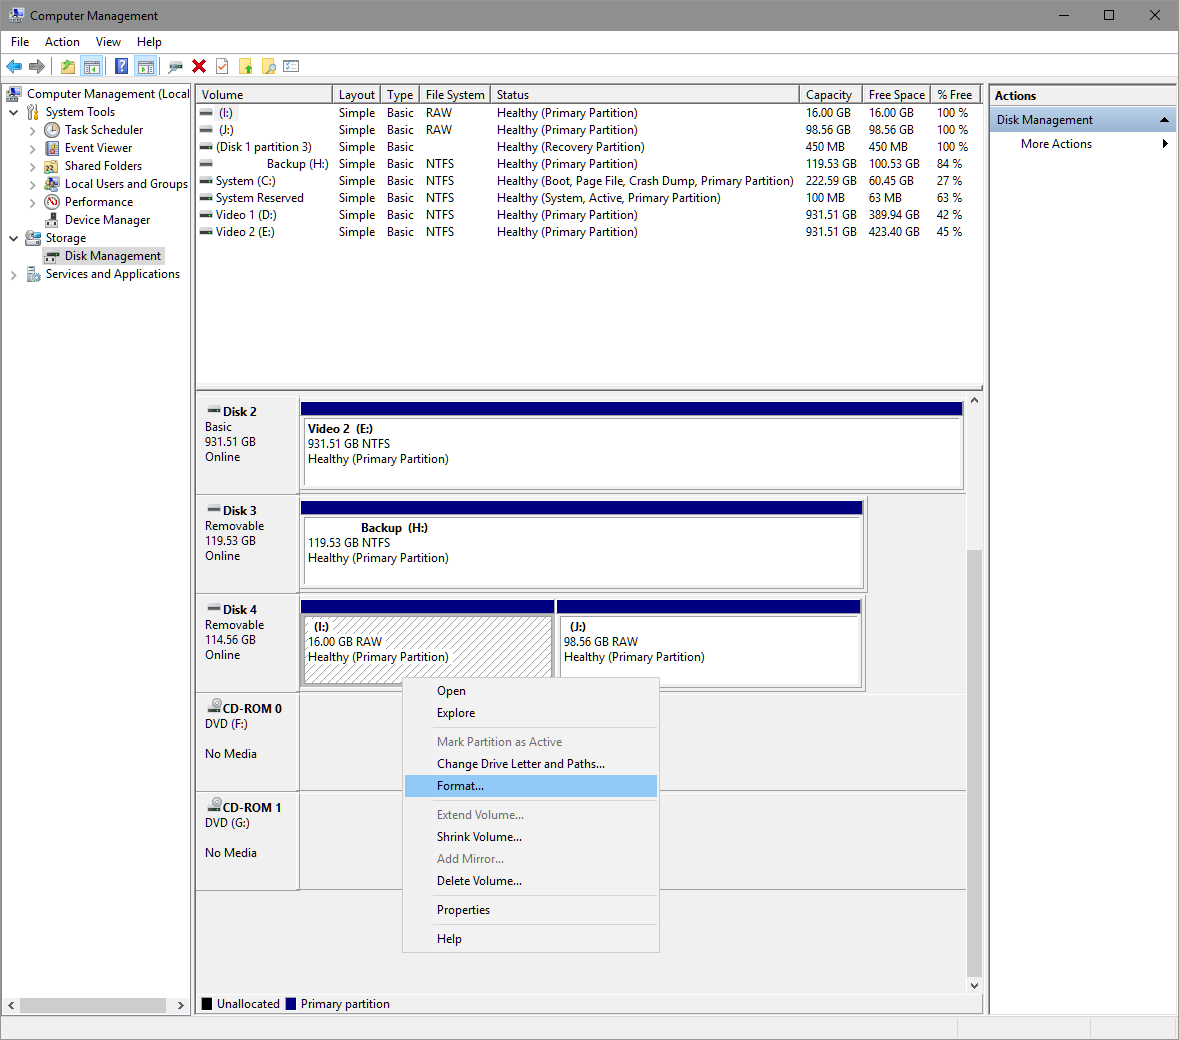
10. Run the Computer Management utility again using the same procedure as in step 2 (click magnifying glass to search, type in Computer Managment). Go to Storage -> Disk Management. Your USB drive will now show two "RAW" partitions. We now need to format them to the FAT32 file system format. Right-click the first 16GB partition and select Format:
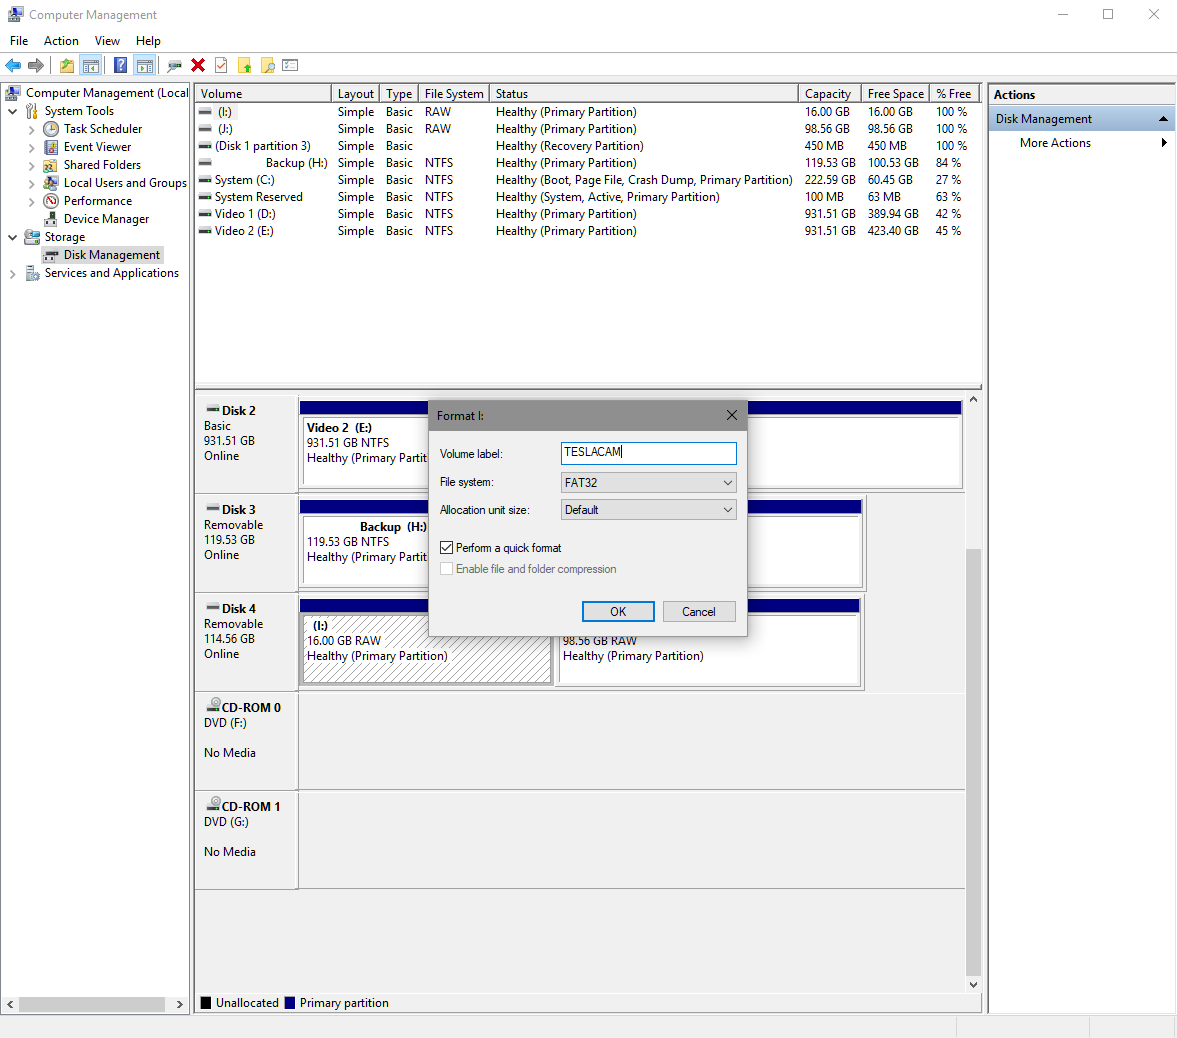
11. The format window will come up asking for details. Give this 16GB partition a volume label of "TESLACAM". Leave the file system as FAT32, the allocation unit size as Default, and the Perform a Quick Format checkbox checked. Click OK to format the partition.
This is the critical step that prevents the TESLACAM partition from getting corrupted and causing the dashcam to stop working. It seems that the 3rd-party FAT32 formatting utilities are creating a partition that has some type of minor problem that the Tesla FAT32 filesystem driver has problems with. When Windows is used to format the TESLACAM partition, this does not occur. (See notes below on file corruption, however).
While Windows cannot format a drive larger than 32GB with FAT32, it can and will operate with FAT32 drives that are larger. The FAT32 file system is designed for partitions up to 2 TB in size.
We do not need a partition larger than 16 GB for the Tesla dashcam. The dashcam is currently limited to storing 1 hour of footage from one camera, the total file size for this hour is approximately 1.8 GB. A 16 GB partition should therefore be enough to hold 1 hour of footage from all 8 cameras if Tesla implements that (1.8 * 8 = 14.4 GB).
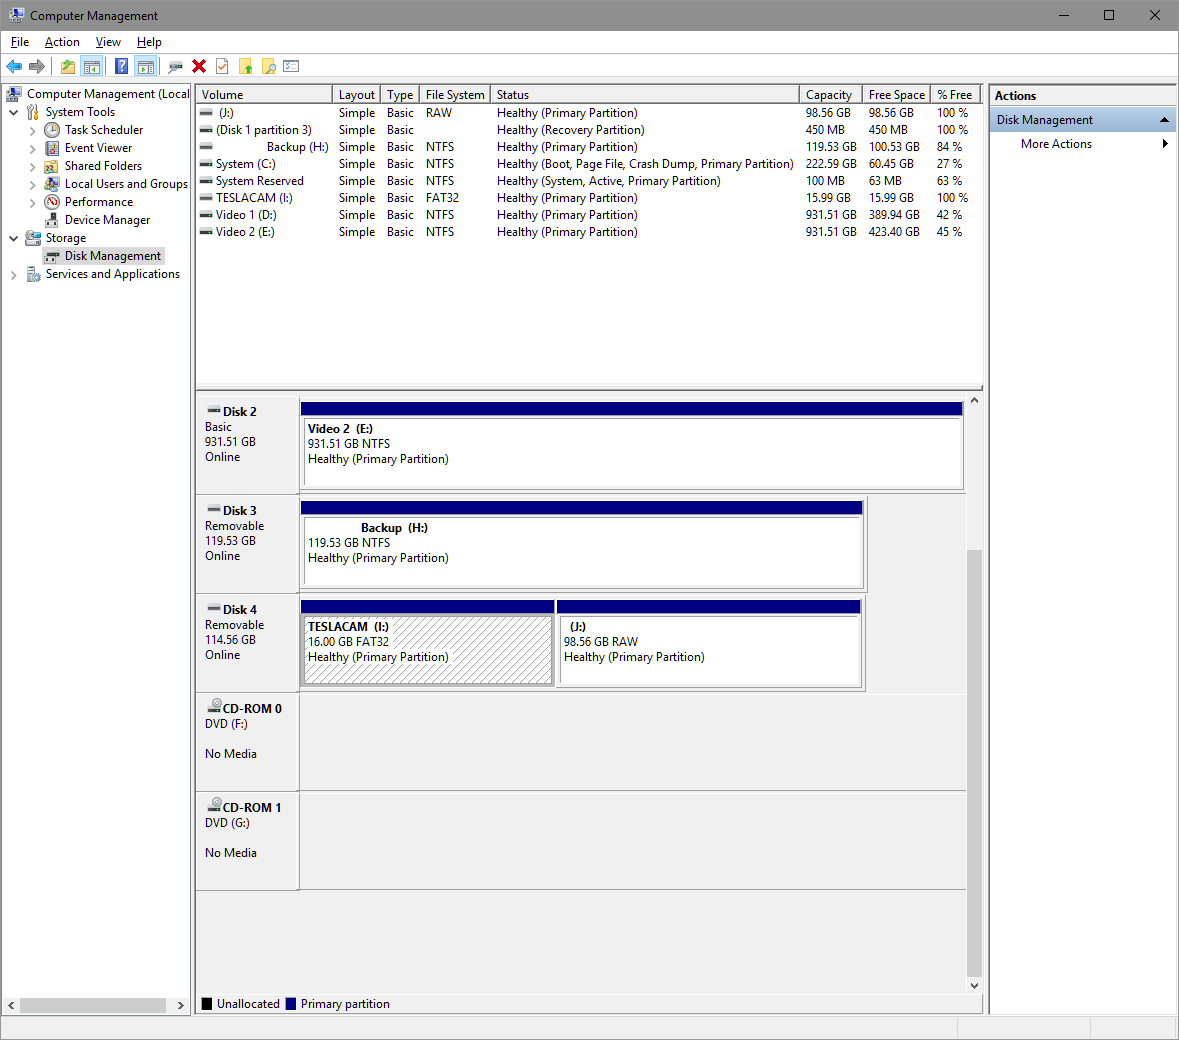
12. Once the TESLACAM partition is formatted you will see the FAT32 partition and a drive letter shown in Computer Management:
Close Computer Management, it should not be open for the next step.
13. We now need to format the music partition as FAT32. We cannot use the Windows format option for this partition because the partition is larger than 32 GB. We will use the 3rd-party formatter for this. Since the Tesla will not be writing to this partition (it will be reading your music files only), this will work. Note the drive letter assigned to the RAW partition above is the J: drive on my computer (yours will be different). We will need this drive letter in the next step.
Run the Fat32Formatter utility that you downloaded from the link in the Tools section (the executable is called guiformat.exe). The formatter will look like this:
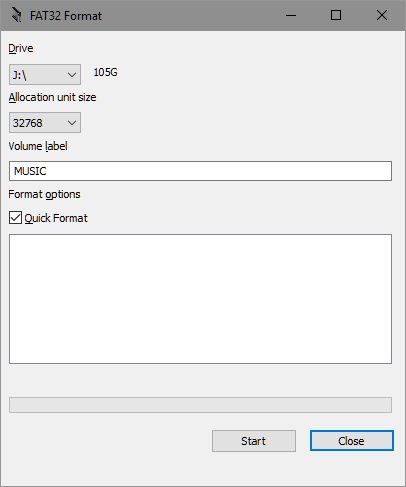
Select the proper drive letter from the pull-down (it may automatically select it for you). Leave the allocation unit size at whatever value the tool automatically selected. Add a label of MUSIC, and leave the Quick Format checkbox checked.
Click the Start button to format the partition.
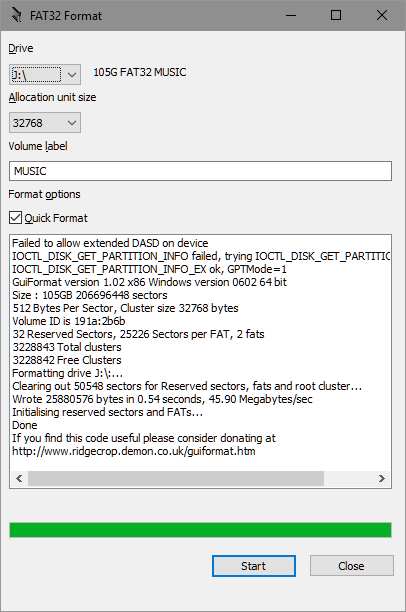
14. Once the format is completed, the tool will inform you and look like this:
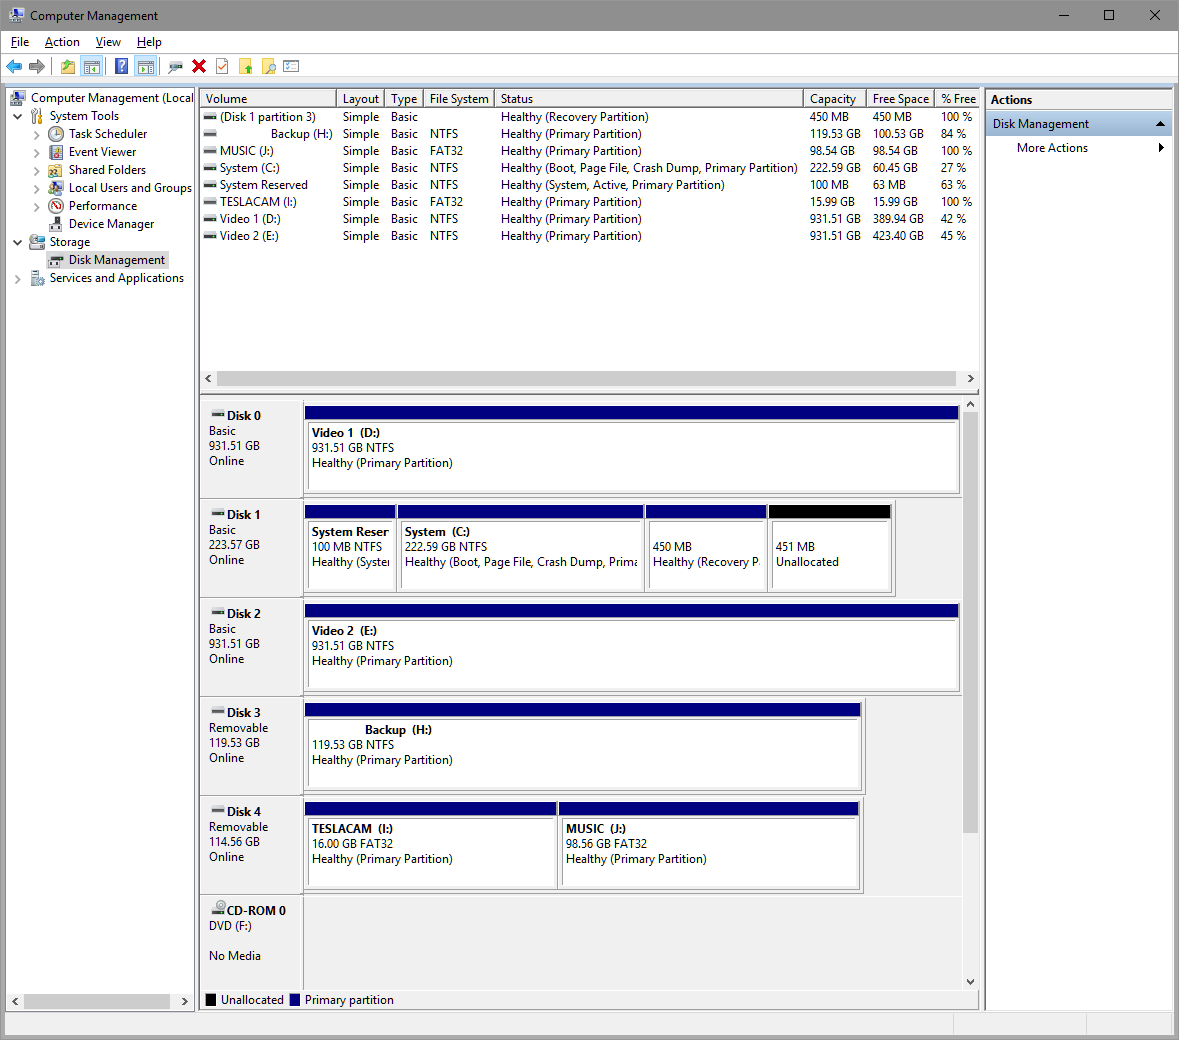
15. If you run Computer Management one more time, you'll see both partitions now:
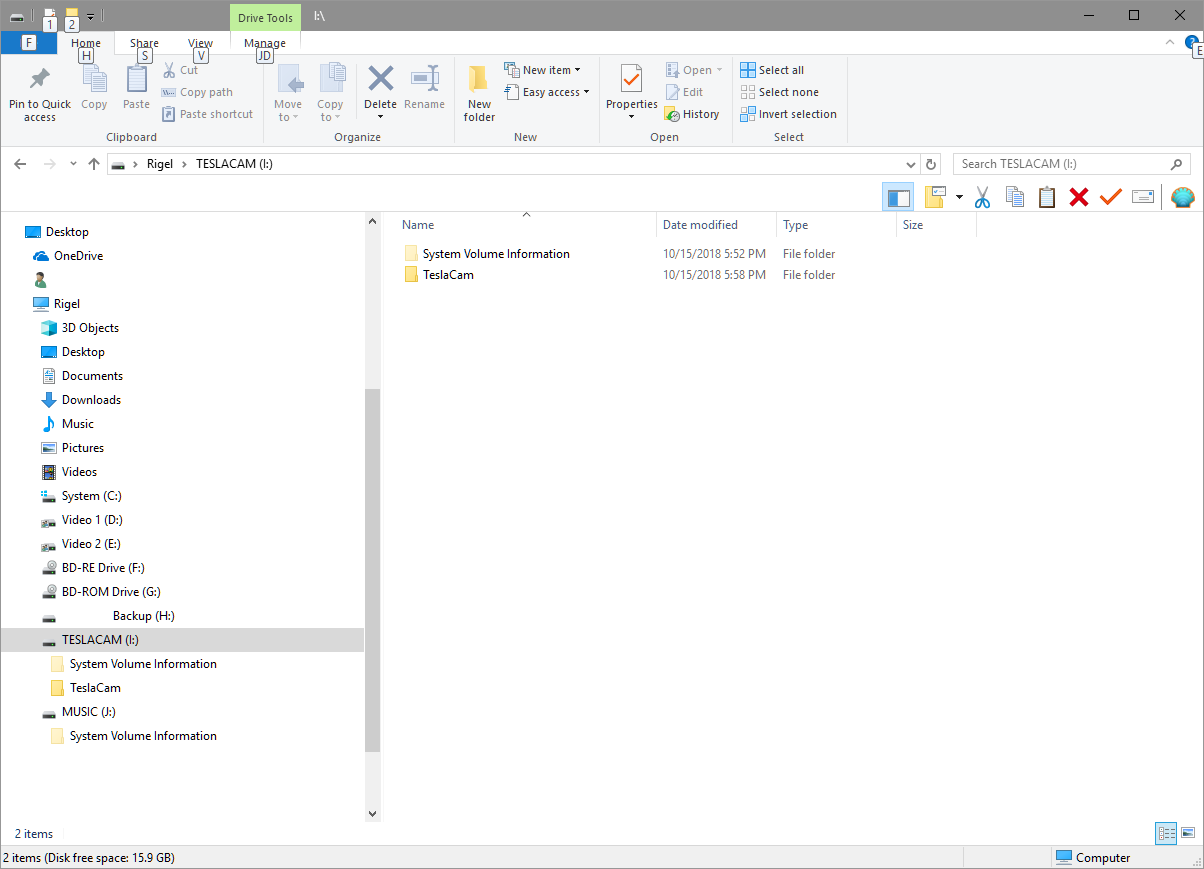
16. In Windows Explorer, you'll see both of your drives available. On my computer, they were the I: and J: drives, on your computer they'll probably be different.
Create a folder "TeslaCam" on the TESLACAM drive as shown below. This is very important, the dashcam will not write to your drive without this folder.
17. Copy any and all music you'd like to listen to to the MUSIC drive.
18. Once your music has finished copying to the MUSIC drive, right-click the MUSIC drive and select Eject. This will allow you to safely remove the USB drive from the computer. You can now go plug it into the car. Check that the dashcam is working (you'll get the dashcam icon with the red dot, indicating it's recording), and then check the USB drive under media to see your music.
Notes and Caveats
I've been running this setup for 24 hours and the dashcam has not stopped working, even with powering down the car, pulling the USB drive while the dashcam is recording, etc. Now, this does not mean that Tesla doesn't still need to work on the dashcam processing because it still corrupts some of the files.
Specifically, the last file that the dashcam is actively recording to when the USB drive is removed or the car is shut down (which powers off the USB ports) is always corrupted and unusable. When the USB drive starts back up on the next power-up, the file system check (FSCK) will run, and will usually find the corrupted sectors of the final file and recover them to some ".FSCK" files that will be on the root of the USB drive (not inside the TeslaCam folder). Periodically you will need to go delete these files so that they don't eat up space. I'd say once a month, remove the USB drive and delete them on your computer.
The FSCK utility recovers those sectors, but doesn't properly allocate them in the file allocation table. When you plug your USB drive back into a Windows computer, Windows will complain that the drive has errors and needs to be scanned. Let it do so, the sector allocation will be fixed.
None of those issues will prevent the dashcam from operating, though. It will still record and save footage.
Note that all of this has received very little testing and scrutiny, and I could be wrong on small pieces of this, or a good amount of it, or possibly the whole thing.") Please post any corrections, discoveries, or other caveats below, we'll eventually come up with good work-arounds.
Please post any corrections, discoveries, or other caveats below, we'll eventually come up with good work-arounds.
I find the requirement for a separate USB drive for music and the v9 dashcam feature to be annoying. Without some type of work-around, that would use both USB ports in the front of the car, leaving you with no USB port for phone charging. It's been reported that you can partition the USB drive into two separate partitions and make a single USB drive work for both dashcam and music, but this is not the easiest thing to do on Windows.
I've tested a lot of configurations over the past 2 days and I think I've finally come up with a method that works reliably. This procedure shows you how to take a USB drive and partition it into 2 partitions so that you can use the drive for both music playback as well as the dashcam feature in version 9.
Like others, I've also had the issue where the dashcam will work at first, then the USB drive appears to become corrupted and the dashcam will no longer record. I believe this method gets around this problem as well. I have not had the dashcam stop recording when the drive is prepared like this.
Tools Required
- Windows 7, 8, 8.1, or 10. I've only tested this on Windows 10, but it should work all the way back to Windows 7. I wouldn't recommend this procedure on the Server operating systems (2008, 2008R2, 2012, 2012R2, 2016).
- A USB flash drive of your choice. I recommend a USB 3.0 flash drive, as these drives are typically made with flash memory that is faster than USB 2.0 drives. A decent choice is the SanDisk Ultra Fit drive, as it's physically very small, relatively inexpensive, and has good (though not outstanding) performance. This USB drive will have all data deleted during this procedure, make sure you have moved any important files somewhere else.
- You will need the 3rd-party Fat32Formatter utility to format the music partition, as Windows cannot format a partition larger than 32GB in FAT32. Do not use this utility to format the TeslaCam partition, this is what causes the corruption that stops the dashcam from working.
Your USB drive probably comes already formatted with the NTFS file system. The Tesla will not read this file system so we have to delete it and create the partitions we want.
1. Insert your new USB drive in the computer and open Windows Explorer (Windows Key + E). Find the drive letter that your USB drive appears on. On my computer, it appeared on drive I:, on yours it's likely to be a different drive letter. Right-click the drive and go to Properties. You should see something like this:
My 128GB drive is formatted as NTFS. We need to delete this so we can make our two FAT32 partitions.
2. Click the magnifying glass next to your Windows start menu, and search for "Computer Management", like this:
Click the Computer Management icon to run the Computer Management application.
3. In the left colum, expand the Storage node, then click on Disk Management. You will see a list of all of your drives and the partitions they contain. It will look something like this. My USB drive is listed as Disk 4, with the partition labeled as drive I:, but on your computer it's likely to be a different drive letter and different drive number.
4. Make sure you do the following on the correct drive. Right-click the USB drive partition and click Delete Volume.
You will be asked to confirm that you want to delete the partition. Look again and make sure you're deleting the USB drive's partition, then click OK.
5. You will now have a blank USB drive with no partition on it. Note that mine is listed as Disk 4, yours is likely to be a different drive number.
Note the size of your USB drive, as this will help you identify the USB drive in the next steps. My USB drive is showing as 114 GB.
Close Computer Management at this point, we will run it again later, but it cannot be open during the next steps.
6. Click the magnifying glass next to your Windows start menu, and search for "diskpart.exe", like this:
Run the diskpart.exe utility by clicking on the icon. Diskpart will ask you for Admin privileges when it launches.
7. Diskpart is a command-line utility that runs in a command window. It will look like this:
We will be using the diskpart utility to create our partitions. We cannot use Computer Management to do it because Computer Management will force us to format the partitions at the time of their creation, and the only options will be NTFS or exFAT.
8. Enter the following commands, exactly as shown, into the diskpart command window, one at a time, hitting Enter at the end of each line. Replace the "#" sign in the second line with the disk number of your USB drive. You can see the disk number in the output of the "list disk" command from the first line. On my computer, my USB drive was disk 4. Yours will probably be different. Look for the size of the USB drive that you noted at the end of step 5 (mine was 114 GB), this will help you identify the disk number.
Code:
list disk
select disk #
list partition
Once you have entered these commands, you'll have some output in your command window that looks like this:
You can see here that the output from the list disk command shows my USB drive as disk 4, which is the same disk number that Computer Management showed. I then selected this disk with the select disk command, then listed its partitions with the list partition command. It correctly shows that there are no partitions on this disk.
9. We will now create the partitions we need on the USB drive. We will be creating a 16GB partition for the Tesla dashcam functionality, then a 2nd partition that uses the remainder of the USB drive for music. Enter the following commands, exactly as shown, into the diskpart window, one at a time, hitting Enter at the end of each line:
Code:
convert gpt
create partition primary size=16384 align=1024
create partition primary align=1024
list partition
Once complete, you'll have output in your command window that looks like this:
You can see that two partitions have now been created.
Close the diskpart command window by typing:
Code:
exit10. Run the Computer Management utility again using the same procedure as in step 2 (click magnifying glass to search, type in Computer Managment). Go to Storage -> Disk Management. Your USB drive will now show two "RAW" partitions. We now need to format them to the FAT32 file system format. Right-click the first 16GB partition and select Format:
11. The format window will come up asking for details. Give this 16GB partition a volume label of "TESLACAM". Leave the file system as FAT32, the allocation unit size as Default, and the Perform a Quick Format checkbox checked. Click OK to format the partition.
This is the critical step that prevents the TESLACAM partition from getting corrupted and causing the dashcam to stop working. It seems that the 3rd-party FAT32 formatting utilities are creating a partition that has some type of minor problem that the Tesla FAT32 filesystem driver has problems with. When Windows is used to format the TESLACAM partition, this does not occur. (See notes below on file corruption, however).
While Windows cannot format a drive larger than 32GB with FAT32, it can and will operate with FAT32 drives that are larger. The FAT32 file system is designed for partitions up to 2 TB in size.
We do not need a partition larger than 16 GB for the Tesla dashcam. The dashcam is currently limited to storing 1 hour of footage from one camera, the total file size for this hour is approximately 1.8 GB. A 16 GB partition should therefore be enough to hold 1 hour of footage from all 8 cameras if Tesla implements that (1.8 * 8 = 14.4 GB).
12. Once the TESLACAM partition is formatted you will see the FAT32 partition and a drive letter shown in Computer Management:
Close Computer Management, it should not be open for the next step.
13. We now need to format the music partition as FAT32. We cannot use the Windows format option for this partition because the partition is larger than 32 GB. We will use the 3rd-party formatter for this. Since the Tesla will not be writing to this partition (it will be reading your music files only), this will work. Note the drive letter assigned to the RAW partition above is the J: drive on my computer (yours will be different). We will need this drive letter in the next step.
Run the Fat32Formatter utility that you downloaded from the link in the Tools section (the executable is called guiformat.exe). The formatter will look like this:
Select the proper drive letter from the pull-down (it may automatically select it for you). Leave the allocation unit size at whatever value the tool automatically selected. Add a label of MUSIC, and leave the Quick Format checkbox checked.
Click the Start button to format the partition.
14. Once the format is completed, the tool will inform you and look like this:
15. If you run Computer Management one more time, you'll see both partitions now:
16. In Windows Explorer, you'll see both of your drives available. On my computer, they were the I: and J: drives, on your computer they'll probably be different.
Create a folder "TeslaCam" on the TESLACAM drive as shown below. This is very important, the dashcam will not write to your drive without this folder.
17. Copy any and all music you'd like to listen to to the MUSIC drive.
18. Once your music has finished copying to the MUSIC drive, right-click the MUSIC drive and select Eject. This will allow you to safely remove the USB drive from the computer. You can now go plug it into the car. Check that the dashcam is working (you'll get the dashcam icon with the red dot, indicating it's recording), and then check the USB drive under media to see your music.
Notes and Caveats
I've been running this setup for 24 hours and the dashcam has not stopped working, even with powering down the car, pulling the USB drive while the dashcam is recording, etc. Now, this does not mean that Tesla doesn't still need to work on the dashcam processing because it still corrupts some of the files.
Specifically, the last file that the dashcam is actively recording to when the USB drive is removed or the car is shut down (which powers off the USB ports) is always corrupted and unusable. When the USB drive starts back up on the next power-up, the file system check (FSCK) will run, and will usually find the corrupted sectors of the final file and recover them to some ".FSCK" files that will be on the root of the USB drive (not inside the TeslaCam folder). Periodically you will need to go delete these files so that they don't eat up space. I'd say once a month, remove the USB drive and delete them on your computer.
The FSCK utility recovers those sectors, but doesn't properly allocate them in the file allocation table. When you plug your USB drive back into a Windows computer, Windows will complain that the drive has errors and needs to be scanned. Let it do so, the sector allocation will be fixed.
None of those issues will prevent the dashcam from operating, though. It will still record and save footage.
Note that all of this has received very little testing and scrutiny, and I could be wrong on small pieces of this, or a good amount of it, or possibly the whole thing.
Please post any corrections, discoveries, or other caveats below, we'll eventually come up with good work-arounds.