Welcome to Tesla Motors Club
Discuss Tesla's Model S, Model 3, Model X, Model Y, Cybertruck, Roadster and More.
Register

Water in tail light

This site may earn commission on affiliate links.
Warranty expired last month and now some water is in one of my tail lights:

2016.12.17: Flooded Tail Light

It's not the old condensation issue in the reverse lights (I had the chrome applique replaced for that). Has anyone removed this piece and if so, how hard was it? Not sure if the water would affect the bulbs themselves, but it's a bit concerning. Definitely avoiding Tesla Service costs at this point.
 
Thanks, really appreciate the info.

Based on https://cdn.shopify.com/s/files/1/0196/5170/files/LightedRearAppliquecopy2.pdf, seems the appliqué involves cutting through some adhesive. I'd also need the proper adhesive to affix it back into place once repairs are done. This sounds like a joy of a project.

Applique attached with 3M automotive tape.

You have found the instructions from Rick/artsci's site (EV Appliques). Not as hard as it looks to slice through the tape with dental floss or the like.

Have fun!
 
I still have this problem and never got around to fixing it. I'm planning on doing this myself soon and last year when I asked someone at the Service Center about the part they mentioned it'd be around $300 for the light assembly, plus another $100 for the appliqué piece as a potential option.

A couple of self-help resources that I've come across:

Tail Light

 
Bought a replacement on ebay 109$. Easy 30 minutes replacement fix. I thought to "reverse engineer"/tear apart the light assembly to find out why its leaking. Here are some pics. Using a heat gun the clear plastic outer shell can be pried off the housing and being sure to remove the 4 nuts that hold the shells together. The LED lights are corroded so badly that its certainly an expensive and hard repair to solder those back in with replacements. I wonder if drilling a hold in these to allow H2O to drain might afford some relief. OR a 1 way valve to let water evaporate out?
 

Attachments

  • tesla light breakdown2.jpg
    tesla light breakdown2.jpg
    381.2 KB · Views: 407
  • tesla light breakdown.jpg
    tesla light breakdown.jpg
    422.2 KB · Views: 333
  • led.jpg
    led.jpg
    320.6 KB · Views: 344
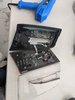
Not sure if others have found the same solution, but I think that I have a permanent fix. I had one tail light on the liftgate that was filled with water after a car wash, and dirty applique lenses as the video above showed. The seal/gasket on the back of the lamp was in proper place (not dropped down as many have shown), but it no longer made a water tight seal with the body panel (water went in from behind the gasket).

My fix was removing the factory seal/gasket and replace it with butyl seal (I used 3M Windo-Seal). First try, I used one bead of the butyl strip, but that didn’t seal completely, so I doubled up, putting one strip on top of the another. To test, I pressure washed the area and did mot see any moisture in the lamps (I also did the other lamp that hadn’t show problems yet but I felt I would eventually. In fact, I also did the applique).

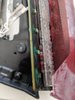
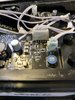
To remove the lamps, I removed all the plastic trims on the liftgate (top, side, and bottom, and unplugged all the wires). I removed the applique completely, because I wanted the lamps to go back in straight instead of having to slide them in from the side if the applique is place. I was glad I did because after removing it, I found that the seal in the upper edge of the applique had failed and allowed water to drench the camera and the license plate lamps from the top (there were already moderate amount of corrosion). I replaced that seal with one layer of butyl seal.

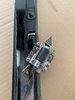
Removing the applique (I might be misspelling this BTW) was tricky. I removed it along with the plastic housing that holds the camera and the plate lamps as one piece, instead of prying it off. To reattach the applique I used one layer of butyl seal along the upper edge, and to the lamps, I used 3M auto moulding tape.

I have used the same butyl seal (for taillights) and moulding tape (for plastic body kits) on other cars before and they are still fine after 20 years in Southern Ontario and Northern US weather so I am expecting it to perform equally well in the P85+.
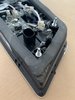
I didn’t take many pictures during the process.

Hope that this is helpful.
 

Attachments

  • 20279C5C-1973-4FAE-9CB0-A66D771C7652.jpeg
    20279C5C-1973-4FAE-9CB0-A66D771C7652.jpeg
    400.1 KB · Views: 325
  • 76986B9D-EB26-41BE-B7E2-77A4FAB9D8A7.jpeg
    76986B9D-EB26-41BE-B7E2-77A4FAB9D8A7.jpeg
    281.2 KB · Views: 322
  • E7736E56-3D5B-4E90-80E1-C72C510C6A8F.jpeg
    E7736E56-3D5B-4E90-80E1-C72C510C6A8F.jpeg
    283.2 KB · Views: 332