


Welcome to Tesla Motors Club
Discuss Tesla's Model S, Model 3, Model X, Model Y, Cybertruck, Roadster and More.
Register
Install the app
How to install the app on iOS
You can install our site as a web app on your iOS device by utilizing the Add to Home Screen feature in Safari. Please see this thread for more details on this.
Note: This feature may not be available in some browsers.
-
Want to remove ads? Register an account and login to see fewer ads, and become a Supporting Member to remove almost all ads.
You are using an out of date browser. It may not display this or other websites correctly.
You should upgrade or use an alternative browser.
You should upgrade or use an alternative browser.
What have you done to your Roadster today (or lately)...
- Thread starter TOBASH
- Start date
Finally got around to a few mod's:
1. With the help of @slcasner (steve did most of the work) was able to add the third brake light mod. Really is a nice feature to have") .
.
2. While I had the third brake light out I changed out the dome light to a Super Bright LED 194-WHP6, what a difference now you can see inside the car.
3. Changed out the OEM radio to a Pioneer AVH-3500 NEX. What a difference in the sound.
4. The last thing I did was add a "Roadster" badge to the rear of the car. Took a Roadster Sport badge and removed the Sport portion.


1. With the help of @slcasner (steve did most of the work) was able to add the third brake light mod. Really is a nice feature to have
.2. While I had the third brake light out I changed out the dome light to a Super Bright LED 194-WHP6, what a difference now you can see inside the car
.3. Changed out the OEM radio to a Pioneer AVH-3500 NEX. What a difference in the sound
.4. The last thing I did was add a "Roadster" badge to the rear of the car.
Took a Roadster Sport badge and removed the Sport portion.rudholm
Member
Finally got around to a few mod's:
1. With the help of @slcasner (steve did most of the work) was able to add the third brake light mod. Really is a nice feature to have
2. While I had the third brake light out I changed out the dome light to a Super Bright LED 194-WHP6, what a difference now you can see inside the car
3. Changed out the OEM radio to a Pioneer AVH-3500 NEX. What a difference in the sound
4. The last thing I did was add a "Roadster" badge to the rear of the car.
View attachment 630369 View attachment 630370 View attachment 630371 View attachment 630372
Does the screen collide with the windshield wiper stalk when it extends/retracts?
da2ny
2010 Roadster Sport Twilight Blue #913
I installed a Pioneer AVH-3500 NEX in my Roadster and I used my trusty Dreml cutoff wheel to remove about 3/16" from the outer end of the stalk and then glued the end cap back onto the end. No clearance problems. Can't see any surgical scars.
I installed a Pioneer AVH-3500 NEX in my Roadster and I used my trusty Dreml cutoff wheel to remove about 3/16" from the outer end of the stalk and then glued the end cap back onto the end. No clearance problems. Can't see any surgical scars.
Woohoo!! nice, would love to see some videos how it functions.
Here are some of my installs,
stereo finished - video
splash screen - video
Does the screen collide with the windshield wiper stalk when it extends/retracts?
Since I installed the Pioneer radio I tried retracting the screen only once and per other comments on other threads regarding this upgrade if you pull back on the stalk while the screen is either extending or retracting it clears without any problems. I have left the screen extended, closed off the center vents (not even an issue here in AZ last summer with 115 degree heat) the cabin is so small the side vents provide sufficient cooling to make the car comfortable to drive.
smorgasbord
Active Member
Lou B
Member
The Carbon Fiber vents look great ! Did you install them your self ? I want to upgrade
Mine also. How long did the install take? Did you install from the wheel wells?
Thank you,
Lou
Mine also. How long did the install take? Did you install from the wheel wells?
Thank you,
Lou
smorgasbord
Active Member
The Carbon Fiber vents look great ! Did you install them your self ? I want to upgrade
Mine also. How long did the install take? Did you install from the wheel wells?
A fellow Roadster owner helped me install them. Yes, from the wheel wells. It's actually not that difficult. First, note that the studs are epoxied to the underside of the car body, so it's actually really easy to torque them off, even with hand tools. It's a 10mm size. Go slow and easy. I ripped once off. Repaired it with the epoxy gel that takes an hour or so to harden (sets in 10 minutes, maybe the longest 10 minutes of my life).
I'd start with the driver's side - it's easy to remove the subwoofer chamber (one screw) then you have pretty easy access to the three nuts. Leave the far nut on - the vent hole there is slotted so it can slide in/out. Having a helper to hold the new vent in place while you retighten the nuts is helpful. Just tighten until the nuts touch - then have the helper try to wiggle the vent and tighten whatever seems loose.
It's a bit tighter on the passenger side, but do-able. I've read you can alternatively remove the rear deck, but don't know how to do that. Anyway, took us a few hours, but if you know what you're doing I could see getting them done in 45 minutes.
Lou B
Member
Steve in SLO
Member
New wheels for # 364. It took me forever to find something I liked, but I think these are really great looking wheels and they are fairly priced.
They arrived within a week from Germany. The fronts are 16 x 7 ET+35, and the rears are 17 X7.5 ET +38. Weights are 16.4/19 # and they are TUV approved. The offsets work well, and the center bore is the same as our Roadsters, so they were very easy to install.
I bought them through tunershop.de. Although they list a Las Vegas location, it is not worth trying to make a contact there, since all wheels are shipped directly from Germany.
Below are links to the wheels and pictures.

 www.tunershop.com

 www.tunershop.com


They arrived within a week from Germany. The fronts are 16 x 7 ET+35, and the rears are 17 X7.5 ET +38. Weights are 16.4/19 # and they are TUV approved. The offsets work well, and the center bore is the same as our Roadsters, so they were very easy to install.
I bought them through tunershop.de. Although they list a Las Vegas location, it is not worth trying to make a contact there, since all wheels are shipped directly from Germany.
Below are links to the wheels and pictures.
Autec Wizard 7,0x16 ET35 5x110 16" Wheel gunmetal matt
Autec Wizard 7,0x16 ET35 5x110 16" Wheel gunmetal matt for Alfa Romeo Fiat Jeep Opel
www.tunershop.com
Autec Wizard 7,5x17 ET38 5x110 17
Autec Wizard 7,5x17 ET38 5x110 17" Gunmetal matt for Alfa Romeo Fiat Jeep Opel Innovative and colourfulType W - Wizard demonstrates AUTECs innovative streng
www.tunershop.com
Most long-time owners in the US pretty much know about Medlock and Sons, Gruber Motor Works, Executive Motor works and Electric Garage who all do maintenance work, repairs, install and upgrades to the Roadsters. Some of the newer owners do not. There are some comparable shops in Europe as well between all of them they keep these precious jewels on the road.
Making progress on new carbon parts for the update and retro fit for our car. After months and months of scouring the forum and e-bay I had grand total of two carbon parts that both need to be refinished and a bunch of misses. So, I had to find, set up and work with multiple sources to get all the items and parts made we wanted to add to our car. The only way I was going to be able to get it done was to have them made. It is still work in progress on some of the parts as well as some additional ones. I am working to see how to create a network for other owners who might want some of these same parts. Some are easy DYI installs others are not. I know there are some other items some owners want to do that do not exist today. May be create a wish list for the other items if there is enough interest. I know Replacement Battery top of the list.
In the US Carl Medlock has made some of these parts as well as several others for 1.5, 2.0 and 2.5 cars as well a couple that our on our wish list.
There are couple of other roadster owners who also make some carbon parts Henry Sharp taillights (wish list) and TexEv makes several different parts (some on my wish list). If there is anyone else someone, please let me know and what they are making.
Here are a few pictures of my new carbon candy.
Steering wheel Flat Bottom. (Use your existing one for round style)
Steering wheel ring
Door sills
Door inserts
Rear spoiler Blade
Binnacle
Airbag Bag Dash cover driver side Passenger
Rear Vents
Side Mirrors
Carbon candy coming next week.
Dash End Caps
Double Din Parts
Door handles both parts
Brake handle
Charge Port Cover
Dash
Next round to work on in carbon
Front Vanes only for the hood
V Front 2.5 lip
Front Vents for 2.5
Center Console interior 2.5
Grill Modification 2.5
(There is one of the shops I found that can do forged with matching body colors on any of the parts if anyone is interested there is another one can do flaked or Kevlar colors and carbon)


.jpg")
.jpg")
Also Working on
Custom Matts
Digital Dash upgrade
Taillights
Making progress on new carbon parts for the update and retro fit for our car. After months and months of scouring the forum and e-bay I had grand total of two carbon parts that both need to be refinished and a bunch of misses. So, I had to find, set up and work with multiple sources to get all the items and parts made we wanted to add to our car. The only way I was going to be able to get it done was to have them made. It is still work in progress on some of the parts as well as some additional ones. I am working to see how to create a network for other owners who might want some of these same parts. Some are easy DYI installs others are not. I know there are some other items some owners want to do that do not exist today. May be create a wish list for the other items if there is enough interest. I know Replacement Battery top of the list.
In the US Carl Medlock has made some of these parts as well as several others for 1.5, 2.0 and 2.5 cars as well a couple that our on our wish list.
There are couple of other roadster owners who also make some carbon parts Henry Sharp taillights (wish list) and TexEv makes several different parts (some on my wish list). If there is anyone else someone, please let me know and what they are making.
Here are a few pictures of my new carbon candy.
Steering wheel Flat Bottom. (Use your existing one for round style)
Steering wheel ring
Door sills
Door inserts
Rear spoiler Blade
Binnacle
Airbag Bag Dash cover driver side Passenger
Rear Vents
Side Mirrors
Carbon candy coming next week.
Dash End Caps
Double Din Parts
Door handles both parts
Brake handle
Charge Port Cover
Dash
Next round to work on in carbon
Front Vanes only for the hood
V Front 2.5 lip
Front Vents for 2.5
Center Console interior 2.5
Grill Modification 2.5
(There is one of the shops I found that can do forged with matching body colors on any of the parts if anyone is interested there is another one can do flaked or Kevlar colors and carbon)
Also Working on
Custom Matts
Digital Dash upgrade
Taillights
Steve in SLO
Member
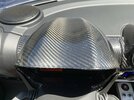
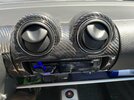
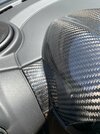
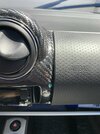
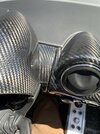
Bought carbon fiber an instrument cowl and central vent cover for my 1.5. These were eBay purchases from China-based seller stonecarbon2009, and were advertised as Lotus Elise and roadster bits.
Each was $201 and the combined the shipping was $50.
They were not exzctly plug and play, as I had to remove some fairly thick resin application from some of the edges so that they would lie flat against each other, and had to grind out the vent openings by about 1.5 mm with a Dremel so that the vent caps would fit. All that took me about 30 minutes and a couple of trips back to the garage to test fit.
Altogether pretty pleased with the workmanship and fitment. They are not perfect but good enough for my standards, and look pretty nice, IMHO.
Attachments
-
 0657F3A2-02A4-44F3-94B2-8074CDFC4F82.jpeg474.9 KB · Views: 43
 -
 DAE3D567-0721-4523-AE9D-973E83E5BFF5.jpeg511.6 KB · Views: 42
 -
 30660251-AA68-406C-8830-9F4F358DFF77.jpeg598.7 KB · Views: 47
 -
 B9CA42F6-BAB1-4995-BF39-26160F940F9E.jpeg520.6 KB · Views: 52
 -
 68360682-3917-43A4-B3E0-0A7B01D1BEC4.jpeg527.3 KB · Views: 42
JaxonDM
Member
My buddy got this Roadster project that we'll work on after we finished installing the bumper and smittybilt tailgate on the Wrangler this week. Bet he'll like more this kind of cosmetic mods.A fellow Roadster owner helped me install them. Yes, from the wheel wells. It's actually not that difficult. First, note that the studs are epoxied to the underside of the car body, so it's actually really easy to torque them off, even with hand tools. It's a 10mm size. Go slow and easy. I ripped once off. Repaired it with the epoxy gel that takes an hour or so to harden (sets in 10 minutes, maybe the longest 10 minutes of my life).
I'd start with the driver's side - it's easy to remove the subwoofer chamber (one screw) then you have pretty easy access to the three nuts. Leave the far nut on - the vent hole there is slotted so it can slide in/out. Having a helper to hold the new vent in place while you retighten the nuts is helpful. Just tighten until the nuts touch - then have the helper try to wiggle the vent and tighten whatever seems loose.
It's a bit tighter on the passenger side, but do-able. I've read you can alternatively remove the rear deck, but don't know how to do that. Anyway, took us a few hours, but if you know what you're doing I could see getting them done in 45 minutes.
Similar threads
- Replies
- 16
- Views
- 720
- Replies
- 22
- Views
- 2K
- Replies
- 32
- Views
- 2K
- Replies
- 3
- Views
- 408