


Welcome to Tesla Motors Club
Discuss Tesla's Model S, Model 3, Model X, Model Y, Cybertruck, Roadster and More.
Register
Install the app
How to install the app on iOS
You can install our site as a web app on your iOS device by utilizing the Add to Home Screen feature in Safari. Please see this thread for more details on this.
Note: This feature may not be available in some browsers.
-
Want to remove ads? Register an account and login to see fewer ads, and become a Supporting Member to remove almost all ads.
You are using an out of date browser. It may not display this or other websites correctly.
You should upgrade or use an alternative browser.
You should upgrade or use an alternative browser.
Brightonuk
Member
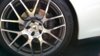
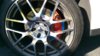
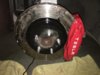
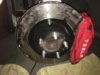
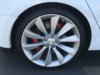
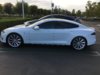
My attempt at Caliper painting:
Front


Rear


Bits an Pieces:
G2 Mustang Fire Red (I chose this over the basic red as it had more of a pop to the basic red)
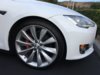
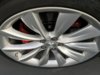
Tesla Brake Caliper Stickers (I got black and white and the wife decided that white was the way to go)
Harbor Freight Trolley Jack
Hockey Puck (Use this on the jack cradle to protect the jack point)
Harbor Freight 24" Breaker bar (Those wheel lugs can be tight)
Harbor Freight Impact Wrench (not needed but makes it fast to remove the lugs once they are loose)
Harbor Freight Torque Wrench 150lbs
4 Small plastic pots
As I am in Florida and it is still rather warm I was afraid that I would not have enough working time with the G2, I did not have the correct jack stands to jack the car and remove all four wheels at once so I had to do one wheel at a time
The G2 stated working time is 2-4 hours once you add the accelerator to the paint, I split the paint into three pots, two to work with and a little extra to touch up after the paint had dried, adding the accelerator when I used the paint.
Use light coats and watch for runs
3M outdoor masking tape
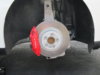
TAPE OFF PARTS THAT DO NOT NEED PAINT Hub Rubber caps etc.
6 Home Depot 1" 69c paint brushes
Watching You Tube videos it was suggested to use these cutting off about an inch of bristles this makes the brush stiffer (OK this I think some small stiff artist brushes would have worked better you can get these from Michaels or any craft store. I did not like the finish the depot brushes gave me, but using a small brush will take more time so splitting the paint as previously described is the way to go if you do use a smaller softer brush.
I used a very small brush to get to the tight areas but still managed to get paint on the hubs and spots where it should not be, hence mask off the parts you don't want paint on.
22ple VM1 Rim & Metal Coating This is a expensive way to try to protect the letters I heard that high temp clear coat can yellow so I decided on this route I will update if it works after a few months.
Mistakes
Cutting off to much from the bristles on the paint brushes.
Checking I did not leave the odd bristle in the paint, I got most but missed one or two as pointed out by the wife and when she pulled these it left a small imperfection which I will touch up in a few weeks)
Not taking enough care when painting, when I went back the day after I see some brush marks, thin areas and a few small runs.
Not wearing latex gloves (I now have red paint on my nails that will not come off)
Not letting the wife do the whole thing with a tiny artist brush.
I did let her apply the letters as she is very very carful and spent time marking where they should go so they are perfectly aligned.
You do not get a second chance with this, once you touch the letter against the paint the letter adheres to the paint so get this right the first time (or ask the wife to do it).

I will buy another kit to touch up the thin parts , or where we pulled the bristles from the partially cured paint but that can wait a few weeks till the paint has fully cured.
It took me three days in total as you cant drive your car until the paint has dried and you must wait and let the paint dry to a "no tack" before applying the letters.
Total cost with all the tools about $225 the 22ple was $60+ way over priced IMO (If I had all the tools Jack, Torque wrench) I could have done this for under $100
If I went with Powder coating it was $1k with storage (4 days)
New Tesla red calipers $?? but more that $225.
Front
Rear
Bits an Pieces:
G2 Mustang Fire Red (I chose this over the basic red as it had more of a pop to the basic red)
Tesla Brake Caliper Stickers (I got black and white and the wife decided that white was the way to go)
Harbor Freight Trolley Jack
Hockey Puck (Use this on the jack cradle to protect the jack point)
Harbor Freight 24" Breaker bar (Those wheel lugs can be tight)
Harbor Freight Impact Wrench (not needed but makes it fast to remove the lugs once they are loose)
Harbor Freight Torque Wrench 150lbs
4 Small plastic pots
As I am in Florida and it is still rather warm I was afraid that I would not have enough working time with the G2, I did not have the correct jack stands to jack the car and remove all four wheels at once so I had to do one wheel at a time
The G2 stated working time is 2-4 hours once you add the accelerator to the paint, I split the paint into three pots, two to work with and a little extra to touch up after the paint had dried, adding the accelerator when I used the paint.
Use light coats and watch for runs
3M outdoor masking tape
TAPE OFF PARTS THAT DO NOT NEED PAINT Hub Rubber caps etc.
6 Home Depot 1" 69c paint brushes
Watching You Tube videos it was suggested to use these cutting off about an inch of bristles this makes the brush stiffer (OK this I think some small stiff artist brushes would have worked better you can get these from Michaels or any craft store. I did not like the finish the depot brushes gave me, but using a small brush will take more time so splitting the paint as previously described is the way to go if you do use a smaller softer brush.
I used a very small brush to get to the tight areas but still managed to get paint on the hubs and spots where it should not be, hence mask off the parts you don't want paint on.
22ple VM1 Rim & Metal Coating This is a expensive way to try to protect the letters I heard that high temp clear coat can yellow so I decided on this route I will update if it works after a few months.
Mistakes
Cutting off to much from the bristles on the paint brushes.
Checking I did not leave the odd bristle in the paint, I got most but missed one or two as pointed out by the wife and when she pulled these it left a small imperfection which I will touch up in a few weeks)
Not taking enough care when painting, when I went back the day after I see some brush marks, thin areas and a few small runs.
Not wearing latex gloves (I now have red paint on my nails that will not come off)
Not letting the wife do the whole thing with a tiny artist brush.
I did let her apply the letters as she is very very carful and spent time marking where they should go so they are perfectly aligned.
You do not get a second chance with this, once you touch the letter against the paint the letter adheres to the paint so get this right the first time (or ask the wife to do it).
I will buy another kit to touch up the thin parts , or where we pulled the bristles from the partially cured paint but that can wait a few weeks till the paint has fully cured.
It took me three days in total as you cant drive your car until the paint has dried and you must wait and let the paint dry to a "no tack" before applying the letters.
Total cost with all the tools about $225 the 22ple was $60+ way over priced IMO (If I had all the tools Jack, Torque wrench) I could have done this for under $100
If I went with Powder coating it was $1k with storage (4 days)
New Tesla red calipers $?? but more that $225.
Attachments

Last edited:

green1
Active Member
Looks great! and I wouldn't worry about some minor brush strokes or places where bristles were pulled out, they don't show up in the photos, and they're behind the wheels of your car anyway, I'm sure you and your wife are the only ones who will ever notice any imperfections. I like it. good work!
Surfah
Member
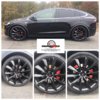
I just got mine painted by Tyler from AFX Customs in Orange County, CA
Tyler
AFX Customs
(949)244-1701
Tyler
AFX Customs
(949)244-1701
Attachments


Surfah
Member
I just got mine painted by Tyler from AFX Customs in Orange County, CA
Tyler
AFX Customs
(949)244-1701
Tyler also painted the rusting wheel rotor hubs that many Teslas have
FlatSix911
Porsche 918 Hybrid
Good instructions for a DIY project ... well done!
My attempt at Caliper painting: Bits an Pieces:
G2 Mustang Fire Red (I chose this over the basic red as it had more of a pop to the basic red)
Tesla Brake Caliper Stickers (I got black and white and the wife decided that white was the way to go)
Harbor Freight Trolley Jack
Hockey Puck (Use this on the jack cradle to protect the jack point)
Harbor Freight 24" Breaker bar (Those wheel lugs can be tight)
Harbor Freight Impact Wrench (not needed but makes it fast to remove the lugs once they are loose)
Harbor Freight Torque Wrench 150lbs
4 Small plastic pots
As I am in Florida and it is still rather warm I was afraid that I would not have enough working time with the G2, I did not have the correct jack stands to jack the car and remove all four wheels at once so I had to do one wheel at a time The G2 stated working time is 2-4 hours once you add the accelerator to the paint, I split the paint into three pots, two to work with and a little extra to touch up after the paint had dried, adding the accelerator when I used the paint.
Use light coats and watch for runs
3M outdoor masking tape
TAPE OFF PARTS THAT DO NOT NEED PAINT Hub Rubber caps etc.
6 Home Depot 1" 69c paint brushes
Watching You Tube videos it was suggested to use these cutting off about an inch of bristles this makes the brush stiffer (OK this I think some small stiff artist brushes would have worked better you can get these from Michaels or any craft store. I did not like the finish the depot brushes gave me, but using a small brush will take more time so splitting the paint as previously described is the way to go if you do use a smaller softer brush. I used a very small brush to get to the tight areas but still managed to get paint on the hubs and spots where it should not be, hence mask off the parts you don't want paint on. 22ple VM1 Rim & Metal Coating This is a expensive way to try to protect the letters I heard that high temp clear coat can yellow so I decided on this route I will update if it works after a few months.
Mistakes
Cutting off to much from the bristles on the paint brushes.
Checking I did not leave the odd bristle in the paint, I got most but missed one or two as pointed out by the wife and when she pulled these it left a small imperfection which I will touch up in a few weeks)
Not taking enough care when painting, when I went back the day after I see some brush marks, thin areas and a few small runs.
Not wearing latex gloves (I now have red paint on my nails that will not come off)
Not letting the wife do the whole thing with a tiny artist brush.
I did let her apply the letters as she is very very carful and spent time marking where they should go so they are perfectly aligned. You do not get a second chance with this, once you touch the letter against the paint the letter adheres to the paint so get this right the first time (or ask the wife to do it).
View attachment 72449
I will buy another kit to touch up the thin parts , or where we pulled the bristles from the partially cured paint but that can wait a few weeks till the paint has fully cured. It took me three days in total as you cant drive your car until the paint has dried and you must wait and let the paint dry to a "no tack" before applying the letters.
Total cost with all the tools about $225 the 22ple was $60+ way over priced IMO (If I had all the tools Jack, Torque wrench) I could have done this for under $100 If I went with Powder coating it was $1k with storage (4 days) New Tesla red calipers $?? but more that $225.
Calipers R US
New Member
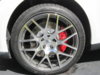
updated photo of painted calipers with the stickers (that arrived today) just installed,
on top of the stickers I applied a clear coat of high-temp spray paint, see for yourself
www.calipersrus.com
Similar threads
- Replies
- 4
- Views
- 2K
- Replies
- 0
- Views
- 255
- Article
- Replies
- 3
- Views
- 3K
- Replies
- 2
- Views
- 1K