


Welcome to Tesla Motors Club
Discuss Tesla's Model S, Model 3, Model X, Model Y, Cybertruck, Roadster and More.
Register
Install the app
How to install the app on iOS
You can install our site as a web app on your iOS device by utilizing the Add to Home Screen feature in Safari. Please see this thread for more details on this.
Note: This feature may not be available in some browsers.
-
Want to remove ads? Register an account and login to see fewer ads, and become a Supporting Member to remove almost all ads.
You are using an out of date browser. It may not display this or other websites correctly.
You should upgrade or use an alternative browser.
You should upgrade or use an alternative browser.
Replacing Onboard Charger Gen3 2017 MS75D...My Experience (With Photos)
- Thread starter dbldwn02
- Start date

Yea, that wasn't available to normies when I posted this way back when. I'd like to think they plagiarized my work. LolThe is a full DIY on all models how to replace the onboard charger on tesla service website. You need to create and account and there you can find a complete how to.
You think it's ok for us just to post the pdf here? Not sure if it's against the rules or not.
Zeemo
Member
I dont think that this should be a problem.Yea, that wasn't available to normies when I posted this way back when. I'd like to think they plagiarized my work. Lol
You think it's ok for us just to post the pdf here? Not sure if it's against the rules or not.
enterandre
New Member
Made an account to say that your post was immensely useful, thank you. I would not have attempted to try this had it not been for your trial and error. I want to also to share my experience in case other people run into the same problems or are trying to diagnose their charger.Here is my experience replacing my onboard charger on my 2017 Tesla MS75D.
Disclosure…
Don’t try this at home, YMMV, High voltage, you can kill yourself if you do something stupid, yadda-yadda, I’m not liable if you do this, warranty void, blah blah blah…
My car specs:
Symptoms:
- 2017 MS 75D (USA)
- Gen 3 charger
- Part # 1052532-00-D Rev01
- >ADC12< 113492 XS 1-1
- XS 2-1 WILL NOT WORK IF YOU’RE REPLACING XS 1-1
- 48amps – Single Charger
So, I could have kept limping along at 24amps (50%) until it gave out all the way, but that doesn’t seem right to do that on a 5-year-old Tesla.
- While using Level 2 chargers, my amps would jump around from 0-24 and then settle at 24 amps
- Tesla Mobile Connector capable of 40amps
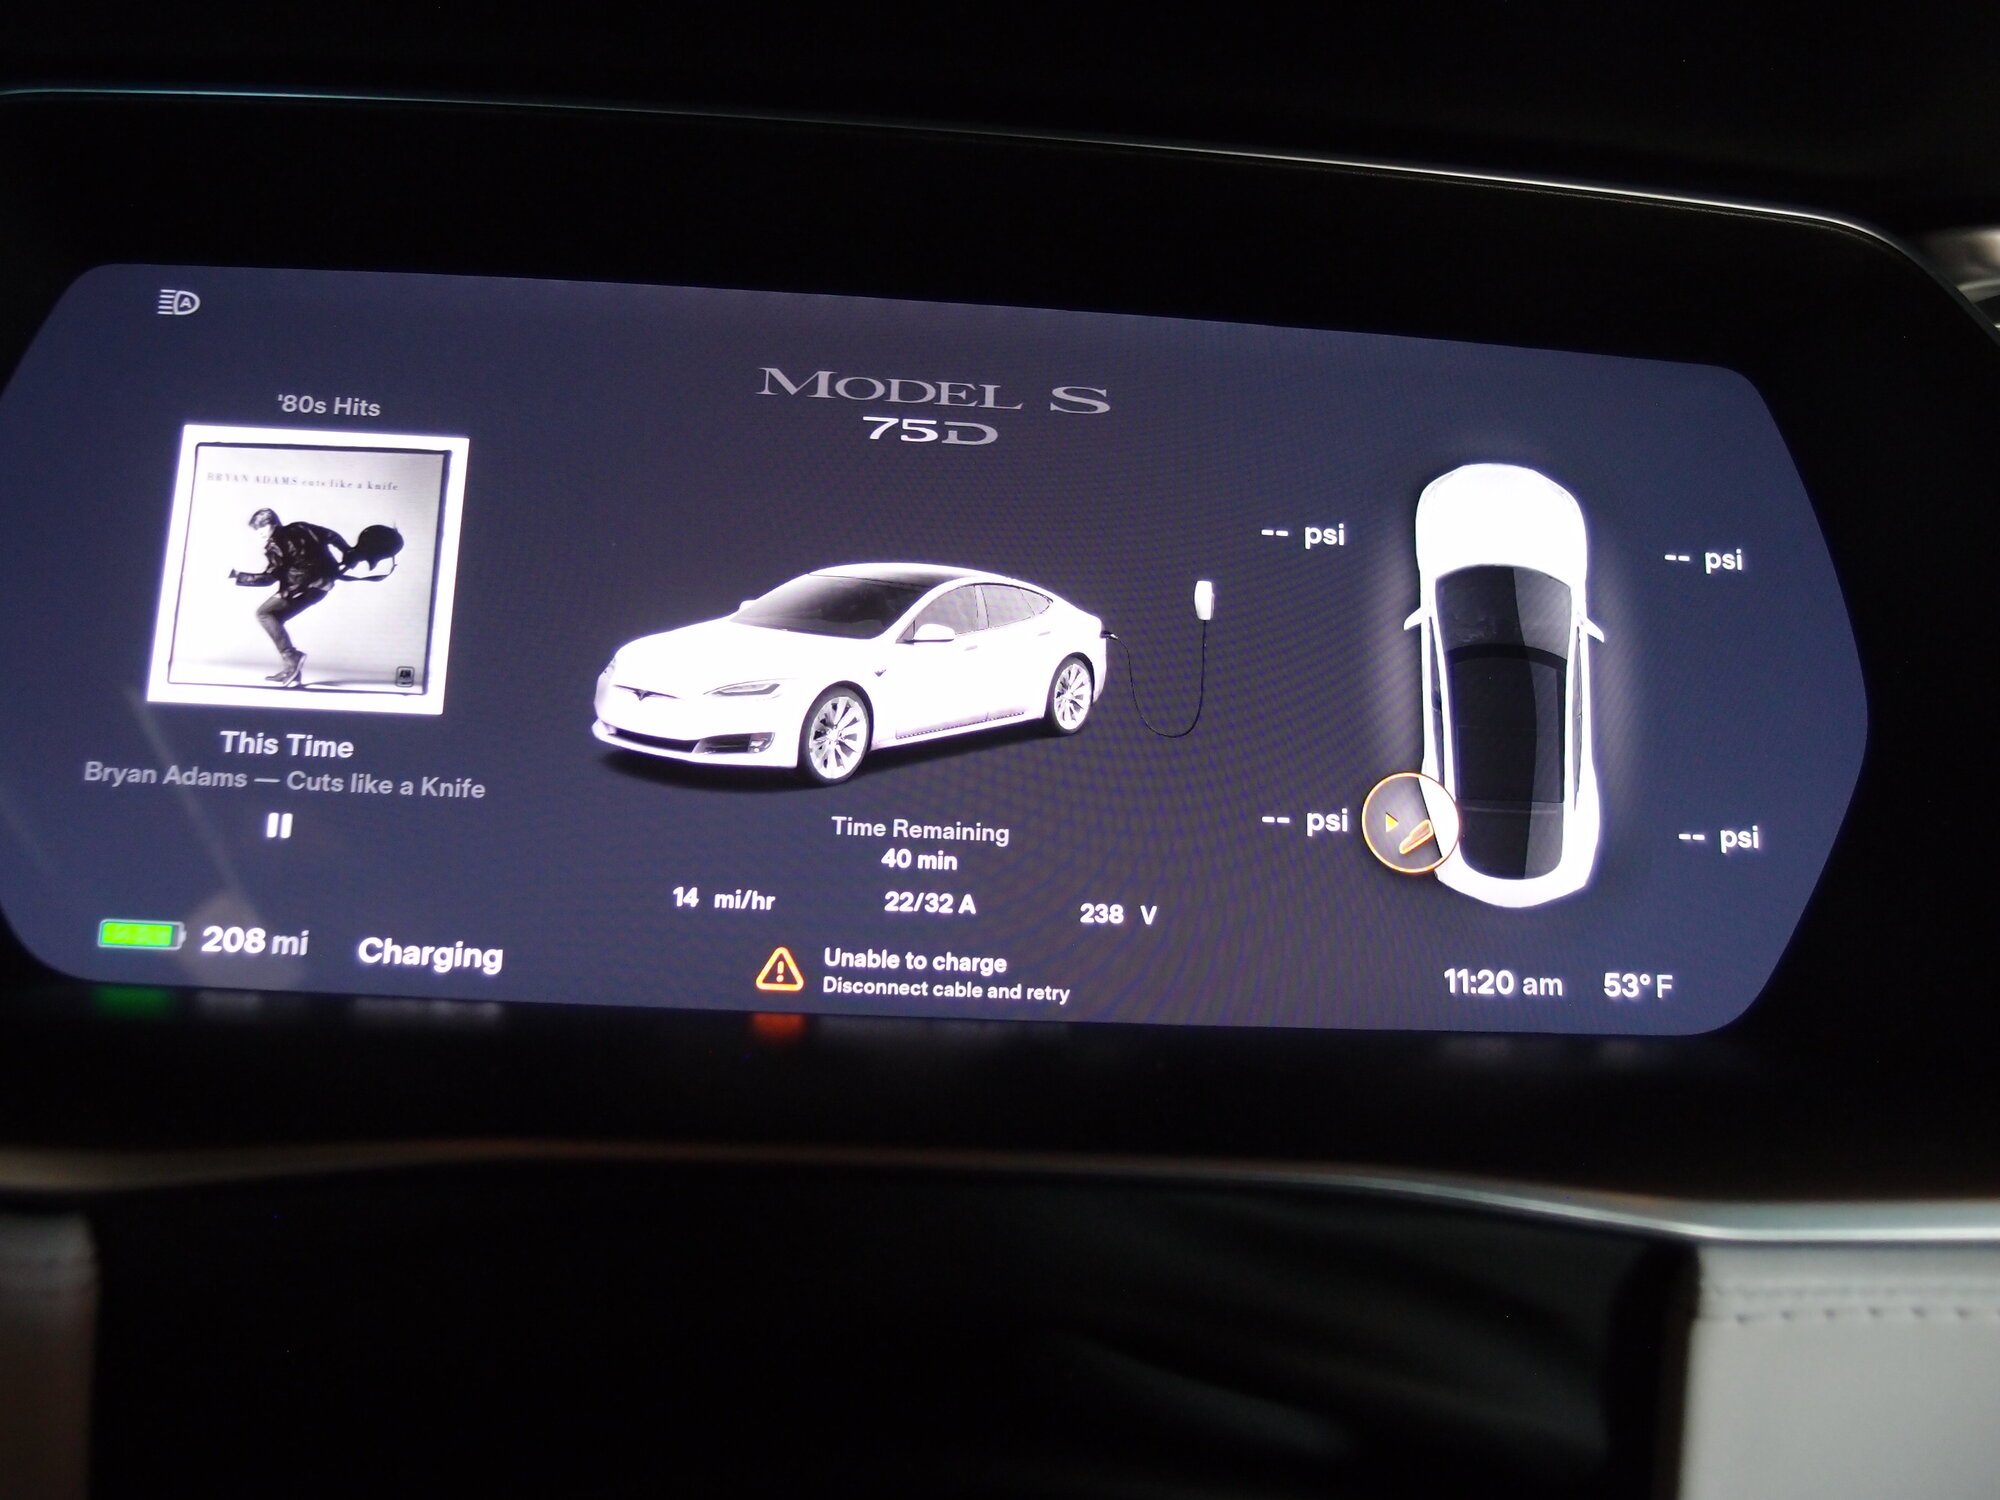
- Multiple errors including:
- Unable to charge, check charging equipment
- Unable to charge, disconnect cable and retry
- Charge speed reduced, unplug and try again
- Notice how it never blamed on the on-board charger???
- This software oversight was disappointing
- How hard would it be to just say, “Your onboard charger is half-broken”?
- I tried charging with my wife’s 1772…no change
- Took it to a Tesla Destination charger (48amp capability) and it did the exact same thing
- Voltage never dropped during charging
- IMO, this ruled out a faulty charging port, which was replaced 18 months ago.
- Supercharging unaffected
First off, these don’t have the troublesome 50-amp fuses from Gen2 chargers. That was my first mistake. After removing the back seat, I could immediately see I had a different/newer charger.
Part # Warning
I bought a charger off EBay from a project car guy. (integrityholdings) He had a stack of them and was unloading them for $300. Unfortunately it was the XS2-1 instead of XS1-1. I didn’t think anything of it and put it in. Tons of errors. I tried to redeploy firmware but it failed. I can only assume the XS2-1 is a slave from a 72amp dual charger setup. I got a hold of the seller and he was able to find an XS1-1. Restaged firmware, swapped charger, installed firmware, and all was good. Charging at a full 48amps now. No issues!
Tools Needed
Part 1 - Pre-Setup and Software Staging – Your car won’t be driveable if you don’t accomplish these procedures first!
- Torx Bits (T-20 – T-30)
- Sockets (Metric)
- Screwdrivers
- Multimeter for checking High-Voltage (600V rating)
- If you don’t know how to use a multimeter for checking AC/DC voltages, you probably should stop here.
- Electrical gloves
- Wife to hold up coolant lines so they don’t spill everywhere
1. It’s almost guaranteed you’ll need to flash the firmware on the new charger after you install, so you’ll need to have a software update pending before you start the replacement
2. Go to a Tesla Service center or approved body shop (most body shops work but not all)
3. Push and hold on your Model in the Software Screen, let go after 5 seconds
View attachment 770641
4. Enter “service”
View attachment 770642
5. Remove speed limit
View attachment 770643
6. Back out of menu
7. Pick “Software Reinstall”
View attachment 770646
8. Pick “Full Reinstall”
- Partial Install probably works, but why chance it?
9. MCU will eventually show a software update is available.
- Could take up to an hour
- Do NOT install yet!
- Leave car in “Service Mode” just in case
10. Drive home
11. Ensure software update is ready to be installed before proceeding
Part 2 – Replacing Charger
1. Move driver and passenger seat all the way forward
2. Roll down windows and open all doors
3. Take pictures along the way, to help with re-assembly
4. Remove frunk…
-View attachment 770649
5. Disconnect 12V battery (negative terminal only) and fireman’s loop
View attachment 770650
6. Charger is located under rear bench seat
7. Pull up on the front part of the seat. There are two retaining clips that you’ll probably break in doing this. The only way to get it out without breaking them is to use a flat head screwdriver. I couldn’t get it, so I just pulled up hard on the seat. I’ll order more later.
8. Disconnect seat weight sensor connectors…3 of them
View attachment 770652
9. Remove side seat small pieces by pulling at the top, toward the front of the car. They should pop out.
10. Remove seat backs starting with the larger one. There’s a rod that connects them at the hinge point. You have to pull the seat toward the door to get it out.
View attachment 770653
11. Remove 8 bolts to release the cage. (Large Blue "Remove" is the seat trim piece that comes off in step 9.
View attachment 770654
12. Cage has one cable running to the frame of the car. Disconnect before removing cage
13. Remove cage to access the charger
14. Pull Blue PTC plug from charger
15. Red clip needs to be pulled to unlock it
16. Put on electrical gloves
17. Open small lid of charger to access 4 HV terminals (T-20 Torx screws)
18. Check terminals against chassis ground for voltage (AC AND DC).
- If more than a couple volts are present, STOP and make sure you disconnected 12V battery and don’t have your car hooked up to a charger.
View attachment 770656
19. Disconnect ground cables (2 of them) from charger (1 is Torx, 1 is a metric bolt)
20. Disconnect:
- 4 orange HV cables
- Nuts on input cables
- Torx on output cables
- The black retaining clips are a pain to release…use flat head screwdriver
21. Disconnect communication cable from far side of charger
- Red clip needs to be pulled to unlock it
22. Remove two bolts and two studs holding charger in place
23. Place towels under coolant lines
24. Get someone to hold coolant lines up
25. Disconnect coolant lines using pliers to release clamps
26. Plug coolant ports on charger if you have plugs, otherwise be prepared to make a mess
27. Remove charger and install new charger
28. Install coolant lines
29. Release Wife or Husband to go back inside
30. Reinstall ground cables, HV cables, comm cable, PTC Blue plug, etc…
31. Reinstall cage, rear seat, seat sensor cables, etc…
32. Connect Fireman's Loop and 12V battery
33. Errors will mostly likely pop up
34. Start firmware update
36. Cross fingers and get a drink (this will take a while)
37. Reinstall whatever left over pieces you have.
If all went well, congrats on saving $2500+
Specs:
2019 Model S 75D, May build. Charger failing at 80k miles. Almost always charged at home since new.
Charger: 1052532-00-D REV01 >ADC12< 113492 XS 2-1
Ebay car's charger was from a wrecked 2018 S 75D
Symptoms:
- Began charging at only 24 amps out of 48. My utility company has a tool that lets me monitor energy usage per hour, and the charging speed halved at about 1-2 hrs into a 5 hour charging session.
- Supercharging initially unaffected. Tried a supercharger during the first week I noticed it failing, and it charged at a rate typical for my SOC for about 10 minutes before I unplugged it.
- Tried supercharging about two weeks later, and the car refused to. Received errors CHG_w063 and CHG_w062, and car told me service required. This was the first time I saw any errors on my dash.
- Day after that, when leaning on the rear seat to pick something up from the back, the area on the rear seat directly above where the charger sits was hot. I had not driven it for about half an hour and the car was not plugged in. Checked periodically after that and it was the only time I noticed that area warm.
My differences in experience:
- In step 20: For the black retaining clips, I found it easier to unbolt the charger from the chassis first, undo the whole top cover of the old onboard charger (which has a lip that prevents good access to the clip), and then positioned the charger up just a bit while it was still connected to the coolant lines to get better access to the bottom part of the clips to remove them. I put the top cover on the bad charger back on to protect it from coolant spill from step 25 just in case my donor car's charger was bad.
- My 12v battery during the software update couldn't sustain a charge long enough to finish the update. My screens would go to black, and noticed that the door handle motors were a bit weaker. Ended up borrowing a friend's truck and kept my car's 12v connected to his with a jumper cable until the update was completed. I haven't changed my battery since new, so I'll have to replace that.
- The repair was initially successful, but would stop charging after about 10 minutes, with the error CHG_f099_noFlowDetected, and another message saying the charger was overheating, and to unplug and try again. I figured it was air in the coolant lines. I kept initiating charging, ran some accessories like the heater and a/c to hopefully get more coolant pumping, and topped off the coolant. After babysitting it for an hour and restarting the charging about 5 times, enough air left the system, and the car has been charging normally since -- about 3 days now for hours at a time on the full 48 amps. Also tried supercharging, and that also works now!
Total repair time with help from a friend was about 7 hours, about 1/3 of that was figuring out I needed more 12v support to get the software update completed. I recommend removing the rear seat before attempting the full repair or ordering the part to see what charger version you have to avoid potential problems, this is not something I would be happy doing twice.
This community is incredible. Thank you!
Thanks to dbldwn02 for his work and all the other people here. My situation is a bit different but still want to seek advice here.
I moved to Spain and brought my 2015 S with me for relatively low mileage free SC and overall very good shape. All the EU mods were completed but somehow along the way the phase 1 on the master charger failed (this makes it impossible to charge at 220V outlet or monophasic wall charger). Could be during the mods or just because it was the time. Tesla in Spain refuses to work on US cars that were modified (they don't do the mods so is BS), on charging issues, everything else they would service. They would also sell me the gen 2 charger. Looking at this and having computer engineering background, I could probably do it, however honestly I'm hesitant as I would not be able to go anywhere if the car is bricked. Ideally I would like to change the fuses in the gen 2 charger to avoid messing with everything else. Also I was under the impression that the charger will have to be programmed as master no?
I spent countless hours searching on how to replace the fuses in the gen 2 charger, however I could not find anything, even though everyone says you could (including dbldwn02). To add to the frustration I have seen a gen 2 open and all is glued in, was not sure what could be done or where the fuses were. Also searched for a place to do it for me but couldn't find anything in Spain.
Anyone could offer advice please?
Thanks!
Zeemo
Member
can you send a picture of that charger?Thanks to dbldwn02 for his work and all the other people here. My situation is a bit different but still want to seek advice here.
I moved to Spain and brought my 2015 S with me for relatively low mileage free SC and overall very good shape. All the EU mods were completed but somehow along the way the phase 1 on the master charger failed (this makes it impossible to charge at 220V outlet or monophasic wall charger). Could be during the mods or just because it was the time. Tesla in Spain refuses to work on US cars that were modified (they don't do the mods so is BS), on charging issues, everything else they would service. They would also sell me the gen 2 charger. Looking at this and having computer engineering background, I could probably do it, however honestly I'm hesitant as I would not be able to go anywhere if the car is bricked. Ideally I would like to change the fuses in the gen 2 charger to avoid messing with everything else. Also I was under the impression that the charger will have to be programmed as master no?
I spent countless hours searching on how to replace the fuses in the gen 2 charger, however I could not find anything, even though everyone says you could (including dbldwn02). To add to the frustration I have seen a gen 2 open and all is glued in, was not sure what could be done or where the fuses were. Also searched for a place to do it for me but couldn't find anything in Spain.
Anyone could offer advice please?
Thanks!
Yea, pictures are worth 10,000 words when dealing with Tesla chargers. Haha.can you send a picture of that charger?
Hopefully we can get you back up and running.
Also, what fault codes is it throwing.
can you send a picture of that charger?
Attachments


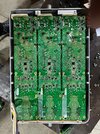
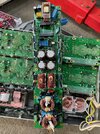
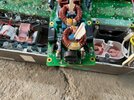
That's a gen 3 charger. What's the part number on the lid? Looks exactly like mine. 2017 MS.
No fuses to replace. You went way farther than I did. It just sounds like one of the three modules is bad. I don't ok now anyone who has replaced a module.
No fuses to replace. You went way farther than I did. It just sounds like one of the three modules is bad. I don't ok now anyone who has replaced a module.
Actually Im pretty sure thats gen2, Tesla is telling me I can still change fuses, need to figure out how…That's a gen 3 charger. What's the part number on the lid? Looks exactly like mine. 2017 MS.
No fuses to replace. You went way farther than I did. It just sounds like one of the three modules is bad. I don't ok now anyone who has replaced a module.
It looks exactly like the inside of my gen3 charger. If you provide a pic of the lid or a part # of the unit you have (not the unit Tesla says you have) I could tell you for sure.Actually Im pretty sure thats gen2, Tesla is telling me I can still change fuses, need to figure out how…
I can say for sure you don't have user replaceable fuses so you can give up finding those. Also Tesla doesn't replace fuses. They usually replace the whole charger and send it back to the factory for refurb.
The two 50amp fuses in gen2 are very easy to get to.
I just spoke with the guy who made the EU mods. He confirmed is gen 2 what i posted and what I have. What fuses I need model etc? I cannot stand Tesla for refusing to work on my car, and I have been supporting them since 2014. I still do although my respect goes to Tesla to all people working there not just one guy…It looks exactly like the inside of my gen3 charger. If you provide a pic of the lid or a part # of the unit you have (not the unit Tesla says you have) I could tell you for sure.
I can say for sure you don't have user replaceable fuses so you can give up finding those. Also Tesla doesn't replace fuses. They usually replace the whole charger and send it back to the factory for refurb.
The two 50amp fuses in gen2 are very easy to get to.
Yup. You're in a tough spot.I just spoke with the guy who made the EU mods. He confirmed is gen 2 what i posted and what I have. What fuses I need model etc? I cannot stand Tesla for refusing to work on my car, and I have been supporting them since 2014. I still do although my respect goes to Tesla to all people working there not just one guy…
You just need to order another charger with the same part #. Follow my instructions in post #1 and you'll be fine.
Naota
Member
There are YouTube videos on getting to the gen 2 charger fuses.
Also wanted to say the OP helped me. I too had my 12v run out and needed to sit it on a tender over night and then I had to get all the bubbles out of the coolant else it would stop charging randomly at different intervals (longest charge first thing each morning).
 teslamotorsclub.com
Also wanted to say the OP helped me. I too had my 12v run out and needed to sit it on a tender over night and then I had to get all the bubbles out of the coolant else it would stop charging randomly at different intervals (longest charge first thing each morning).
Faulty Onboard Gen 3 Charger
Six months ago my MS 75D started charging at half the speed on a wall charger, it would only go up to 24 amps instead of 48. Yesterday it stopped charging entirely - it would charge a mile or so, drop to 23 amps and then eventually to zero. It would happen 3 or 4 times and then error out. I...
teslamotorsclub.com
I don’t think those videos are for gen 2, found out they were all about gen1.There are YouTube videos on getting to the gen 2 charger fuses.
Also wanted to say the OP helped me. I too had my 12v run out and needed to sit it on a tender over night and then I had to get all the bubbles out of the coolant else it would stop charging randomly at different intervals (longest charge first thing each morning).
Faulty Onboard Gen 3 Charger
Six months ago my MS 75D started charging at half the speed on a wall charger, it would only go up to 24 amps instead of 48. Yesterday it stopped charging entirely - it would charge a mile or so, drop to 23 amps and then eventually to zero. It would happen 3 or 4 times and then error out. I...
You're gonna keep saying that without sending a part #? Or photo of the lid?I don’t think those videos are for gen 2, found out they were all about gen1.
I don’t think those videos are for gen 2, found out they were all about gen1.
tldr: If you posted photos of the outside we would have been able to tell you it was Gen2. Your internals look exactly the same as a Gen3, which has no 50amp fuses in them. Buy a new charger and be done with it.
When I google "Tesla Gen 2 Onboard" charger, I get these results...These don't have the fuses.
This is probably what you have but your internals look exactly the same as a Gen 3. You only posted internal photos so that's why everyone thought Gen3. While you may be able to figure out which charging bank is bad, I don't know if replacing one bank is going to work. Maybe if you got another doner charger with exactly the same PN and firmware, but at that point, why not just replace the charger itself. It's like $300-500 on ebay.
Hell...here's one for $400, Brand New in Packaging.
When I Google "Tesla Gen 3 Onboard Charger", I get this...which is exactly what my 2017MS charger looks like
Similar threads
- Replies
- 0
- Views
- 569
- Article
- Replies
- 15
- Views
- 5K
- Replies
- 7
- Views
- 4K
- Replies
- 21
- Views
- 3K