Welcome to Tesla Motors Club
Discuss Tesla's Model S, Model 3, Model X, Model Y, Cybertruck, Roadster and More.
Register

S/X Palladium Motorized Screen Tilt Kit

Which kit would you prefer? See post for details.

  • Mechanical

    Votes: 31 30.7%
  • Switches

    Votes: 3 3.0%
  • Simple Integration

    Votes: 6 5.9%
  • Full Integration

    Votes: 61 60.4%

  • Total voters
    101
This site may earn commission on affiliate links.
If it works with other similar products I have worked with, you would configure you colour and mode (brightness etc) with the APP and it stores it. You can then hard switch the power on and off and it will come on at the last configured setting. Mine will be easy. Set to BLUE and DIM via the APP and then I will use the voltage sense from the existing cabin light (footwell) to turn it on and off via the relay module. Setup by the APP, on off hardline. Also, it includes a physical on/off button so you could even power them on/off via a relay across that button instead of powering on and off.
 
If it works with other similar products I have worked with, you would configure you colour and mode (brightness etc) with the APP and it stores it. You can then hard switch the power on and off and it will come on at the last configured setting. Mine will be easy. Set to BLUE and DIM via the APP and then I will use the voltage sense from the existing cabin light (footwell) to turn it on and off via the relay module. Setup by the APP, on off hardline. Also, it includes a physical on/off button so you could even power them on/off via a relay across that button instead of powering on and off.
I have similar lights as to what you described. Got them installed by Wraptors. However they didn't connect it to the "Ambient Lights" button. I'm in Mississauga. Would you know how to connect my lights to the button? I'm willing to drive over and even pay you for your time/effort.
Currently I have to turn off the lights manually using an IR remote.
Also couldn't find a way to direct message you. Sorry for the public post everyone 😞
 

Attachments

  • 20230918_205018.jpg
    20230918_205018.jpg
    341.6 KB · Views: 33
I have similar lights as to what you described. Got them installed by Wraptors. However they didn't connect it to the "Ambient Lights" button. I'm in Mississauga. Would you know how to connect my lights to the button? I'm willing to drive over and even pay you for your time/effort.
Currently I have to turn off the lights manually using an IR remote.
Also couldn't find a way to direct message you. Sorry for the public post everyone 😞

Hi TechMeister, search for this thread and it outlines how/what to do....

RGB Ambient Lighting project for Palladium Model S - lets do it​

I started the thread and moving the convo from here as there is quite a bit of interest and a lot of mystique around it (and major $$ to have installers do it)
 
Last edited:
The motorized tilt kit can now be installed. The caveat is you have to find a Tesla employee to activate it. Here is the youtube link.

Another poster dropped a youtube link regarding tail lights installation (retrofit) that also require some inner changes in the software.

The good part? He dropped some info on someone happy to make the required modifications (headlight configuration, tail light configuration, motorized swivel

in the video description:
If you need someone to change the config for you here is the contact I used:

Telegram handle @devsaider
Email ([email protected])

He has the capability to adjust configurations for all Tesla models, including tail lights, headlights, navigation regions (such as Cyprus, Australia, Europe, etc.), swivel screen controls, and various other features across all Tesla Models. Additionally, he offers my proprietary Diagnostic software (https://tesware.net/) for Tesla, which fully encompasses the original Toolbox functionality.


There is hope, boiiiiiiiiiiiis
 
  • Love
Reactions: cwanja
I was interested in doing this for my 21 Plaid. Hardware is the easy part. Knowing someone with toolbox to do the update is a whole other story. Also, if you can actually do this and get it to work, if something happens to the screen in the future, Tesla will not warranty it.
 
I wonder how and if a config update can be done on 21 MSP w/o steam since there's no ethernet connector.
Should be all good. I wondered about the same thing, but after digging into the service mode:


Connect to the service connector under the center display.
  • If there is a small round Fakra connector:
    1. Connect the vehicle interface cable, the ethernet cable, and the USB cable to the interface box.
    2. Connect the vehicle interface cable to the Fakra connector under the center display.
    3. Connect the ethernet cable and USB cable to the laptop.\

  • If there is a small cube ethernet connector:
    1. Connect the ethernet cable to the ethernet connector under the center display.
    2. Connect the ethernet cable to the laptop

We are the Fakra peeps, so the troolbox3 will connect to our machine via the interface box

And how did you do the config update?
 
And how did you do the config update?
Sorry I should have been more specific, after digging through the service mode page on the link, i had discovered the accessibility to the interface hardware without the need of an Ethernet port

Another user who was able to do it mentioned about putting together an instruction manual on how to perform the config changes. As soon as this develops, I'll make sure to link it here

So there's hope for us 2021 guys??? :)
 
  • Like
Reactions: misc3r
So there's hope for us 2021 guys??? :)
yezziiiir!


and specifically this post:


now as things develop, there will be more instances of people completing the process successfully and a standardized set of indfo should be out there eventually
 
I upgraded my computer yesterday to the steam version. The matrix headlights config survived the update but the tilt screen config did not. I needed to re-do the tilt screen config.

Not sure why one change survived and the other did not. The SC might have considered disabling the headlights a safety issue. I will report back when I find out.
 
I completed the matrix and tilt screen retrofit earlier this week and am working a write-up for others with everything I learned along the way. Need to give a big shout-out to @interbear99, @leecox, @ShockYT, and @terranx for their support and guidance in this project. This is a smaller community of DIYers compared to other brands which makes the information of our projects so much more valuable. Thank you all for your patience and insight to get this done.

Project thoughts:
As a long-time DIYer, I wanted to learn as much as I could and do all the work. The parts needed to complete this were not too hard to get but the recent 2x in price for a left body control module does make it harder to achieve. I ended up sourcing a used on via Ebay. The media converter is also another non-standard challenge as it requires a few parts and the best-priced items were from China. This led me to contact Electrified Garage in FL to see what they would be able to contribute. Ultimately, they were much less familiar with this process than anyone following this forum.

Matrix:
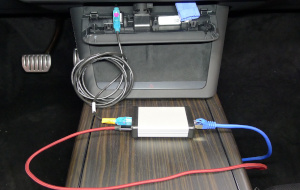
Based on other posts from leecox, I was able to identify the required parts to build my own adapter harness. I have previous electrical experience and love building stuff so it was not that hard but there are some nuances about this particular harness that Lee was really helpful in shedding light on such as ensuring the wires pulled out from the main 14-pin harness are fed in from the rear when moving them around as the insulation will not allow you to seat them in otherwise.

Interbear99, gave great advice on the best approach to removing the headlights! BLUF: remove only the 6 bolts along the top of the bumper, the T-25 torx at the inner edge of the bumper from the wheel well, and the frunk basket for easy access to everything. Lights hooked up perfectly and I only had a little scare when one headlamp did not power on. The issue was that 14-pin connector had a slide lock from the inside that needed to be pushed the other way to fully seat.

Programming was a breeze going through service shell and nothing else was required. Honestly, a super easy process.
1. "Service Shell"
2. enter "gw-diag SET_CONFIG_DATA 00 28 2"
3. enter "reboot-gateway"
4. From Service Mode "reinstall firmware" and your done!

Tilt-screen:
Motor installation was super easy and I finished this in less than 30 min.

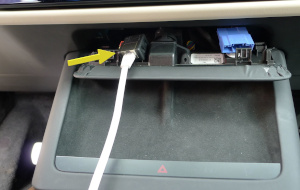
Body controller was a PITA, mostly because the connectors all have a lock tab that can be difficult to find or push. Additionally, once removed, the new one did not want allow for the securing nut to be attached (which is needed as it is a grounding nut). The lesson here is to ensure you are pushing back and down FIRMLY on the top portion of the controller when replacing it for it to properly seat on top and lower enough for the nut to attach.

Programming here is a little more involved. I did try it on my original controller to see what would happen. The tilt button was present but I could not run the post-install commands to calibrate the motors.

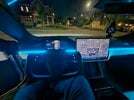
When power is reconnected it will take about 5 min for the screen to come on. I'm not gonna lie, it scared the hell outta me, lol.
1. "Service Shell"
2. enter "gw-diag SET_CONFIG_DATA 00 132 2"
3. enter "reboot-gateway"
4. From Service Mode "reinstall firmware"
5. VCleft post replacement procedure *lower front windows to allow access and do not sit in the driver seat while running the cmd*
-This is a very important procedure to run as it will calibrate the windows, steering wheel, mirrors, and pair the immobilizer to your car, otherwise you ain't going anywhere. It did not complete entirely for me, so I needed to run the "immobilizer..." command to finish.
6. Search for mech and run "Display Mechanism Calibration" (turns on motors) See pic 1
7. Run "Mech Function Test" (Motors will run and move screen)

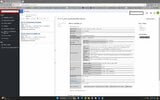
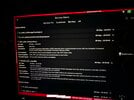
I had a few errors come up after that worried me (see pic 2) but they were only shown on the service side, not customer-facing. I did another software reinstall and a dual button reboot but it was still there. The next morning I watched some YouTube in the car, did a scroll wheel reboot and they went away!

Final Thoughts:
I learned a lot and it tool me 8 hours after work to complete this but knowing what I know now, I feel I could complete both retrofits in under 2 hours max. The controller piece was the biggest time sucker. If you can source the parts you need for a good price, I totally think it's worth it. BTW, either of the two listed LH body controllers will work (03-B and 00-C)! If you can coordinate to share toolbox access with someone, this would also REALLY help save some money.

Best of luck to those who choose to follow through on this project.
 

Attachments

  • Screenshot 2024-05-08 174047.jpg
    Screenshot 2024-05-08 174047.jpg
    256.7 KB · Views: 4
  • IMG_0262.jpg
    IMG_0262.jpg
    250.6 KB · Views: 3
I upgraded my computer yesterday to the steam version. The matrix headlights config survived the update but the tilt screen config did not. I needed to re-do the tilt screen config.

Not sure why one change survived and the other did not. The SC might have considered disabling the headlights a safety issue. I will report back when I find out.
Hmm interesting. Could be that configs that are officially changeable by either us or service are backed up to the cloud. The screen tilt option is not officially editable even by the service centers

Or it’s safety relevant items that are transferred like you mentioned.

You also changed the trim from wood to carbon right? Did that survive?