The facelift model S gets new part numbers 1058007-00-Rev, and 1057851-00-Rev. I replied to the tesla service chat with a screenshot showing a "G" revision. They responded with "thank you for the update." I will update with what they actually allow me to buy.Sorry, no idea. Did not know the "F" are crap.
I just know what Tesla told me and that is that i need whole new "package" due to new version of the "housing" - no idea thou what this means.
Maybe the "G" are for newer tesla's ?


Welcome to Tesla Motors Club
Discuss Tesla's Model S, Model 3, Model X, Model Y, Cybertruck, Roadster and More.
Register
Install the app
How to install the app on iOS
You can install our site as a web app on your iOS device by utilizing the Add to Home Screen feature in Safari. Please see this thread for more details on this.
Note: This feature may not be available in some browsers.
-
Want to remove ads? Register an account and login to see fewer ads, and become a Supporting Member to remove almost all ads.
You are using an out of date browser. It may not display this or other websites correctly.
You should upgrade or use an alternative browser.
You should upgrade or use an alternative browser.
ResHacker
Member
You should be able to buy it separately - independently on the car issue.. If they're compatible with the car and are on stock of course ...I got a reply that the system will not allow them to order the G revision and that F was in stock and fully interchangeable.
I wouldn't have any more revision "F" installed. The shaft passage is too short. It looks as if the shaft passage was made with a 3D printer. Revisions I and J have a different shaft passage. It is actually longer. The shaft cannot twist as much as it can with revision F.
Attachments

ResHacker
Member
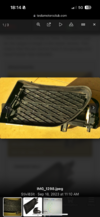
Hi all, lettin you know as I have some news regarding louvers. Over this this week I have replaced coolant radiator, then (probably) faulty 3-way radiator bypass valve (but the fault still remains there) and also had look at the radiator shutters. And guess what, both had broken axle pin or hiw to call it - the part which goes into the actuator. Fortunately both pins were found inside. So we have mounted it back using some plastic welder wire and also glued it with epoxy and piece of rag to make it hard. Put it back and faults are disappeared, no diag test needed!! Nevertheless it's weird, it worked on second sch attempt, during the first one all shutters were dead + faults on. I'll post some pics later on...
ResHacker
Member
ResHacker
Member
Yes, it doesn't matter as the system initiates some test-round probably each time you get into the car, plug the charging cable in, etc.. So it learns then the border positions itself. There's also one remark I have made as it seems the system will clear all of the faults once when all of the 4 louvers are working without the need of any diag init. In my case when only 2 louvers were ok but not working and with faults, the diag init was necessary to make them working.How are you suppose to place them back in? Open or closed? Or it doesn’t matter as the actuator can turn in both direction during the initial test? Thx
And last point I want to mention is, it has been really PITA process to put the radiator louvers back into the assembly as it is not possible to disassemble it (was wondering how do they complete it in the factory - maybe by applying some heat to make it softer??). Also was worried whether the upper glued pin or the remaining bottom one will eventually break, but fortunately it has survived. The plastic from which it is made is very very robust and can be also a bit bent if needed. Therefore was wondering how much torque force there has to be to cyclically stress the pin as it then finally breaks... Curious how long will the repaired ones survive
")
ResHacker
Member
Yeah, I believe when the assembly itself is mechanically ok, then there's only a little probability the actuator is bad. So if all of the assemblies are ok, the car should resynch it itself. If not, then the faults will remain. I believe similar problem might be the 3 and 4-way valves.. This is now under my investigationWhen I removed the fins from the side louvers assembly then I cleaned them in hot water - very hot actually, just let the water to cool a bit to use by hand - for re-assembly. Worked quite good.
ResHacker
Member
Hmm, maybe you're right, sorry ... I have also assembled it in opened position. The fact is, there's probably a feedback potentiometer which can spin only in defined range.... at least this kind of assembly is used in the 3 and 4-way valve so I believe it will be the same in this kind of actuator ....Apparently it does matter (open v. closed) as I took it apart once more, has set them open and assembled it all together. All are working well now. Prior to this - errors and no movement.
Hmm...so I was about to remove my front bumper to access the louvers, but one of the 10mm bolt is stucked so I aborted and have to visit my mechanic friend to see if he can remove it.
Anyhow, was browsing the internet to get a better idea on how to remove the bumper and found this video:
Here, the person removing it, says nothing about unscrewing anything from under the car, which I understood as one of the steps? Are these older models (mine is 2015) built different or is this step just missing from the video?
Im talking about this step from the manual:
One more question, if I am somehow unable to repair the current louver is it safe to not install it back while waiting for new part - to preserve some time for future repairs, or shall I install it back in to protect the radiator which would otherwise be exposed to dirt/debris?
Yes, you might have the ones pointed by the red arrows upward - second place from each side - 10mm head metal screw. All the rest underneath are push-pin plastic reverts commonly used on the car.Hmm...so I was about to remove my front bumper to access the louvers, but one of the 10mm bolt is stucked so I aborted and have to visit my mechanic friend to see if he can remove it.
Are these older models (mine is 2015) built different or is this step just missing from the video?
Im talking about this step from the manual:
View attachment 1050403
Mine is 03/16 car and I also have the second screw from side a metal one. I did only used this guide, quite simple. Have somone to assist you or find suitable cardboard boxes ready to support the bumper as you need to swing it open to the passenger side as there is the connector. If you only need to change out the louvers then there is no need to disconnect the harness.
Now when looking at the video and some others on the web it’s sad to se that every mechanic always wants to remove that rubber hood limiter (that bolt which has large rubber cover) on each side to take the plastic cover off. How does the mechanic knows what was the initial position of the hood when they put it back? Why not just pull the cover OVER that rubber head, you can lubricate it with some oil drops if needed to help the move?….here is another video of achually replacing the louvers on an older model and person in this video shows which screws under needs to be unscrewed:
And to take that bumper off at that hight ALONE is also unthinkable. I have done the removal several times and mine is with coil suspension, I have never needed to rise the car to get it off. It’s much easier also if the clearance from ground is not that (jack) high. And as told, if you do not take the bumper off for painting or such then you do not need to disconnect that harness.
Similar threads
- Replies
- 22
- Views
- 3K
- Replies
- 6
- Views
- 2K
- Replies
- 17
- Views
- 524
- Replies
- 9
- Views
- 10K