The lower rocker area in front of the rear wheel is REALLY messed up on, guessing, everyone’s Tesla. I’m guessing because I’ve seen it on at least two other cars and if mine is this bad at 30k miles then, well, I’m guessing everyone…
I used two different methods of painting/fixing this – One side I just basically finger painted the basecoat and wiped away some excess with a paper towel and then put PPF over it.
The other side I still finger painted, but used the basecoat and the pearl coat, wet-sanded and then polished before putting on the PPF. This method, I don’t think was really worth it as it doesn't look that much better, especially under the PPF.
I had a bunch of extra Llumar PPF to protect it. I think cutting out a custom sized piece and rolling edges into the door sill and around the body panel by the tire will look better than precut over time as there are less edges to get dirty and stand out.
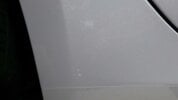
Before: A little hard to see on white, but zoom in to see tons of chips. They are easy to feel also.

Here is the other side (before):

Same side (before):

This is after finger painting ONLY the basecoat (very white) and wiping excess away with a paper towel - I think I did this twice (two coats). The paint dried so quickly that the paper towel was basically acting like a fine sandpaper. This looked a little more blotchy in real life, but it looked good enough for me to just cover in PPF!

Here it is after PPF. Keep in mind there are a few small air bubbles that should go away.

Here is the other side after basecoat, pearl coat, wet sanding and polishing - this whole process twice. Looks better than the other side, but not that much better. If I had also put pearl coat on the other side I think it would have looked even better and closer to how this side appears.

Here is the same side after PPF. Again, some air bubbles...

I used these brush-on paints. I bought them a while back for a few other chips and thought I would give finger-painting a try - haha. I never did use the clearcoat.

I used a 4000 grit sandpaper and a really old bottle of Meguiars #7 polish.
Overall I am VERY happy with how both sides turned out and am glad to finally get some PPF on this area!
If I had to do it over I would just finger paint the basecoat, wipe/sand it with the paper towel, then add the pearl coat and wipe/sand it, put the PPF on it and call it a day.
If you would like to see video of this whole process:
I used two different methods of painting/fixing this – One side I just basically finger painted the basecoat and wiped away some excess with a paper towel and then put PPF over it.
The other side I still finger painted, but used the basecoat and the pearl coat, wet-sanded and then polished before putting on the PPF. This method, I don’t think was really worth it as it doesn't look that much better, especially under the PPF.
I had a bunch of extra Llumar PPF to protect it. I think cutting out a custom sized piece and rolling edges into the door sill and around the body panel by the tire will look better than precut over time as there are less edges to get dirty and stand out.
Before: A little hard to see on white, but zoom in to see tons of chips. They are easy to feel also.
Here is the other side (before):
Same side (before):
This is after finger painting ONLY the basecoat (very white) and wiping excess away with a paper towel - I think I did this twice (two coats). The paint dried so quickly that the paper towel was basically acting like a fine sandpaper. This looked a little more blotchy in real life, but it looked good enough for me to just cover in PPF!
Here it is after PPF. Keep in mind there are a few small air bubbles that should go away.
Here is the other side after basecoat, pearl coat, wet sanding and polishing - this whole process twice. Looks better than the other side, but not that much better. If I had also put pearl coat on the other side I think it would have looked even better and closer to how this side appears.
Here is the same side after PPF. Again, some air bubbles...
I used these brush-on paints. I bought them a while back for a few other chips and thought I would give finger-painting a try - haha. I never did use the clearcoat.
I used a 4000 grit sandpaper and a really old bottle of Meguiars #7 polish.
Overall I am VERY happy with how both sides turned out and am glad to finally get some PPF on this area!
If I had to do it over I would just finger paint the basecoat, wipe/sand it with the paper towel, then add the pearl coat and wipe/sand it, put the PPF on it and call it a day.
If you would like to see video of this whole process: