


GreenHokie
Member
As an update, I was able to successfully switch the battery and ground wires into their proper/intended slots on the main connector.
Removing the orange cover was extremely easy, just as Raymond demonstrated in his video from the above post.
Removing the wires from their current pin locations was a tad more challenging but still fairly easy. An important tip that Raymond did not mention was, when you slide the needle nose tweezer into the slot, you also need to apply some downward pressure on the metal pin as you slide the tip of the tweezer into the slot. This will help wedge the tip of your tweezer between the metal pin and the hidden release tab that is deep in the slot hole. Then, push & lift the tweezer tip in an upward motion to release the tab, as described by Raymond in his video. You cannot hear or see anything that tells you the tab has been released. It’s kind of a very subtle feel and you’re never really sure if you have released the internal tab. Just pull on the wire (you’ll need to give it a good tug) to see if it will slide out of the slot. You might have to give it a few tries (insert, slide and lift the tweezer) to get the tab to release, but eventually it will release.
By the way, I just messaged Raymond at EVOffer and he said they will send replacement wiring harnesses to anyone who received a “bad” harness (with the battery & ground wires switched out of their normal/intended locations) and are not comfortable making the correction/switch themselves.
For affected customers who made the swap themselves (like me), Raymond is offering to extend the warranty from 1 to 2 years at no cost. This is great customer service, folks. Well done, Raymond! I retract my initial language & concern about buying this frunk kit from EVOffer!
And now for some photos, so you know I’m not some bot created by an AI like ChatGPT!
Orange cover removed from the main connector:

One of the wires (ground) successfully removed from the main connector:

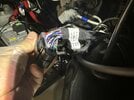
All wiring & connectors re-assembled and zip-tied for a clean install:

Everything reassembled except top cover, to show the normal red blinking light on the EVOffer ECU:

Removing the orange cover was extremely easy, just as Raymond demonstrated in his video from the above post.
Removing the wires from their current pin locations was a tad more challenging but still fairly easy. An important tip that Raymond did not mention was, when you slide the needle nose tweezer into the slot, you also need to apply some downward pressure on the metal pin as you slide the tip of the tweezer into the slot. This will help wedge the tip of your tweezer between the metal pin and the hidden release tab that is deep in the slot hole. Then, push & lift the tweezer tip in an upward motion to release the tab, as described by Raymond in his video. You cannot hear or see anything that tells you the tab has been released. It’s kind of a very subtle feel and you’re never really sure if you have released the internal tab. Just pull on the wire (you’ll need to give it a good tug) to see if it will slide out of the slot. You might have to give it a few tries (insert, slide and lift the tweezer) to get the tab to release, but eventually it will release.
By the way, I just messaged Raymond at EVOffer and he said they will send replacement wiring harnesses to anyone who received a “bad” harness (with the battery & ground wires switched out of their normal/intended locations) and are not comfortable making the correction/switch themselves.
For affected customers who made the swap themselves (like me), Raymond is offering to extend the warranty from 1 to 2 years at no cost. This is great customer service, folks. Well done, Raymond! I retract my initial language & concern about buying this frunk kit from EVOffer!
And now for some photos, so you know I’m not some bot created by an AI like ChatGPT!
Orange cover removed from the main connector:
One of the wires (ground) successfully removed from the main connector:
All wiring & connectors re-assembled and zip-tied for a clean install:
Everything reassembled except top cover, to show the normal red blinking light on the EVOffer ECU:
Last edited:
 . At least my frunk opens and closes properly now! Phew.