


DIY CF hardtop
Back in November, December it was becoming clear that Tesla Motors weren’t going to be bringing a CF hardtop out in time for Santa’s annual delivery run so I thought I’d have a go.
Disclaimer: Once again; this is all on you; as you’re fiddling with the roof bits, make sure it’s all compliant with your local authorities, what you read here are simply my experiences.
Difficulty: Medium
Tools:
5mm Allen key
Rivet tool + 12x 3mm x 3mm rivets
A little rubber lubricant or Vaseline
Electric drill + 3mm (1/8”) + 5mm bit
Time:
Basic install – all afternoon really.
Plus Lining – another afternoon.
Parts
RevoZport.com
FRP Carbon Elise Hardtop RevoZport Racing Technology Ltd.
LotusGarage.com
1 x 02 Seal, hard top to side glass, LH SKU:A116V0249F
1 x 02a Seal, hard top to side glass, RH SKU:A116V0248F
1 x 04 Seal Carrier, LH SKU:A116V0241F1
1 x 04a Seal Carrier, RH SKU:A116V0240F
2 x 05 Double Sided Tape, 12mm, carrier to hard top SKU:C075U6071V
1 x 09 Trim/Clamp Panel, front, hard top to screen header SKU:A116B1078J
Local fabric shop
Off-cut of faux suede in gray to fit – get plenty
Two pieces of half inch foam to fill the left and right blisters
Tin of aerosol fabric glue
The parts list starts with the staple; the hardtop is from Ken Cheung of RevoZport.com. He’s based in Hong Kong and makes the CF hard tops to order, it takes about a month to create them and ship them over, plus, as he’s in HK time email is the best way to communicate. Ken studied some of our pictures in the threads on the site and chose the carbon weave to match the car. The roof arrived packed in not one, two or three but four layers of differing packaging to ensure a safe arrival. I have to say that he’s been very helpful through the process; he was kind enough to warrant the fit with a return it if it didn’t fit perfectly; thanks Ken, it did!
To complete the build, additional parts are required and LotusGarage.com in the US stepped in. The roof comes with some of the basic fittings but omits the rubber seals on the side and the interior trim piece that finishes the job off nicely.
Lastly, I decided to line the inside of the roof with suede to create a more ‘plush’ result. The CF roof is bare on the inside but for a little extra can be lacquered to match the outside. I chose my own solution to create a warmer, slightly more soundproofed option.
Getting to work
Step one: fit
After unpacking the roof I tried it on the car first to make sure the fit looked good; it did. Use this time to understand how the supplied brackets work, the pins at the front, the hooks on the rear and the center clamp. Also note the extra three bolts along the front edge; they’re there to hold the trim piece.
Step two: Fitting the rubber seals
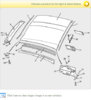
Refer to the exploded diagram attached; the rubber seals clip into the rails that then affix to the hardtop.
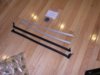
If you lay the roof on its top on a soft surface (I used a beanbag) you can study the edges where the rails fit the roof. Look at each rail and study the shape; you’ll see how they’re left & right handed and which side fits which.
Using a gentle pressure bend the rails to match the profile of the roof so that they fit reasonably well. It should only call for a few gentle flexes of the rails to get them to almost fit the curve. Don’t worry if they’re not perfect they’ll be pinned in place with the rivets later.
Take a look at the roof, you’ll find marks on the roof that match the holes on the rails; holding the rails against the roof, drill 3mm holes into the surface for each of the rivets.
To ensure a watertight seal, use the thin double-sided tape to hold the rail on initially. I recommend applying the tape to the rail and using a screw/nail, etc. in the first rivet hole to locate the rail in its final place before pressing it home.
Apply the rivets to each hole working from the inside, center out to the edges.
Now we need to add the rubber seals. Study both seals to see which side fits which. Also note that the seals have a built in adhesive strip along the top; don’t pull that off yet!
Carefully feed the rubber strip into the rail, you should be able to complete this by hand, sharp tools may damage the rubber. When you have the rubber strip in, check from both top and bottom that the seal is in place. Don’t pull the adhesive strip off yet.
Looking at the ends of the rubber strip, you’ll see clips to fit into the hardtop. Again, carefully drill the holes (5mm) into the roof to match the location of the holes in the rubber.
It’s now time to release the adhesive strip on the rubber seal. Check the fit of the seal and peel away the strip. Seat the rubber to the top of the roof and press down to seal.
At this point you’re pretty much done and are ready for fitting.
Lining
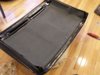
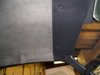
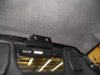
To add a little extra to the result I wanted to line the inside. I found an offcut of faux suede in light grey at a local fabric shop. I folded the ends that reached to the left and right to ensure it didn’t fray and added foam inserts into the raised area above the drivers and passengers heads. This lost a little headroom but added warmth and a little extra sound insulation. All of the material was held in place with aerosol adhesive. You can see in the finished result how far I took the material. Any further would interfere with the mounts.
Final step: Installation
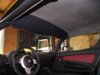
Installing the finished roof is simple work if fiddly. I have a couple of recommendations: Take a moment to insert the bolts into the roof to get a feel for the effort and the angle that they go in; DO NOT USE power tools at this stage; whilst the retaining bolts are good, a cross-threaded bolt would be a disaster. And, do take care not to drop the bolts as you put them in, especially the rear ones as they can (did) fall behind the seat. Lastly, I recommend applying some rubber lubricant or Vaseline to the cars rubber seals; I don’t intend to remove the roof; I’m not a soft top fan and the lubricant will protect the seals.
Open both windows and doors.
For simplicity I sat in the car and mounted the clips loosely at the back first. Then, the front pins and finally the rear center clamp. Tighten the bolts firmly by hand (no power tools), pressing down the seals.
Carefully check that the doors close ok and then re-open the doors, close the windows and check the fitment again. Take care, if something went wrong you’ll pick that up easily and safely.
The front trim piece was a challenge; it’s difficult to explain but, the angle of the thread in the roof called for the bolts to go in at quite a steep angle; basically, I couldn’t get them in without trimming the holes in the trim piece, opening them up a little to allow me to get the bolts in straight and not crossed. This is good reason why you don’t use power tools; you can’t feel the bolt being cross-threaded. I chose to replace the bolts with black ones to keep things a little neater; they’re M8 sized.
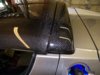
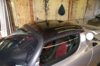
The finished result is I think, fantastic. It looks good inside and out and an extra bonus, the car is quieter, especially at speed. I’d prefer to get some pictures of the result in the sunshine but it keeps disappearing every time the car comes out.
The total project took about 5 hours. Best project to date.
Update: Liner Fail: Come the summer time the liner started to sag; the glue stopped being glue. In the end I took the liner off and went down to my local paint shop. For $300 they pained in inner surface silver, same colour as the car. I then injected expanding foam into the void between the panels through the bolt holes; result; it's sonically inert and has better insulation properties... and, matches the car.
Update 2: I found that the front edge mounting brackets began to squeak; the pin that goes into the a-piller had rubbed a little paint off and was squeaking. Grease didn't help for long so I tried a 1cm length on polythene water pipe to create a tight fitting bush. This has been squeak free for months.
Back in November, December it was becoming clear that Tesla Motors weren’t going to be bringing a CF hardtop out in time for Santa’s annual delivery run so I thought I’d have a go.
Disclaimer: Once again; this is all on you; as you’re fiddling with the roof bits, make sure it’s all compliant with your local authorities, what you read here are simply my experiences.
Difficulty: Medium
Tools:
5mm Allen key
Rivet tool + 12x 3mm x 3mm rivets
A little rubber lubricant or Vaseline
Electric drill + 3mm (1/8”) + 5mm bit
Time:
Basic install – all afternoon really.
Plus Lining – another afternoon.
Parts
RevoZport.com
FRP Carbon Elise Hardtop RevoZport Racing Technology Ltd.
LotusGarage.com
1 x 02 Seal, hard top to side glass, LH SKU:A116V0249F
1 x 02a Seal, hard top to side glass, RH SKU:A116V0248F
1 x 04 Seal Carrier, LH SKU:A116V0241F1
1 x 04a Seal Carrier, RH SKU:A116V0240F
2 x 05 Double Sided Tape, 12mm, carrier to hard top SKU:C075U6071V
1 x 09 Trim/Clamp Panel, front, hard top to screen header SKU:A116B1078J
Local fabric shop
Off-cut of faux suede in gray to fit – get plenty
Two pieces of half inch foam to fill the left and right blisters
Tin of aerosol fabric glue
The parts list starts with the staple; the hardtop is from Ken Cheung of RevoZport.com. He’s based in Hong Kong and makes the CF hard tops to order, it takes about a month to create them and ship them over, plus, as he’s in HK time email is the best way to communicate. Ken studied some of our pictures in the threads on the site and chose the carbon weave to match the car. The roof arrived packed in not one, two or three but four layers of differing packaging to ensure a safe arrival. I have to say that he’s been very helpful through the process; he was kind enough to warrant the fit with a return it if it didn’t fit perfectly; thanks Ken, it did!
To complete the build, additional parts are required and LotusGarage.com in the US stepped in. The roof comes with some of the basic fittings but omits the rubber seals on the side and the interior trim piece that finishes the job off nicely.
Lastly, I decided to line the inside of the roof with suede to create a more ‘plush’ result. The CF roof is bare on the inside but for a little extra can be lacquered to match the outside. I chose my own solution to create a warmer, slightly more soundproofed option.
Getting to work
Step one: fit
After unpacking the roof I tried it on the car first to make sure the fit looked good; it did. Use this time to understand how the supplied brackets work, the pins at the front, the hooks on the rear and the center clamp. Also note the extra three bolts along the front edge; they’re there to hold the trim piece.
Step two: Fitting the rubber seals
Refer to the exploded diagram attached; the rubber seals clip into the rails that then affix to the hardtop.
If you lay the roof on its top on a soft surface (I used a beanbag) you can study the edges where the rails fit the roof. Look at each rail and study the shape; you’ll see how they’re left & right handed and which side fits which.
Using a gentle pressure bend the rails to match the profile of the roof so that they fit reasonably well. It should only call for a few gentle flexes of the rails to get them to almost fit the curve. Don’t worry if they’re not perfect they’ll be pinned in place with the rivets later.
Take a look at the roof, you’ll find marks on the roof that match the holes on the rails; holding the rails against the roof, drill 3mm holes into the surface for each of the rivets.
To ensure a watertight seal, use the thin double-sided tape to hold the rail on initially. I recommend applying the tape to the rail and using a screw/nail, etc. in the first rivet hole to locate the rail in its final place before pressing it home.
Apply the rivets to each hole working from the inside, center out to the edges.
Now we need to add the rubber seals. Study both seals to see which side fits which. Also note that the seals have a built in adhesive strip along the top; don’t pull that off yet!
Carefully feed the rubber strip into the rail, you should be able to complete this by hand, sharp tools may damage the rubber. When you have the rubber strip in, check from both top and bottom that the seal is in place. Don’t pull the adhesive strip off yet.
Looking at the ends of the rubber strip, you’ll see clips to fit into the hardtop. Again, carefully drill the holes (5mm) into the roof to match the location of the holes in the rubber.
It’s now time to release the adhesive strip on the rubber seal. Check the fit of the seal and peel away the strip. Seat the rubber to the top of the roof and press down to seal.
At this point you’re pretty much done and are ready for fitting.
Lining
To add a little extra to the result I wanted to line the inside. I found an offcut of faux suede in light grey at a local fabric shop. I folded the ends that reached to the left and right to ensure it didn’t fray and added foam inserts into the raised area above the drivers and passengers heads. This lost a little headroom but added warmth and a little extra sound insulation. All of the material was held in place with aerosol adhesive. You can see in the finished result how far I took the material. Any further would interfere with the mounts.
Final step: Installation
Installing the finished roof is simple work if fiddly. I have a couple of recommendations: Take a moment to insert the bolts into the roof to get a feel for the effort and the angle that they go in; DO NOT USE power tools at this stage; whilst the retaining bolts are good, a cross-threaded bolt would be a disaster. And, do take care not to drop the bolts as you put them in, especially the rear ones as they can (did) fall behind the seat. Lastly, I recommend applying some rubber lubricant or Vaseline to the cars rubber seals; I don’t intend to remove the roof; I’m not a soft top fan and the lubricant will protect the seals.
Open both windows and doors.
For simplicity I sat in the car and mounted the clips loosely at the back first. Then, the front pins and finally the rear center clamp. Tighten the bolts firmly by hand (no power tools), pressing down the seals.
Carefully check that the doors close ok and then re-open the doors, close the windows and check the fitment again. Take care, if something went wrong you’ll pick that up easily and safely.
The front trim piece was a challenge; it’s difficult to explain but, the angle of the thread in the roof called for the bolts to go in at quite a steep angle; basically, I couldn’t get them in without trimming the holes in the trim piece, opening them up a little to allow me to get the bolts in straight and not crossed. This is good reason why you don’t use power tools; you can’t feel the bolt being cross-threaded. I chose to replace the bolts with black ones to keep things a little neater; they’re M8 sized.
The finished result is I think, fantastic. It looks good inside and out and an extra bonus, the car is quieter, especially at speed. I’d prefer to get some pictures of the result in the sunshine but it keeps disappearing every time the car comes out.
The total project took about 5 hours. Best project to date.
Update: Liner Fail: Come the summer time the liner started to sag; the glue stopped being glue. In the end I took the liner off and went down to my local paint shop. For $300 they pained in inner surface silver, same colour as the car. I then injected expanding foam into the void between the panels through the bolt holes; result; it's sonically inert and has better insulation properties... and, matches the car.
Update 2: I found that the front edge mounting brackets began to squeak; the pin that goes into the a-piller had rubbed a little paint off and was squeaking. Grease didn't help for long so I tried a 1cm length on polythene water pipe to create a tight fitting bush. This has been squeak free for months.
Attachments
-
 Exploded view.jpg97.6 KB · Views: 674
 -
 Rail and rubbers.JPG1 MB · Views: 509
 -
 Lined roof.JPG810.9 KB · Views: 561
 -
 Exterior closeup.JPG1.2 MB · Views: 572
 -
 Interior 1.JPG740.1 KB · Views: 531
 -
 Interior 2.JPG1.1 MB · Views: 512
 -
 Interior 3.JPG887.4 KB · Views: 524
 -
 Exterior 1.JPG906.2 KB · Views: 586
Last edited: