Hi all,
I know it's been talked about a bunch over the past couple years, but I wasn't able to find a thread discussing the DIY repair method for these two errors.
Recently my 2015 S 85 started reporting the above two errors. After having my wife stand outside the car and cycling the car between P-D I was able to figure out the electric parking brake was no longer working on the passenger side. Some of you have experienced the same issue but were instead unable to release the parking brake; this should apply to those too.
After reading the threads here I found out the hard way Tesla doesn't just replace (or even offer for sale) just the electronic motor but instead opts to replace the entire parking brake caliper, sometimes on both sides to the tune of €1600-1800 for both sides!
Not wanting to settle for that (and throwing away perfectly good parts since just the motor is 'defective') I figured I'd take apart mine and see what I could do.
Below is a write-up of how I disassembled the motor and repaired fixed the EPB_w053 / EPB_w052 errors for a mere €37 in tools & RTV.
If you don't want to try fixing your own, or if it doesn't work, you can find the motor on AliExpress for ~$60. The part number is 40C07812.
Note that I haven't bought this and can't vouch for its quality, but I wouldn't be surprised if it's the exact same part. At least it looks the same and all the marking match up.
Tools required:
- A jack
- A jack stand (optional, but highly, highly recommended)
- A flat blade screwdriver
- Torx T25 bits (preferably long since there's not much clearance either side of the parking brake motor body)
- White lithium grease (I couldn't find any so I used ballbearing grease instead).
- Brake cleaner or degreaser and a (tooth)brush
Optional:
- Some RTV
- A razor blade or small plastic scraper
If you're attempting this I assume you know how to take a wheel off, so let's skip that and get to the good stuff.")
Just make sure you've engaged Jack Mode prior to jacking up the car.
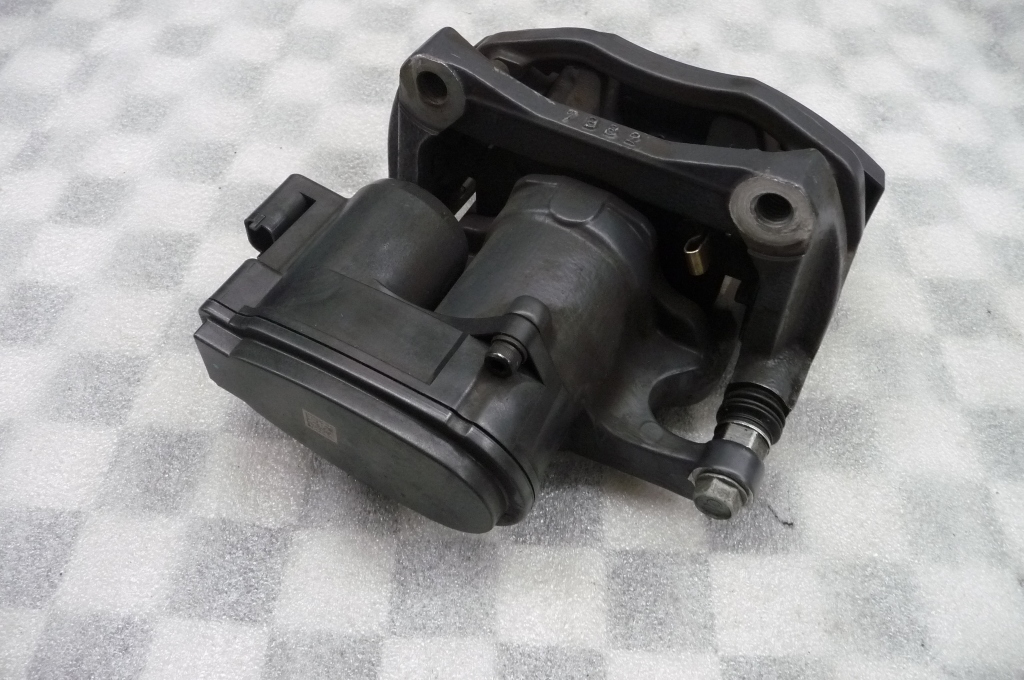
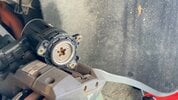
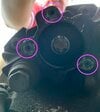
Here's my passenger side rear; main brake caliper on the left-hand side of the picture and the parking brake caliper on the 2 o'clock.
The electric parking brake motor is bolted into the back of the caliper.
At this point hose down the motor with the brake cleaner or degreaser where it bolts into the caliper and scrub the grime off of it to prevent it from falling into the caliper later on.

The first bolt is on the left-hand side, accessible from the top. You'll need to feel around a little. If at this point you can still feel some crud in the bolts, get out the brake clean again and spray into it so your torx bit makes good contact.
If you strip out these bolts there's no other option but to take the whole caliper off. So take your time, there's only three of them, all accessible from the top.

The second bolt is right in the center. Can't miss it.

Finally the third and last bolt is on the right. It's not too hard to find.

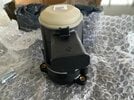
Unfortunately I didn't take any photos of the next step but with those bolts removed the EPB motor should come off easily.
Before you start yanking on it remember the plug is still attached. To release the plug take your flat-blade scewdriver and push against the red tab with a reasonable (but not plastic-breaking) amount of force. Now try to wiggle the connector off. If it won't come off, light up the black plastic 'flap' and try again.
You should now have the EPB motor disconnected. At this point I'd recommend bringing it inside (if your wife lets you).
Start by removing the c-clip that surround the area where the motor bolts into the caliper. There's not too much strength on this clip; I was able to get it off using two flat-blade screwdrivers in opposite direction. Engage safety squint in case it flies off.
There should also be an o-ring here. Take it off as well.

Now remove the two remaining torx bolts. Again T25's.

Before you start separating the two halves make a mark so you know how it lines up come reassembly.
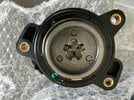
Now it's time to split the EPB body. Start at #1 (below the metal 'plate' that's sandwiched between both halves).
Once that's loose you can split #2 but you only pull it up enough so you can see / clean inside it, there's some resistance there which I believe is the wiring for the plug up top so be careful.
Note: keep the EPB motor with plug facing when you take it apart or else the gears may fall out (not too big of a deal, they only go back in one way).

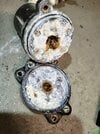
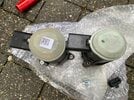
With the halves separated you'll end up with this. Note the flakes of salt that came off of mine as soon as I opened up.
Now it's time to get cleaning. Avoid gauging the surface; the smoother the surface, the better the seal you'll have going forward.
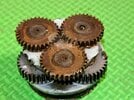
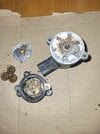
I'd recommend laying parts out in the order they came out, in the orientation they came out.
If you're reapplying grease, clean off all the old grease off the gears and surrounding surfaces before applying the new grease.
If your o-rings are still flexable (mine were) clean off the salt/crusties off of them and apply a light coating of grease so they continue to stay flexable.
Since the most salt was by far found in this part of the EPB motor I decided on running some RTV around the outside where the o-ring goes to help it seal better.
If you want to do this is up to you, but I figured (when applied sparingly!) it can't do any harm and clearly the old o-ring didn't seal 100% anyway.

That's it! Make sure you reassemble it the same way, don't forget any parts like the c-clip and, if you applied RTV, now is a good time for a coffee break to give it some time to set up.
In order to prevent the gear from engaging I'd recommend bolting the EPB motor back in place and *then* plugging the connector back in.
Once complete, cycle from P-D a couple times. The error should now have cleared. If not, either you didn't do the right side or the EPB motor is beyond saving. They're up for sale on AliExpress but I haven't tried them so your mileage may vary.
I know it's been talked about a bunch over the past couple years, but I wasn't able to find a thread discussing the DIY repair method for these two errors.
Recently my 2015 S 85 started reporting the above two errors. After having my wife stand outside the car and cycling the car between P-D I was able to figure out the electric parking brake was no longer working on the passenger side. Some of you have experienced the same issue but were instead unable to release the parking brake; this should apply to those too.
After reading the threads here I found out the hard way Tesla doesn't just replace (or even offer for sale) just the electronic motor but instead opts to replace the entire parking brake caliper, sometimes on both sides to the tune of €1600-1800 for both sides!
Not wanting to settle for that (and throwing away perfectly good parts since just the motor is 'defective') I figured I'd take apart mine and see what I could do.
Below is a write-up of how I disassembled the motor and repaired fixed the EPB_w053 / EPB_w052 errors for a mere €37 in tools & RTV.
If you don't want to try fixing your own, or if it doesn't work, you can find the motor on AliExpress for ~$60. The part number is 40C07812.
Note that I haven't bought this and can't vouch for its quality, but I wouldn't be surprised if it's the exact same part. At least it looks the same and all the marking match up.
Tools required:
- A jack
- A jack stand (optional, but highly, highly recommended)
- A flat blade screwdriver
- Torx T25 bits (preferably long since there's not much clearance either side of the parking brake motor body)
- White lithium grease (I couldn't find any so I used ballbearing grease instead).
- Brake cleaner or degreaser and a (tooth)brush
Optional:
- Some RTV
- A razor blade or small plastic scraper
If you're attempting this I assume you know how to take a wheel off, so let's skip that and get to the good stuff.
Just make sure you've engaged Jack Mode prior to jacking up the car.
Here's my passenger side rear; main brake caliper on the left-hand side of the picture and the parking brake caliper on the 2 o'clock.
The electric parking brake motor is bolted into the back of the caliper.
At this point hose down the motor with the brake cleaner or degreaser where it bolts into the caliper and scrub the grime off of it to prevent it from falling into the caliper later on.
The first bolt is on the left-hand side, accessible from the top. You'll need to feel around a little. If at this point you can still feel some crud in the bolts, get out the brake clean again and spray into it so your torx bit makes good contact.
If you strip out these bolts there's no other option but to take the whole caliper off. So take your time, there's only three of them, all accessible from the top.
The second bolt is right in the center. Can't miss it.
Finally the third and last bolt is on the right. It's not too hard to find.
Unfortunately I didn't take any photos of the next step but with those bolts removed the EPB motor should come off easily.
Before you start yanking on it remember the plug is still attached. To release the plug take your flat-blade scewdriver and push against the red tab with a reasonable (but not plastic-breaking) amount of force. Now try to wiggle the connector off. If it won't come off, light up the black plastic 'flap' and try again.
You should now have the EPB motor disconnected. At this point I'd recommend bringing it inside (if your wife lets you).
Start by removing the c-clip that surround the area where the motor bolts into the caliper. There's not too much strength on this clip; I was able to get it off using two flat-blade screwdrivers in opposite direction. Engage safety squint in case it flies off.
There should also be an o-ring here. Take it off as well.
Now remove the two remaining torx bolts. Again T25's.
Before you start separating the two halves make a mark so you know how it lines up come reassembly.
Now it's time to split the EPB body. Start at #1 (below the metal 'plate' that's sandwiched between both halves).
Once that's loose you can split #2 but you only pull it up enough so you can see / clean inside it, there's some resistance there which I believe is the wiring for the plug up top so be careful.
Note: keep the EPB motor with plug facing when you take it apart or else the gears may fall out (not too big of a deal, they only go back in one way).
With the halves separated you'll end up with this. Note the flakes of salt that came off of mine as soon as I opened up.
Now it's time to get cleaning. Avoid gauging the surface; the smoother the surface, the better the seal you'll have going forward.
I'd recommend laying parts out in the order they came out, in the orientation they came out.
If you're reapplying grease, clean off all the old grease off the gears and surrounding surfaces before applying the new grease.
If your o-rings are still flexable (mine were) clean off the salt/crusties off of them and apply a light coating of grease so they continue to stay flexable.
Since the most salt was by far found in this part of the EPB motor I decided on running some RTV around the outside where the o-ring goes to help it seal better.
If you want to do this is up to you, but I figured (when applied sparingly!) it can't do any harm and clearly the old o-ring didn't seal 100% anyway.
That's it! Make sure you reassemble it the same way, don't forget any parts like the c-clip and, if you applied RTV, now is a good time for a coffee break to give it some time to set up.
In order to prevent the gear from engaging I'd recommend bolting the EPB motor back in place and *then* plugging the connector back in.
Once complete, cycle from P-D a couple times. The error should now have cleared. If not, either you didn't do the right side or the EPB motor is beyond saving. They're up for sale on AliExpress but I haven't tried them so your mileage may vary.