Got a second charger for my cottage.My electrician has trenched a line from the box to the edge of the parking and now I need to mount the charger.What have folks done? Any pics of your solution?


Welcome to Tesla Motors Club
Discuss Tesla's Model S, Model 3, Model X, Model Y, Cybertruck, Roadster and More.
Register
Install the app
How to install the app on iOS
You can install our site as a web app on your iOS device by utilizing the Add to Home Screen feature in Safari. Please see this thread for more details on this.
Note: This feature may not be available in some browsers.
-
Want to remove ads? Register an account and login to see fewer ads, and become a Supporting Member to remove almost all ads.
You are using an out of date browser. It may not display this or other websites correctly.
You should upgrade or use an alternative browser.
You should upgrade or use an alternative browser.
Need to put my cottage charger on a post-ideas?
- Thread starter Biscuitman
- Start date
mrElbe
Active Member

Thanks for looking that up for me!Best one I've seen around these forums is the one posted by @StealthP3D. You can see it here.
That is am impressive job indeed.
Good job mrElbe!Here is my post: Charging . Not as fancy as the one shown above.
Looking forward to getting mine underway as soon as this crazy period is over.
Blu-Ion
Member
I got charger with 25 foot cable for the cottage, so I can install on side of cottage and still reach, how far away is your parking spot
StealthP3D
Well-Known Member
Good job mrElbe!
Looking forward to getting mine underway as soon as this crazy period is over.
I have a few tips regardless of what style pedestal you choose:
1) If you use a pressure-treated wood post for the upright, the end-grain will draw up groundwater which, over time, causes the wood preservative to leach away. You can greatly extend the life of the post by a) burying the factory end (not a cut end); b) painting epoxy on the end grain to prevent water wicking; c) using a pointed rock in the middle of your dug hole to hold the post off the soil. When you pour the concrete in, the end of the post will be encased in concrete which will act somewhat like a wood preservative. Most people don't do this and the results, over time, are terrible with the wood rot travelling up the center of the post from the base. I had some latex admixture laying around which makes the concrete shrink less and densifies it to further reduce leaching. It's not much more difficult to do it right the first time!
These same tips are applicable to a cedar post because cedar has rot resistant oils inside that are subject to leaching over time.
2) I personally think a 6x6 looks better proportioned than a 4x4. I might have used a 4x4 if I didn't have a left-over 6x6 laying around and I'm glad I did because it looks more substantial.
3) Make sure you have a suitable bit for drilling a hole for the conduit to pass through the upright. Most regular holesaws cannot drill deep enough for this.
I had a lot of fun with my install and it gives me a good feeling every time I plugin so it's worth it to plan it out and do it how you really want rather than getting in a last-minute rush and taking short-cuts.
Thanks very much for this good information.I have a few tips regardless of what style pedestal you choose:
1) If you use a pressure-treated wood post for the upright, the end-grain will draw up groundwater which, over time, causes the wood preservative to leach away. You can greatly extend the life of the post by a) burying the factory end (not a cut end); b) painting epoxy on the end grain to prevent water wicking; c) using a pointed rock in the middle of your dug hole to hold the post off the soil. When you pour the concrete in, the end of the post will be encased in concrete which will act somewhat like a wood preservative. Most people don't do this and the results, over time, are terrible with the wood rot travelling up the center of the post from the base. I had some latex admixture laying around which makes the concrete shrink less and densifies it to further reduce leaching. It's not much more difficult to do it right the first time!
These same tips are applicable to a cedar post because cedar has rot resistant oils inside that are subject to leaching over time.
2) I personally think a 6x6 looks better proportioned than a 4x4. I might have used a 4x4 if I didn't have a left-over 6x6 laying around and I'm glad I did because it looks more substantial.
3) Make sure you have a suitable bit for drilling a hole for the conduit to pass through the upright. Most regular holesaws cannot drill deep enough for this.
I had a lot of fun with my install and it gives me a good feeling every time I plugin so it's worth it to plan it out and do it how you really want rather than getting in a last-minute rush and taking short-cuts.
Our cottage is in the snow belt off Lake Huron, but we never get dumps like you clearly have at your abode!
You have set the bar high, I will do my best.
I have the 25 foot cable also but my cottage is set about 40 ft from the parking area, so putting it on the side of the cottage is not an option. Need to put a post in.I got charger with 25 foot cable for the cottage, so I can install on side of cottage and still reach, how far away is your parking spot
M3Mike
New Member
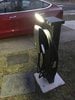
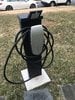
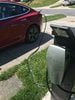
Don’t have a garage, I had one installed next to driveway (rather than on side of house) so it could be used for multiple cars without having to shuffle cars around to reach the charger. Added inexpensive solar motion sensor light on top for winter. Tesla electrician (i got three quotes) installed the pedestal along with their wall charger, and poured a small concrete pad. I believe this is the pedestal: ProMountDuo Universal Pedestal for ClipperCreek Tesla EVSE
I’m happy with the solution. Very durable and weather proof solution.
I’m happy with the solution. Very durable and weather proof solution.
Attachments
StealthP3D
Well-Known Member
Thanks very much for this good information.
Our cottage is in the snow belt off Lake Huron, but we never get dumps like you clearly have at your abode!
You have set the bar high, I will do my best.
Well, an A-frame roof is over-kill for most locations as most EVSE is rated for installing out in the weather. I did the more extensive solution because the location is in a PNW rainforest and I didn't want to have to scrub the "green" off every year.
I do have one more tip:
The install will look more finished if you run the conduit up the backside of the post instead of up the post and into the bottom of the HPWC.
Very clean and sleek looking job . Thanks for posting.Don’t have a garage, I had one installed next to driveway (rather than on side of house) so it could be used for multiple cars without having to shuffle cars around to reach the charger. Added inexpensive solar motion sensor light on top for winter. Tesla electrician (i got three quotes) installed the pedestal along with their wall charger, and poured a small concrete pad. I believe this is the pedestal: ProMountDuo Universal Pedestal for ClipperCreek Tesla EVSE
I’m happy with the solution. Very durable and weather proof solution.
Similar threads
- Replies
- 8
- Views
- 529
- Replies
- 4
- Views
- 1K
- Replies
- 31
- Views
- 2K
- Replies
- 7
- Views
- 537