After purchasing a fast wireless charging pad for the model 3 of ebay (separate post to follow on that), I realized I had to provide the 9v 1.5a requirement to the usb ports of the charging pad for fast charging to work.
Instead of routing 2 usb wires from the back bin connected to a fast usb 12v charger, i decided to remove the console and find a way to add a 12v socket to the front to avoid routing wires through the 2 bins.
What follows is a guide of sorts for the removal of the center console as well as installation and wiring notes of my modification. This is not a step-by-step guide, I assume if someone is interesting in doing this themselves they have a certain amount of comfort around their car and basic electric principles.
The center console must be removed from the car, there is no way around it. Luckily the car is very well put together and its very easy to take apart.
There are a total of 6 bolts with a 10mm head and 2 hex screws, two bolts on each side of the console and 2 on the back (on the side as well).
Starting with the rear of the console:

Then removing the rear connector:

Moving to the front, removing the two screws under the phone tray:

You can then remove the carpet side trims on each side of the console. These are a bit flimsy so don't force to much.
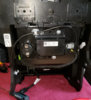
Once removed we get access to the last 4 bolts as well as the front connector:


That's all! Center console can now be taken out by wiggle-ling aft wards and lifting. (make sure the phone tray cover is closed)
Once out you can see the available space next to the front usb ports and figure out the best place for the new socket.

The two yellow and two black power in for the front USB are the same, you can splice into any of the two for the 12v source. This will not trip any efuse if you don't use the socket for your portable 12v oven.
And once installed:

Before putting the console back in the car there is a little caveat. There are two ...well two nipples of sorts holding the usb panel in place so that it does not flex too much. One of those is right where the new socket is and needs to be trimmed down to the same length that the socket is occupying. Photos are worth a million words, so :

You can then proceed with installing the console back. I was to eager to put it all back so I didn't take any photos of my wiring job that I'm very proud off ....pity.
And here is the final result with cables all nice and tidy.

Wubbalubbadubdub!
Instead of routing 2 usb wires from the back bin connected to a fast usb 12v charger, i decided to remove the console and find a way to add a 12v socket to the front to avoid routing wires through the 2 bins.
What follows is a guide of sorts for the removal of the center console as well as installation and wiring notes of my modification. This is not a step-by-step guide, I assume if someone is interesting in doing this themselves they have a certain amount of comfort around their car and basic electric principles.
The center console must be removed from the car, there is no way around it. Luckily the car is very well put together and its very easy to take apart.
There are a total of 6 bolts with a 10mm head and 2 hex screws, two bolts on each side of the console and 2 on the back (on the side as well).
Starting with the rear of the console:
Then removing the rear connector:
Moving to the front, removing the two screws under the phone tray:
You can then remove the carpet side trims on each side of the console. These are a bit flimsy so don't force to much.
Once removed we get access to the last 4 bolts as well as the front connector:
That's all! Center console can now be taken out by wiggle-ling aft wards and lifting. (make sure the phone tray cover is closed)
Once out you can see the available space next to the front usb ports and figure out the best place for the new socket.
The two yellow and two black power in for the front USB are the same, you can splice into any of the two for the 12v source. This will not trip any efuse if you don't use the socket for your portable 12v oven.
And once installed:
Before putting the console back in the car there is a little caveat. There are two ...well two nipples of sorts holding the usb panel in place so that it does not flex too much. One of those is right where the new socket is and needs to be trimmed down to the same length that the socket is occupying. Photos are worth a million words, so :
You can then proceed with installing the console back. I was to eager to put it all back so I didn't take any photos of my wiring job that I'm very proud off ....pity.
And here is the final result with cables all nice and tidy.
Wubbalubbadubdub!