Welcome to Tesla Motors Club
Discuss Tesla's Model S, Model 3, Model X, Model Y, Cybertruck, Roadster and More.
Register

3M adhesive won't stick. Gap in my rear diffuser install

This site may earn commission on affiliate links.
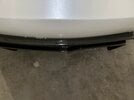
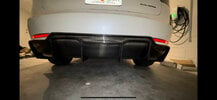
I bought a carbon fiber rear diffuser and installed it carefully. I cleaned the car paint with rubbing alcohol, used adhesive promoter, and applied strong double-sided adhesive tape (Scotch 3M Extreme, 30lb) to attach the bumper. I also used six self-tapping screws on the bottom part of the diffuser. However, the top middle section isn't sticking well. I don't want to disassemble it and start over.

Can someone suggest a good clear silicone adhesive that won't damage the car's paint and will ensure a strong bond?
 

Attachments

  • IMG_9241.jpg
    IMG_9241.jpg
    284.6 KB · Views: 149
  • 2.jpg
    2.jpg
    214.5 KB · Views: 103
What brand is this one? If it’s the reproduction ones the fitment is meh. You’d have to take off the screws in the bottom, restick the adhesive and make sure it stays, then screw in the bottom ones.
 
What brand is this one? If it’s the reproduction ones the fitment is meh. You’d have to take off the screws in the bottom, restick the adhesive and make sure it stays, then screw in the bottom ones.
Yeah I got it off ebay New Real Carbon Fiber V-Style Rear Lip Bumper Diffuser For 19-23 Tesla Model 3 | eBay. I did stick it first, then do the screws last in that exact process. Ultimately now just trying to find something else to do without taking it a part again. This is actually the second time I've taken it a part.
 
I had the same issue with a Maxton Design v2 diffuser. It fit great but where it wrapped around at the top had a bead of double-sided tape and the same thing. Prepped the area really well and should have held great but a few spots it started pulling away. I hated how bad it looked and spent a lot of time heating those areas up and taping them down with pressure. It would hold again for a few days but eventually pull away again.

I took some black silicone RTV and filled the top gap in all the way around. It came out really good and looks solid now. No more gaps.

Tip: Get a little bowl of water and some paper towels. After you put the bead of Silicone in .. Wet your finger and dab it on the paper towel and run it across the silicone. It will give it a very smooth texture. Use paper towel to clean up any silicone you don't want until you get the results you're after.
 
  • Like
  • Informative
Reactions: slzeal and Skavatar
I had the same issue with a Maxton Design v2 diffuser. It fit great but where it wrapped around at the top had a bead of double-sided tape and the same thing. Prepped the area really well and should have held great but a few spots it started pulling away. I hated how bad it looked and spent a lot of time heating those areas up and taping them down with pressure. It would hold again for a few days but eventually pull away again.

I took some black silicone RTV and filled the top gap in all the way around. It came out really good and looks solid now. No more gaps.

Tip: Get a little bowl of water and some paper towels. After you put the bead of Silicone in .. Wet your finger and dab it on the paper towel and run it across the silicone. It will give it a very smooth texture. Use paper towel to clean up any silicone you don't want until you get the results you're after.
Do you have a picture of the end result? Would love to see how it ended up.
 
I had the same issue with a Maxton Design v2 diffuser. It fit great but where it wrapped around at the top had a bead of double-sided tape and the same thing. Prepped the area really well and should have held great but a few spots it started pulling away. I hated how bad it looked and spent a lot of time heating those areas up and taping them down with pressure. It would hold again for a few days but eventually pull away again.

I took some black silicone RTV and filled the top gap in all the way around. It came out really good and looks solid now. No more gaps.

Tip: Get a little bowl of water and some paper towels. After you put the bead of Silicone in .. Wet your finger and dab it on the paper towel and run it across the silicone. It will give it a very smooth texture. Use paper towel to clean up any silicone you don't want until you get the results you're after.
Would you mind sending me which black silicone adhesive you used?

wish I could find a clear one since I have a white car lol but guess i'll just have to be extra steady
 
1708121442894.png


Appreciate you linking me, might go for it

Sidenote: my father that does handyman work for a living recommended me to use this stuff. Said it’ll stick for sure, water proof, clear and won’t damage paint. Just hard to take serious considering it's meant for Kitchen and Bath stuff lmao anyone hard disagree or think it's worth a shot?
 
View attachment 1019108


Appreciate you linking me, might go for it

Sidenote: my father that does handyman work for a living recommended me to use this stuff. Said it’ll stick for sure, water proof, clear and won’t damage paint. Just hard to take serious considering it's meant for Kitchen and Bath stuff lmao anyone hard disagree or think it's worth a shot?
They usually also have a doors and windows version that's for exterior also. However given this will see direct sunlight and your diffuser is black, if where you are using it will be exposed (as in the adhesive is a bead exposed to the sun), perhaps using the black DAP mentioned might be better (as it is UV resistant) and might blend in better.

100% silicone does tend to be fairly safe and strong though, and typically can be peeled off fairly easily if you change your mind (may have to run something in between however to break the bond).

For the 3M tape note that it needs cure in above room temperature for more than 24 hours to stick properly, ideally even higher temperatures. You may also need to tape elsewhere to support it first to let it cure. But you are already past that point, as you only get one try with it.
Yeah I tried taking off the diffuser twice now with 3m, waited 24 hours and still caused a gap. Silicone is the choice I'm leaning towards.

This the one you are talking about? GE Advanced Silicone 2 10.1 oz. Clear Exterior/Interior Window and Door Sealant 2811092 - The Home Depot

The only reason why I don't want to use black is after years of it staying on I don't want it to stain the white paint. Feel like clear would give less of a fight lol
 
  • Like
Reactions: Dysan911
Yeah I tried taking off the diffuser twice now with 3m, waited 24 hours and still caused a gap. Silicone is the choice I'm leaning towards.
It and the surface has to be above room temperature (70F) for the whole 24 hours to form a 90% bond. That can be challenge for a car unless you have a heated garage. Although you can accelerate it greatly by using much higher heat (150F or higher curing temp can form a 90% bond in 20 minutes).


Also when applying, 15 PSI of force must be applied. It might be a bit difficult to do that for something on the bottom (unlike a trunk spoiler on top). You may need to apply in two stages, first to apply one side of the tape to the diffuser, let it cure, then peel off the backing and apply the diffuser. Use other tape or other means to hold diffuser in place until tape as fully cured (otherwise gravity will naturally pull things apart before it has properly cured).

And note you would have to replace the tape with new tape if you have taken it off. The 3M tape loses its tack after curing so you only get one try essentially.
This the one you are talking about? GE Advanced Silicone 2 10.1 oz. Clear Exterior/Interior Window and Door Sealant 2811092 - The Home Depot

The only reason why I don't want to use black is after years of it staying on I don't want it to stain the white paint. Feel like clear would give less of a fight lol
Yeah, that's the exterior version. I haven't used it before to attach anything to a car, so don't know how well it would perform in that application, but have used it on a tile wall to attach a soap dispenser and it's surprisingly strong once cured (the instructions called for only using silicone, and I was skeptical it can stay on with no screws). The only thing in the reviews I noticed is to check the expiration date, sometimes they have expired stock if the store doesn't get much traffic.
 
I followed everything you have mentioned besides applying force and having the correct tempature while it sits for 24 hours. I even sanded the part where the 3m would rest along side the diffuser to give it more grip. Just kind of over the 3m, for the diffuser at least lol appreciate all the information nontheless, it's grea to know for any future projects. Going to give the silicone a try and will update! Thanks a ton my guy!
 
When it comes to addressing issues with adhesive bonding, especially for automotive applications like installing a rear diffuser, it's crucial to use a high-quality adhesive that provides a strong and durable bond without damaging the car's paint.

One option you might consider is the 3M 08661 Clear Super Silicone Seal. This silicone adhesive is specifically formulated for automotive use and is known for its excellent adhesion properties, flexibility, and weather resistance. It's transparent, ensuring that it won't detract from the appearance of your carbon fiber diffuser or the car's paint.

Before applying the silicone adhesive, make sure to thoroughly clean the surfaces with rubbing alcohol to remove any dirt, grease, or residue. Apply a thin, even layer of the silicone adhesive to the areas where the bonding tape isn't sticking well, ensuring complete coverage. Press the diffuser firmly into place and allow sufficient time for the adhesive to cure according to the manufacturer's instructions.

Alternatively, you could also consider using 3M VHB (Very High Bond) Tape, which is renowned for its exceptional strength and durability. It's designed to bond to a variety of surfaces, including automotive paints, plastics, and metals, providing a reliable and long-lasting bond.

If you decide to go with either of these options, I recommend testing the adhesive on a small, inconspicuous area of the car's paint first to ensure compatibility and to verify that it won't cause any damage or discoloration.

In addition to addressing the immediate issue with your diffuser installation, it's also essential to monitor the bond over time and consider periodically checking and reapplying the adhesive as needed to maintain a secure attachment.