


Welcome to Tesla Motors Club
Discuss Tesla's Model S, Model 3, Model X, Model Y, Cybertruck, Roadster and More.
Register
Install the app
How to install the app on iOS
You can install our site as a web app on your iOS device by utilizing the Add to Home Screen feature in Safari. Please see this thread for more details on this.
Note: This feature may not be available in some browsers.
-
Want to remove ads? Register an account and login to see fewer ads, and become a Supporting Member to remove almost all ads.
You are using an out of date browser. It may not display this or other websites correctly.
You should upgrade or use an alternative browser.
You should upgrade or use an alternative browser.
Burrito
Member
Murattukaalai
Member

Attachedpics? probably just leave it, not like you can see both left and right at the same time
Burrito
Member
Murattukaalai
Member
Thanksi own a tesla and would never even notice that. i say leave it
I used G2 brake caliper kit on my model 3. I just looked at multiple YouTube videos, taped off my calipers well, and took my time. The kit comes with a paintbrush, it helps to buy a cheap craft brush that is very fine to get into the small areas. This is going to take two separate days though, I only had two jacks so could only do the back calipers today but will do the front ones in a few days.
hi-
the stock Model 3 front calipers have black “Tesla” lettering. It looks like the lettering is painted into recesses in the caliper. Is this correct, or are these just decals? If so, Do you remove before painting the calipers?
Murattukaalai
Member
The stock has white and it is not same lettering style as decals they are selling online and looks painted in recesshi-
the stock Model 3 front calipers have black “Tesla” lettering. It looks like the lettering is painted into recesses in the caliper. Is this correct, or are these just decals? If so, Do you remove before painting the calipers?
GreenHokie
Member
hi-
the stock Model 3 front calipers have black “Tesla” lettering. It looks like the lettering is painted into recesses in the caliper. Is this correct, or are these just decals? If so, Do you remove before painting the calipers?
I'm not sure if the original lettering on the stock calipers are painted or decals, but I am certain they are not recessed. When I prepped my calipers to be painted, I used ultrafine sand paper to smooth out the rough edges/surfaces of the stock calipers and the OEM lettering simply wore off to a smooth surface with very little effort. In other words, the surface of the caliper is perfectly flat in the area where the OEM lettering was positioned.
Here are a few pics of mine. I used the G2 kit and it turned out great IMO.
It's time consuming, but totally worth it. As others have said, painted calipers gives you about a 10 hp boost in power!!
")
Good luck!!!
rlb4
Member
I'm not sure if the original lettering on the stock calipers are painted or decals, but I am certain they are not recessed. When I prepped my calipers to be painted, I used ultrafine sand paper to smooth out the rough edges/surfaces of the stock calipers and the OEM lettering simply wore off to a smooth surface with very little effort. In other words, the surface of the caliper is perfectly flat in the area where the OEM lettering was positioned.
Here are a few pics of mine. I used the G2 kit and it turned out great IMO.
It's time consuming, but totally worth it. As others have said, painted calipers gives you about a 10 hp boost in power!!
Good luck!!!View attachment 503451
View attachment 503453
View attachment 503458
View attachment 503459
View attachment 503460
View attachment 503461
Did you spray or paint a clear coat over just the letters or the entire caliper after applying the Tesla letters?
GreenHokie
Member
Did you spray or paint a clear coat over just the letters or the entire caliper after applying the Tesla letters?
Good question. After I applied the Tesla decal, I sprayed a high temp clear coat over everything. VHT was the brand.
https://www.amazon.com/dp/B000CPJLV2/ref=cm_sw_em_r_mt_dp_U_GDEkEbFCFEMEY
The G2 paint system already has a built-in gloss coat. So, it was not necessary to spray a clear coat over the paint. However, it was just easier to spray everything to get the desired 2-3 coats of clear over the letters.
So far, it's held up very well to the typical environmental conditions and maintenance washes with a pressure washer. Looks just as good now, as it did when I did the work.
rlb4
Member
Good question. After I applied the Tesla decal, I sprayed a high temp clear coat over everything. VHT was the brand.
https://www.amazon.com/dp/B000CPJLV2/ref=cm_sw_em_r_mt_dp_U_GDEkEbFCFEMEY
The G2 paint system already has a built-in gloss coat. So, it was not necessary to spray a clear coat over the paint. However, it was just easier to spray everything to get the desired 2-3 coats of clear over the letters.
So far, it's held up very well to the typical environmental conditions and maintenance washes with a pressure washer. Looks just as good now, as it did when I did the work.
Thanks. What did you use to clean the calipers before painting?
GreenHokie
Member
Thanks. What did you use to clean the calipers before painting?
The G2 paint kit comes with a non-chlorinated (but very effective) can of brake cleaner. The process I used was to spray my calipers with the supplied brake cleaner, do a light manual sanding of the calipers to smooth the surface a little, and then hit everything again with the brake cleaner. Afterwards, the calipers were super clean/pristine and ready to accept paint. My vehicle was fairly new at the time, so there was really not much to clean/remove from the calipers.
Can you please send me or post the link to the lifts you used please. Thank you. I'm thinking about doing this too. Think I can get it done in a weekend?The G2 paint kit comes with a non-chlorinated (but very effective) can of brake cleaner. The process I used was to spray my calipers with the supplied brake cleaner, do a light manual sanding of the calipers to smooth the surface a little, and then hit everything again with the brake cleaner. Afterwards, the calipers were super clean/pristine and ready to accept paint. My vehicle was fairly new at the time, so there was really not much to clean/remove from the calipers.
Murattukaalai
Member
Can you please send me or post the link to the lifts you used please. Thank you. I'm thinking about doing this too. Think I can get it done in a weekend?
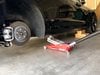
You don't need expensive stand to paint caliper kit. I used one jack and bunch of 2x4s with another puck, dropped the car very lightly on the wood. One jack lifts both side wheels at the same time. Wood jack is insurance policy in case something goes wrong. I did both sides in 8 hours with G2 caliper paint.
Attachments
GreenHokie
Member
Can you please send me or post the link to the lifts you used please. Thank you. I'm thinking about doing this too. Think I can get it done in a weekend?
Here’s the link to the QuickJack product page. I bought the BL-5000EXT model.
As described, the EXT is slightly longer than the standard SLX model, which is needed to make full contact with & properly support the front & rear jack points on the Model 3. I initially bought the SLX but returned it because it is just a tad bit too short for the Model 3.
BL-5000EXT
The above poster is correct in that you can just use a traditional (& much less expensive) jack & stands. However, just be aware you have a limited time to use/apply the G2 paint once you add/mix in the supplied hardening agent to the paint. I think the G2 application instructions say somewhere around 4 hrs before the paint starts to thicken/harden to a point where it becomes difficult to apply. I think I got around 6 hrs before mine started to get too thick. Point is... you will want to have everything prepped and ready for painting as soon as you open the paint can and mix in the required/supplied hardening agent.
So, if you go with the traditional jack & stand, I recommend you have the vehicle completely off the ground on stands and all four wheels removed, before you start the paint process. You’ll need to apply at least 2-3 light coats on each caliper. I can’t empathize how important it is to do only light coats with each application. Multiple light coats will usually result in the best/smoothest looking finish.
Yes, it can be done in one weekend, but barely especially if you plan on applying the Tesla decals and spraying a clear coat over those decals. I recommend getting your vehicle to a point where you are ready to start painting by early Saturday morning (this means you may need to put your car up on stands and clean your calipers Friday evening). From start to finish, the whole process will take much longer than the 8 hours mentioned by the above poster... especially if you want to do it “right”.
Good luck!!
Last edited:
@GreenHokie Thank you so much for the great information. The whole "light" coat" thing is news to me so I'm grateful for that awesome tip. That jack system looks amazing but I think I may have to got the cheap route and jack it up one side at a time and prop it up with wood. Thanks again! I love the Tesla community!Here’s the link to the QuickJack product page. I bought the BL-5000EXT model.
As described, the EXT is slightly longer than the standard SLX model, which is needed to make full contact with & properly support the front & rear jack points on the Model 3. I initially bought the SLX but returned it because it is just a tad bit too short for the Model 3.
BL-5000EXT
The above poster is correct in that you can just use a traditional (& much less expensive) jack & stands. However, just be aware you have a limited time to use/apply the G2 paint once you add/mix in the supplied hardening agent to the paint. I think the G2 application instructions say somewhere around 4 hrs before the paint starts to thicken/harden to a point where it becomes difficult to apply. I think I got around 6 hrs before mine started to get too thick. Point is... you will want to have everything prepped and ready for painting as soon as you open the paint can and mix in the required/supplied hardening agent.
So, if you go with the traditional jack & stand, I recommend you have the vehicle completely off the ground on stands and all four wheels removed, before you start the paint process. You’ll need to apply at least 2-3 light coats on each caliper. I can’t empathize how important it is to do only light coats with each application. Multiple light coats will usually result in the best/smoothest looking finish.
Yes, it can be done in one weekend, but barely especially if you plan on applying the Tesla decals and spraying a clear coat over those decals. I recommend getting your vehicle to a point where you are ready to start painting by early Saturday morning (this means you may need to put your car up on stands and clean your calipers Friday evening). From start to finish, the whole process will take much longer than the 8 hours mentioned by the above poster... especially if you want to do it “right”.
Good luck!!
Murattukaalai
Member
@GreenHokie Thank you so much for the great information. The whole "light" coat" thing is news to me so I'm grateful for that awesome tip. That jack system looks amazing but I think I may have to got the cheap route and jack it up one side at a time and prop it up with wood. Thanks again! I love the Tesla community!
Light coat technique is common in painting communities but with G2 it is self leveling so its very forgiving. Agree I rushed to do it in 8 hours. I mixed the paint once I taped the first side on both wheels. You could also mix half in different container to avoid hardening and do it slow. Do not use supplied brush buy a nice set from Amazon and use smaller head brushes. Also if you go wood route, do not drop the car on the wood, I had it hanging about 2mm over the wood. This was my first time and I was pretty terrified lifting cars. Lucky we have regen braking so not much to clean. I used supplied cleaner plus P&S brake buster to clean.
I masked the pin and out of 4 one didn't work. I liked the above idea of pushing it back so you don't get paint on them.
This is the video I followed:
Mine is torch red.
mastermind
Member
@Nguyenning what shop in Dallas did you get a quote from. I'm looking for one as I don't have a jack or tools to DIY.Hmm got a quote from a shop (in Dallas, TX) to paint my calipers for $380. For what it’s worth, they take them off and paint them, then reassemble.
I’ve seen some crazy quotes of over $1K so this is kind of enticing...
But this thread is making me wonder if I should try and do it myself... for the cost of the paint ha
jenzfc
Member
Similar threads
- Replies
- 6
- Views
- 386
- Replies
- 1
- Views
- 469
- Replies
- 0
- Views
- 290
- Replies
- 2
- Views
- 1K