Welcome to Tesla Motors Club
Discuss Tesla's Model S, Model 3, Model X, Model Y, Cybertruck, Roadster and More.
Register

DIY: Roadster 2.5 PEM cleaning - step by step

This site may earn commission on affiliate links.
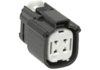
Yes I had this problem this week! Funny thing it is not mentioned anywhere on TMC in the 8 years I have had my Roadster... until now with your post. It's also funny I have never had this problem before. Here's my theory: I sprayed DeoxIT D5 in both halves of the connectors to clean them. I think there is a solvent in DeoxIT that attacked the orange gasket and caused it to swell up. It's just a theory but I can't think of any better explanation.

I was reading reviews of Deoxit on Amazon and found this:

"DO NOT USE ON SEALED AUTOMOTIVE WEATHERPACK TYPE CONNECTORS. It DESTROYS the rubber seals inside of them. Was looking to clean and protect the weatherpack junctions on my truck and watercraft. It destroyed the rubber seal that keeps moisture out of them. I had to pull and discard the seal.. it swelled up to almost twice its normal length and was impossible to get connectors back together."

So it is a great product to use, but maybe keep it off the rubber seals.
Yeah, this is very true. I had the SC clean my PEM fan connector contacts, and didn't warn them sufficiently about the seals. Puffed up rather nicely, from what they said...

So they're ordering a replacement "grommet", but of course, stock on hand is zero. Maybe one over in the Netherlands.

Question to the knowledgeable... Is there an off the shelf equivalent for the rubber part?
 
Update: The connector part has been received at the SC (I didn't have to get one myself), and am scheduled for a "connector repinning" next week.

But, the PEM is running really really hot. Like, just driving around town on a hot day, it's in the yellow. Any stress (like accelerating normally from a stop) pushes it to power limit. The thing is, I pulled the logs and there are NO alerts. I expected to see a bunch of 1146's in there, but it's very clean. If the air duct isn't attached securely somewhere, wouldn't that trip an alert? Motor temps seem pretty normal, and I can hear the fan blowing like crazy, so I don't think the blower itself is a problem, nor the power going to it.

I can't see under the PEM well enough to tell. I tried fishing around with a webcam to see if I could spot anything wrong, but can't seem to get a good look at the right parts.
If I remember correctly (on a trip at the moment) ...

With the PEM fan running, you should feel strong airflow just to the left of the PEM (this is where the air is directed) if the duct is properly connect. Mine came off once and your symptoms are the same as what I encountered.

If you have a lift available, you can easily pull the rear undertray and reconnect the duct without pulling the PEM.
 
Do you feel a lot of air blowing up between the pem and battery? On the left side where the duct is connected to the pem?

Mine wasn't connected right once and I felt a lot of air flow coming up between the pem battery on left side.

It is possible to connect again without removing pem. Unscrew 8 nuts / bolts (6 small / 2 big) like in the DIY pem cleaning thread and only lift the left side of the pem up and put a piece of wood in between. Just enough so you have enough space for attaching the duct.
 
Ps: if you look down between pem and battery (with flashlight) you can see if duct is connected right.
BINGO! Nailed it!

PEM duct disconnected.jpg

You are looking at the plastic housing that attaches the duct to the PEM. It's come off the pegs, and is probably flopping down underneath as well.

Are there supposed to be "C" clips that hold the housing to the PEM? What about on the bottom? How is it supposed to be held in place?

I can push a screwdriver down between it and the battery pack and push it into place, but it is loose and can flop back. I'm thinking I can wedge some wood down there to hold it for the trip down the hill.
 
Check out post #1, step 30. It can be a little tricky getting the duct back on.
Ah, right. Sorry, should have checked. Given that they have to lift up the PEM to re-pin the fan connector, I think I'll stick with the wooden wedge to keep it from dropping off the pins, and let them deal with attaching it properly. Should have a lot more airflow with it at least being in position, versus having the side of the duct blowing straight up into thin air.
 
Update: The connector part has been received at the SC (I didn't have to get one myself), and am scheduled for a "connector repinning" next week.

But, the PEM is running really really hot. Like, just driving around town on a hot day, it's in the yellow. Any stress (like accelerating normally from a stop) pushes it to power limit. The thing is, I pulled the logs and there are NO alerts. I expected to see a bunch of 1146's in there, but it's very clean. If the air duct isn't attached securely somewhere, wouldn't that trip an alert? Motor temps seem pretty normal, and I can hear the fan blowing like crazy, so I don't think the blower itself is a problem, nor the power going to it.

I can't see under the PEM well enough to tell. I tried fishing around with a webcam to see if I could spot anything wrong, but can't seem to get a good look at the right parts.


I'd do more then repin UNLESS the connector is in perfect condition. Normally extracting the pins tends to damage the connector a little.

They are going to the trouble of taking the connector apart, you might as well replace the connector as well. Its a 15.00 part from the SC or $1.80 from digikey. They did my pins first and it was bad again in a few months of hot weather ( 1144's and 1146's galore). I had to replace the MOLEX connector AND pins the 2nd time myself, then the errors stopped

Molex Connector Part Number - 19418-0004

Careful if you apply Deoxit, as it will swell the gaskets as well. KEEP IT JUST ON PINS!

Just my humble opinion, but better to be safe than sorry when working with your PEM connector.


PEM - Plug.jpg
 

Attachments

  • 194180004_ISO.gif
    194180004_ISO.gif
    14.6 KB · Views: 188
Last edited:
I'd do more then repin UNLESS the connector is in perfect condition. Normally extracting the pins tends to damage the connector a little.

They are going to the trouble of taking the connector apart, you might as well replace the connector as well. Its a 15.00 part from the SC or $1.80 from digikey. They did my pins first and it was bad again in a few months of hot weather ( 1144's and 1146's galore). I had to replace the MOLEX connector AND pins the 2nd time myself, then the errors stopped

Molex Connector Part Number - 19418-0004

Careful if you apply Deoxit, as it will swell the gaskets as well. KEEP IT JUST ON PINS!

Just my humble opinion, but better to be safe than sorry when working with your PEM connector.


View attachment 448363
They're calling it a re-pin, but I do think they're replacing the connector. Will mention the concern about "saving" the old pins.

I finally met (in person!) the tech who will be working on it. Nice guy, seems quite knowledgeable. They work in teams of three, and one of the other two was the one who did the (over) spraying. Anyway, he said that besides DeOxit, another thing to apply is some "dielectric grease", which helps carry away any heat that might build up.

Any thoughts / concerns about that? Seems like putting an insulator inside an electrical connector might not be the best idea, but I understand the benefit of preventing heat buildup.

make sure they replace the connector and not just the pins (actually the pins are in the PEM side) they are plugs on the connector side.

PEM side looks like this

PEM - JACK.jpg


In the connector there are "plugs" that those PEM pins fit into.

upload_2019-8-30_12-8-8.png


The interesting this is THIS plug is only rated for 25 connections with the TIN pings and plugs, 100 for gold plated per the spec.

https://www.molex.com/pdm_docs/ps/PS-19417-001-001.pdf

upload_2019-8-30_12-3-52.png


This seems RIDICULOUSLY LOW for its use in an automotive use and it clearly states in the specs its NOT FOR AUTOMOTIVE use as well...


Just have them send you pictures of the old plug and underside of the PEM jack connector so you have that as a reference pre and post service.

I'd also the SC ask to keep the OLD plug and the pins as well so you can inspect them for wear and verify what was ACTUALLY replaced.
 
  • Informative
Reactions: dhrivnak
That cheap, undersized connector should be eliminated and the PEM hard wired to the car's harness. I hope the harness has 14 ga minimum wiring. Also add a temp sensor in the air flow with readout on dash for day to day confidence.
--
 
  • Like
Reactions: AtAge19
That cheap, undersized connector should be eliminated and the PEM hard wired to the car's harness. I hope the harness has 14 ga minimum wiring. Also add a temp sensor in the air flow with readout on dash for day to day confidence.
--
No need to hardwire it, just put a proper connector on. The 1.5's don't have this problem. Alternatively, make a short pigtail that you leave connected into the PEM, doing the mating on the other end. After that second connector is worn out, just replace the pigtail. Should extend the life of the PEM-side connector by 10x. Better, put a properly sized connector on the other end of the pigtail, and a matching one in place of the deficient one going to the fan. Lots of alternatives if you want to dig around under the PEM.

Also include some weather stripping on the underside of the PEM, to seal leaks from around the plastic housing.
 
  • Like
Reactions: dhrivnak
> Alternatively, make a short pigtail that you leave connected into the PEM, doing the mating on the other end. [gregd]

You could pigtail both sides (eliminating the connector entirely) with your favorite stranded wire, and then tie the pigtails together using WIRE NUTS. After test driving you could solder them in if you want.

When I re-activate my Roadster there will be leads to the big electrolytics for quick voltage monitoring as the PEM fires up. Prudent since car has been dead for so long.
--
 
No need to hardwire it, just put a proper connector on. The 1.5's don't have this problem. Alternatively, make a short pigtail that you leave connected into the PEM, doing the mating on the other end. After that second connector is worn out, just replace the pigtail. Should extend the life of the PEM-side connector by 10x. Better, put a properly sized connector on the other end of the pigtail, and a matching one in place of the deficient one going to the fan. Lots of alternatives if you want to dig around under the PEM.

Also include some weather stripping on the underside of the PEM, to seal leaks from around the plastic housing.
I should do a quick update here... The tech at the SC tried putting some thin weather stripping under the PEM, but couldn't get the plastic housing to re-attach. Apparently it's just too tight, so probably not a significant source of air leakage either.