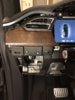
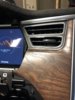
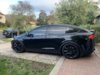
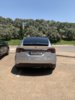
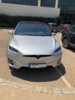
Hey everyone. Loving my new (to me) Tesla. Just wanted to show off some pictures from my DIY vinyl wrapping. Wasn't a fan of the interior trim so did some vinyl wrapping. Wasn't a fan of the exterior chrome, so did some more wrapping. Now I think i may have overdid it with the carbon fiber on the outside. Was thinking of changing the exterior carbon fiber to just black. What do you all think? Open to all opinions.


Welcome to Tesla Motors Club
Discuss Tesla's Model S, Model 3, Model X, Model Y, Cybertruck, Roadster and More.
Register
Install the app
How to install the app on iOS
You can install our site as a web app on your iOS device by utilizing the Add to Home Screen feature in Safari. Please see this thread for more details on this.
Note: This feature may not be available in some browsers.
-
Want to remove ads? Register an account and login to see fewer ads, and become a Supporting Member to remove almost all ads.
You are using an out of date browser. It may not display this or other websites correctly.
You should upgrade or use an alternative browser.
You should upgrade or use an alternative browser.
DIY vinyl wrap interior and exterior :)
- Thread starter bionichomer
- Start date
I was going to do the same Crome delete with carbon fiber but wasn’t sure what it would look like. I’m glad you posted pictures so I could see it.. I already have the carbon fiber on the inside but I was going to do the back of the captains chairs on the first and second row with carbon fiber. On the outside I was also going to do the wing.
jkoya
NA2 NSX
Thanks all! I was afraid it was too much fake carbon fiber.
BeardedBro... not my first time, but it's not too terribly difficult, just takes a little patience.
Freerster... I could not remove any of the seat backs. I pulled and pulled and it would not unsnap. Just for fun i did install a sheet on the top half of the passenger seat back. It looked fine but the sheet was not long enough. Bought 5ft x 2ft off Amazon. I didn't measure properly and ended up wasting a roll, then bailed on the seat backs. The sides of the front seats actually wrap around more than i thought, especially towards the bottom. Measure several times, then order vinyl") Good luck on yours!
Good luck on yours!
BeardedBro... not my first time, but it's not too terribly difficult, just takes a little patience.
Freerster... I could not remove any of the seat backs. I pulled and pulled and it would not unsnap. Just for fun i did install a sheet on the top half of the passenger seat back. It looked fine but the sheet was not long enough. Bought 5ft x 2ft off Amazon. I didn't measure properly and ended up wasting a roll, then bailed on the seat backs. The sides of the front seats actually wrap around more than i thought, especially towards the bottom. Measure several times, then order vinyl
Good luck on yours!Dre78
Member
I like that the carbon fiber accents the exterior, and the other chrome pieces on the car are plain black.
With all the money saved, it's time to buy carbon fiber rims!?
With all the money saved, it's time to buy carbon fiber rims!?
Looks great. Did you remove the rear chrome piece on the hatch then wrap it, if so can you tell me how to remove that piece? How did you cut around the letters?
Thanks! Yes i removed it. I thought someone would ask so i took a few pictures when I did it
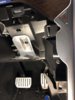
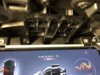
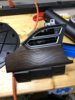
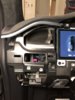
There are 6 snaps in the upper center (yellow arrows), then there are 4 alignment ribs that go into these slots (red arrows), then there is a triangular piece of adhesive (red circles) on each end of the chrome.I started on the right side. I pried the end of the chrome up with some trim tools. Probably could have done the floss trick (for emblems) to break the adhesive but I was kind of impatient. Then i worked left to unsnap the hooks, then eventually ended on the left and broke the adhesive with the trim tools again. The adhesive is really the hardest part. The trick is to pry up, then wedge something sharp under and cut the double stick tape a little at a time.
After removing the trim from the car, the logo part must be broken off the trim. The logo is heat staked onto the trim...Meaning there are some plastic posts on the logo part that are melted to the trim part. This "welds" them together. See the red circles below. There are 5 or 6 posts that have to be ground off to remove the logo part. I used a Dremel tool to grind off the tops of the posts. Pictures already have the post tops removed.
Logo part removed...
After the logo part is removed just apply the vinyl to the chrome part, press it into the letter holes as best you can, put your blade in there and follow the edges of the openings to make the cuts. Really easy after removing the Tesla logo part. Oh also the logo part snapped back into the chrome part w/o issue. I was going to glue the logo part back in, but it held pretty well so i just left it alone.
Hope this helps, good Luck!
I like that the carbon fiber accents the exterior, and the other chrome pieces on the car are plain black.
With all the money saved, it's time to buy carbon fiber rims!?
Thanks! Didn't even know carbon fiber rims were a thing. I'm sure i'd ruin them if I got some
Do u have any pics where you removed the dash and the door pieces?
Here are some random ones. I took off some of the dash parts, but not all. The door pieces i removed and they were a pain. Don't quote me, but i think they're all snaps. Dash had several screws. Can't remember where they are. I found a video or a forum that showed how to remove it for a model S and i just followed it.
Attachments


Looks amazing! Your work is awesome... so much I'm inspired and will try wrapping a few places. Really appreciate the detailed breakdown on the rear hatch logo. I want to do that, but in carbon fiber matte WHITE! Trying to be different using contrasting colors (my x is black also). Thanks again!
Looks amazing! Your work is awesome... so much I'm inspired and will try wrapping a few places. Really appreciate the detailed breakdown on the rear hatch logo. I want to do that, but in carbon fiber matte WHITE! Trying to be different using contrasting colors (my x is black also). Thanks again!
Thanks. Glad I inspired. It's not too bad. Hardest part is removing the chrome without destroying it . Good luck!
WeooooooHuh
Member
dblankenbaker
Member
Looks sick. I did the same thing. You can get your badges painted or dip yours in like an hour which is what I did. Holding flawlessly after 31k miles. You can also dip the Tesla lettering on back trim and that contrast of CF/black would be cool.
Some cool things:
RPMTESLA sells the trim by the fog lights to wrap. I did that and it is super easy.
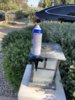
I took off my front badge and taped it where it was sticking out on the side of my lights in front of my house to get around it 360* so I dipped it. Rear badges I just dipped. Looks great and do not have to worry about replacing them perfectly. Pictures attached.
Some cool things:
RPMTESLA sells the trim by the fog lights to wrap. I did that and it is super easy.
I took off my front badge and taped it where it was sticking out on the side of my lights in front of my house to get around it 360* so I dipped it. Rear badges I just dipped. Looks great and do not have to worry about replacing them perfectly. Pictures attached.
Attachments

dhayek
Member


Similar threads
- Replies
- 1
- Views
- 433
- Replies
- 6
- Views
- 543
- Replies
- 6
- Views
- 2K