So this will be part 1 of who knows, but I'm a bit tired and annoyed with this process so far. As with most installs, the labor intensive parts are running the power wire and audio control (line output converter).
Step 1: Remove the funk panels and bin tray. This takes < 15 mins total. There are 20 screws holding the frunk bin in place (10mm). The panels simply pry upwards. Once completed, you'll see the massive HEPA Airfilter (if equipped).

Step 2: Remove the nut on the bolt that holds the rear portion of the accessory wire in place (10mm). This is where you'll connect your power wire directly to the 12V battery (don't connect the wire to the battery right now). I used an in-line fuse holder, with a 100 amp fuse, but what you run will vary based upon the power consumption of the amp (can be more or less). If you turn the connector to face the firewall, you can put the plastic housing back over the positive battery terminal with any issues.

Step 3: Remove the plastic panel that has a small divider for the hood arm on the right. Run the wire (I used 4 gauge) along the back of the electrical bay and route it to the upper right (this is where you'll run the wire into the vehicle as well. This shouldn't require any fishing wire, but that does make this a bit easier).

Step 4: Remove the trim panel in the footwell, you'll need to access the wire from here.

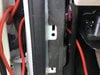
Step 5: Run the power wire under the plastic panel in the frunk and into the front door hinge area (don't worry, your door will close properly). I spent about 3 hours trying to find a way through the firewall, but this location was found after I was about to call it quits for the day. I used an Exacto blade and cut a small 2" incision in the rubber that encapsulates the speaker wires from the stock amp. You'll want to run it into here and into the cabin of the vehicle. There's a pretty sizable opening for the wires coming into the car, very easy to fish your wire through this area inside.


X
Step 1: Remove the funk panels and bin tray. This takes < 15 mins total. There are 20 screws holding the frunk bin in place (10mm). The panels simply pry upwards. Once completed, you'll see the massive HEPA Airfilter (if equipped).
Step 2: Remove the nut on the bolt that holds the rear portion of the accessory wire in place (10mm). This is where you'll connect your power wire directly to the 12V battery (don't connect the wire to the battery right now). I used an in-line fuse holder, with a 100 amp fuse, but what you run will vary based upon the power consumption of the amp (can be more or less). If you turn the connector to face the firewall, you can put the plastic housing back over the positive battery terminal with any issues.
Step 3: Remove the plastic panel that has a small divider for the hood arm on the right. Run the wire (I used 4 gauge) along the back of the electrical bay and route it to the upper right (this is where you'll run the wire into the vehicle as well. This shouldn't require any fishing wire, but that does make this a bit easier).
Step 4: Remove the trim panel in the footwell, you'll need to access the wire from here.
Step 5: Run the power wire under the plastic panel in the frunk and into the front door hinge area (don't worry, your door will close properly). I spent about 3 hours trying to find a way through the firewall, but this location was found after I was about to call it quits for the day. I used an Exacto blade and cut a small 2" incision in the rubber that encapsulates the speaker wires from the stock amp. You'll want to run it into here and into the cabin of the vehicle. There's a pretty sizable opening for the wires coming into the car, very easy to fish your wire through this area inside.
X