I never said its the frist just sharing a conversion build that's all. But if it's boring then I'll stop. Thanks


Welcome to Tesla Motors Club
Discuss Tesla's Model S, Model 3, Model X, Model Y, Cybertruck, Roadster and More.
Register
Install the app
How to install the app on iOS
You can install our site as a web app on your iOS device by utilizing the Add to Home Screen feature in Safari. Please see this thread for more details on this.
Note: This feature may not be available in some browsers.
-
Want to remove ads? Register an account and login to see fewer ads, and become a Supporting Member to remove almost all ads.
You are using an out of date browser. It may not display this or other websites correctly.
You should upgrade or use an alternative browser.
You should upgrade or use an alternative browser.
OEM facelift
- Thread starter Cibtrading88
- Start date
Definitely not this topic has been ongoing for 3 yrs lol. However it’s become possible and easier due to others continuing to add to it especially with videos etc. This forum has definitely made it possible for practically anyone to complete the conversion themselves.There are a whole bunch of other threads on this very topic. This is hardly the first time it'e been done.
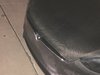
Hood completed
Can you give me the link to the controller please. ThanksThe controller for the light need to be order on ebay. Just search the conversion. Attach is picture of the new hood
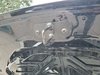
Btw the rear trunk striker is a perfect match for the hood. Not only is it short (depending on your plastic coverings) but it also aligns perfectly with the hood. I removed some of the covering and got it to fit but I was also adjusting the alignment. I figure if anything it is sealed much tighter without the front and side plastic covering. If my assumption is correct than changing the trim around the frunk becomes unnecessary which is a huge bonus. If you wait for it too lock on it’s own or if the latch is already closed it will lock as it is so short it cannot hit the latch low enough to engage the lock. But this also means it’s that much tighter and snug with no wiggle room. Literally it is as snug as can be. Will not budge at all.We decided to do a whole bracket swap. Now we have a single latch hood.
Having already removed the old prefacelift lift hood I am curious if this would rid the gap issue as well. I think it will.
It also works with all the coverings under the hood and makes in not move a cm when locked
This is with an unplugged performance bumper on so it may vary slightly but I don’t think it won’t work universally as the hood lays flat on the headlights
Last edited:
Rockwell
Member
Is that an OEM bracket or you made that bracket?Btw the rear trunk striker is a perfect match for the hood. Not only is it short (depending on your plastic coverings) but it also aligns perfectly with the hood. I removed some of the covering and got it to fit but I was also adjusting the alignment. I figure if anything it is sealed much tighter without the front and side plastic covering. If my assumption is correct than changing the trim around the frunk becomes unnecessary which is a huge bonus. If you wait for it too lock on it’s own or if the latch is already closed it will lock as it is so short it cannot hit the latch low enough to engage the lock. But this also means it’s that much tighter and snug with no wiggle room. Literally it is as snug as can be. Will not budge at all.
View attachment 488372
Having already removed the old prefacelift lift hood I am curious if this would rid the gap issue as well. I think it will.
It also works with all the coverings under the hood and makes in not move a cm when locked
View attachment 488374 View attachment 488375
This is with an unplugged performance bumper on so it may vary slightly but I don’t think it won’t work universally as the hood lays flat on the headlights
Is that an OEM bracket or you made that bracket?
It was the bracket from my rear trunk. I just saw that it was much shorter and decided to test it out. It’s too short really but does work and since it’s so short it makes it tighter but obviously the original oem parts work better cause it cannot hit the latch to get it too lock so it locks once the car automatically engages the hood lock. It lines up with the holes of the newer hood but you must makes sure the depth is right when lining it up to the latch as it will move slightly forward and back and side to side when not tightened down. It’s a short term fix for the oem parts but does give it a more snug fit. Which should eliminate concern for the hood allowing water thru or at least minimize more than anyway besides redoing the lining to match the lining of the frunk tub. My hood is carbon fiber so it may not be identical to the oem hood but it worked perfect for it.Is that an OEM bracket or you made that bracket?
The main thing anyone that tries this is that they need to know what they are doing and understand the importance of the striker lining with the latch correctly cause I would assume with it being shorter that if you don’t you could make it difficult to release if it gets caught somehow to the latch itself. At least that was my only concern when trying it but never had and issues with mine after trying but I also adjusted it a few times making sure it was aligned correctly to see if it could engage the latch on its own. I also make sure the striker was tighten down tight cause if it shifted it would definitely be possible of getting caught based off how short is. I may be over analyzing it but common sense just tells me that the limited space of the striker inside the latch could make it a possibility and the last thing I wanted to happen. Also making sure when the latch does lock that the striker is locked in place is the number 1 thing you would need to check before driving it obviously.
I’m sure there has to be other latches from other cars that would align with the mounting holes of the striker and still be short enough to engage the latch when pushing the hood down.
I’m going to see how it works on an older hood however I already know my hood’s mounting points were different so it might only be able to mount one screw which I’m fine testing it with but wouldn’t be comfortable with it installed like that always.
Rockwell
Member
Rockwell
Member
My was a double latch. I guess we solved how to install the facelifted hood for both designs.If you have a single latch prefacelift Model S do you need to make any changes to the latches? Here’s how my hood looks with the single latch
View attachment 487261 View attachment 487262
BrianS85
Member
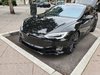
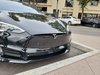
@tyler2323 can we get a side shot of the new hood with the unplugged front bumper? I feel like you’ve stumbled upon something awesome here but just want to see what, if any, underbite remains.
My was a double latch. I guess we solved how to install the facelifted hood for both designs.
The new hood make it identical now to a newer Model S. I also figured out how to close the gap with the old hood and get rid of the need of a gap filler basically. Here’s a side pic with the new hood. You can just buy the newer striker for 2017-2019 and use it on both bumpers. If you have a single latch/striker. On the older hood you can move the the latch not striker up by losing the 2 bolts in front. You can also remove the lining depending on how snug you want it. I put the old hood back on just to check for those still only planning on using their oem hood. With the Unplugged v stripe I could barely close it after I remove the oem v bar. I took the lining off the frunk to get it shut it’s that snug.@tyler2323 can we get a side shot of the new hood with the unplugged front bumper? I feel like you’ve stumbled upon something awesome here but just want to see what, if any, underbite remains.
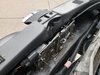
This is not with the new latch so slightly open
These are with the rear trunk striker
The actual frunk striker for these pics. Will take some with the oem v bar tomorrow
Attachments
Rockwell
Member
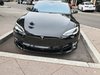
Got the car back from the body shop and they did a great job. The Cost was 500 for paint and install.
All we did was purchased a facelifted bracket and actuators and welded it onto the frame of the car. We still have some little adjustments we have to do to make it perfect.
We postion the bracket too close to the middle grill....so we will have to re-weld it about .5 away further and we will be done
Attachments
Rockwell
Member
Also FYI, IF you want the face-lifted bumper and want to avoid the gap, you can purchase (if they let you) the unpluggled middle grill and it will fill in the hood gap.
How do i know? We installed my old Unplugged Performance grill (since i am using the OEM grill now )onto my friends OEM faclifted bumper and it filled in the gap perfectly.
How do i know? We installed my old Unplugged Performance grill (since i am using the OEM grill now )onto my friends OEM faclifted bumper and it filled in the gap perfectly.
Yea I have the middle piece and would like to make something similar for anyone doing this. They won't let you buy it, this was discussed when artsci was doing the refresh and hood years ago. You will need to file the openings on it to fit tho. Takes 2 min. They don't line up with the clips on any facelift bumper perfectly and vice versa, I had to do the same thing to get the oem v bar to fit on the unplugged bumper.Also FYI, IF you want the face-lifted bumper and want to avoid the gap, you can purchase (if they let you) the unpluggled middle grill and it will fill in the hood gap.
Looks Great! $500 for paint and install is a great price.
How do i know? We installed my old Unplugged Performance grill (since i am using the OEM grill now )onto my friends OEM faclifted bumper and it filled in the gap perfectly.
Rockwell
Member
That doesn’t do it justice cuz it’s not a side pic of you prefacelift hood. Too bad u don’t have one to compare with a side pic.
The difference is much better than this picture may seem, trust me to anyone out there that might not think it’s much different and not worth it. The hood makes the conversion in my opinion

@tyler2323 can we get a side shot of the new hood with the unplugged front bumper? I feel like you’ve stumbled upon something awesome here but just want to see what, if any, underbite remains.
Also FYI, IF you want the face-lifted bumper and want to avoid the gap, you can purchase (if they let you) the unpluggled middle grill and it will fill in the hood gap.
How do i know? We installed my old Unplugged Performance grill (since i am using the OEM grill now )onto my friends OEM faclifted bumper and it filled in the gap perfectly.
If anyone knows someone looking for a facelift bumper I have s brand new one primed with the pre cut holes and park assist retainers and fog light brackets already mounted. If you live in So Cal or Arizona and are not handy I can do the entire install for you.
I also have an Unplugged Performance facelift bumper. I actually installed the fog lights and louvers so if someone did want it they could just swap parts with me and most the work is done.
Also I have the UP V bar and looking to see who is out there with the potential skill to make something similar or better(Carbon Fiber). This would be huge for anyone keeping the original hood for the overall appearance as I do not want to leave out people wanting to do the conversion that don’t or can’t spend the money on a hoody. Cause that piece definitely takes your eye away from the underbite with the way it made.
Also anyone with a single latch can install a new hood in no time. Took me 20 minutes. You can use the trunk striker as well since the A holes on eBay sell the frunk striker for facelift Model for $100 and costs like $12. You can adjust your latch to move up with just loosing the screws and either a new striker or trunk striker will work perfectly
Pictures of the extra facelift bumper I have for sale.
Last edited:
Not sure if you made sure to add this part but it’s very important and most assume you must remove it and not replace it. The facelift ankle catcher. You should definitely install one if you didn’t. As well as any owner who has done this conversion. It wasn’t made just for looks lol
Similar threads
- Replies
- 4
- Views
- 1K
- Replies
- 6
- Views
- 798