Welcome to Tesla Motors Club
Discuss Tesla's Model S, Model 3, Model X, Model Y, Cybertruck, Roadster and More.
Register

Trunk tub, removing bolts

This site may earn commission on affiliate links.

Pianewman

2021 MYLR VIN 88,XXX, Rd/Wh, 12/20 delivery
Supporting Member
Oct 28, 2020
3,641
3,251
Fort Worth
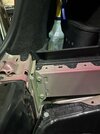
I'm attempting to install tie-down straps for my collapsible spare which resides in the deep well sub trunk. The photo shows nowhere to run straps through the boxbeam frame.

I'm thinking I could secure tie-down rings to the bolts (2) that hold the bottom tub in place. One bolt is visible in the lower part of the photo, securing the sub trunk.

Are those bolts bolted directly to a (threaded) hole in the frame, or would I need to remove the diffuser from below to access nuts for the bolts?

Thoughts? TIA.
 

Attachments

  • Teslasubtrunk.jpg
    Teslasubtrunk.jpg
    403.4 KB · Views: 7
The service manual covers those sorts of things.

I would very much doubt it is nutted but not enough to start winding it off.

Diffuser should come off pretty easy. There's a link to service pages for pulling the arse end apart for swaybar swap if you look in that thread about MYP upgrade swaybar.
 
I pulled up the Tesla manual for this. To REMOVE the tub, the diffuser needs to be removed. It wasn't clear as to how the tubs bolts are attached.
I'd rather not have to crawl around to remove the diffuser. My almost 70 year old body just isn't happy doing those things any more!

Thanks for the quick response.
 

google
 
  • Informative
Reactions: QtownTaxiGreg
I must be missing something or the China built ones are very much different? Joining dots, the diffuser is bolted to the trunk ass'y and the trunk ass'y is bolted to the diffuser and the body.

Removing the trunk tub there would be nothing for the diffuser to hang onto. Very confusing.
 
My OCD really had me needlessly worrying about this. It was ridiculously simple. (Sorry, my photos were blurry, didn't notice that until I had everything already installed.)

Remove one corner bolt. Install D ring (photo) Repeat on the other side.
Set the formed tub back in the well, marked where I needed to cut small holes in the corners of the fabric tub, to access the rings.
Replaced tub and side covers.
Used a ratcheted hold down strap to secure the Vredestein SpaceMaster spare, with the shop hydraulic jack secured beneath it.

***I had to slightly enlarge the hole in the d-ring to accommodate the bolt. Also, secured the d-ring plates with only one bolt. Drilling and using both plate holes would be overkill, IMHO.
 

Attachments

  • drings.jpg
    drings.jpg
    724.4 KB · Views: 4