Welcome to Tesla Motors Club
Discuss Tesla's Model S, Model 3, Model X, Model Y, Cybertruck, Roadster and More.
Register

2nd run of camera switch that show a front image on the touch screen

This site may earn commission on affiliate links.
UPDATE: Okay good news. I successfully installed artsci's 2nd run prototype front cam switch on a X today. Works great.
And on Monday last, I received one of the two beta CAN BUS switches that appleguru built. I used that switch and installed it on the same X with the front cam switch. Works great. Works great. This should remove any doubts that we have talked about here with both the 2nd run switch and installing it on a X, and appleguru's CAN BUS switch.

As far as I can tell from this forum, this is the first time the front cam switch has been installed on a X. Works fine.

When installing on a X, there are a couple of differences worth mentioning. Before you ask, I don't have pictures yet. The person that owns the X was working with me, and took pictures. I will get pictures later and pass them to artsci and appleguru to go into the instructions. That insures maximum benefit in a reliable location versus buried in one post on this long thread.

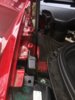
1. The front of the X 'behind the front bumper" is a bit more busy or complex than the S, so threading the long front cable is a bit more difficult. But can be done.

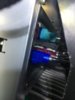
2. Threading the cable along the inside/underside of the right front fender is a bit more complex at the frunk lid hinge and where you move the cable towards the right side door. The cable routing path is a bit different than on an S. We will not be routing the cable to the cabin by prying the top of the fender away from the bottom edge of the windshield (using a couple of trim removal tools) like we do on the S.

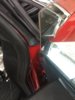
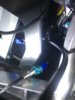
The cable will feed through a small opening at the back of the fender (near the door). You are going to need a fish or long stiff wire. There's a strip of rubber sort of a seal near the frunk lid hinge. That's a very good place to slide the cable under the rubber seal and run it toward the door/dash.. Move around to the open door and look towards the end of the right front fender for an opening above the door's hinge toward the opening end of the right front. You are looking for an opening to pull the cable through. The only opening is narrow but tall, however the cable's Z style connector will not fit through the opening, its simply large to go through the hole.

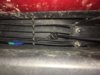
However appleguru taught be a trick that helped with this. The Z style connect is made up of three parts. A small plastic lock (usually purple), a plastic housing that slips over a long metal end with 4 connectors inside. On the Z style connector, If you carefully remove the purple housing lock with a small blade, then lift the slender tab near the lock, you can easily slide the plastic housing off the metal end of the cable. Then using your fish, pull/thread the cable through and put the housing back on the end before you lose the purple lock.

Take note folks. IMPORTANT. When you slide the Z style housing off the end of the cable, take special note of the three 90 degree sides on the metal terminal shoulder. The fourth shoulder on the metal end is shaved at a 45 degree angle. It helps you identify how to slide the housing back on to re-align the cable's four connections to match the car - how they need to be.

I'm working on install this now and does anyone have a picture of the opening where the cable routes into the cabin on the X? I think I see the correct hole, but i'm not seeing how to route the cable into the cabin without it getting smashed by the door. Many thanks!
 
I'm working on install this now and does anyone have a picture of the opening where the cable routes into the cabin on the X? I think I see the correct hole, but i'm not seeing how to route the cable into the cabin without it getting smashed by the door. Many thanks!

I don't have a picture. But go back and look at the method/path used to route it into the cabin on the S, - the same.
But to confirm, you are talking about the section of metal at the body where the A Pillar comes down and is attached to the body? Just above the hinge? We lift the weatherstrip at the body that seals against the front of the fender, and slide the cable underneath the weatherstrip, between the body/metal and the sticky backside of the weatherstrip. You pull the weatherstrip up a length of about 2-3 inches so you can create a small gap. Slide the cable, pull it thru to reduce the slack and get the length inside the car, then press the weatherstrip back down. Creats a little bump, but does just fine with you close the door. Don't cut your weatherstrip. Behind your weatherstrip.
 
8F4744ED-588D-4CCF-B6EA-9D5FCD55696A.jpeg
CC466D70-839E-4B52-8A9B-DBD4218F8012.jpeg


Is it these two spots?
 
Are for me to tell from the picture. But second/lower picture looks right, right where the circle is. I was describing that area to the left of the circle where we see the black trim. That's the one you lift and slide the cable behind. There's a seam/edge there under the trim, you don't want to cut through the cable with the metal seam, but you want the trim to press it down and then cushion it when the door closes.

And you didn't put me on the spot, but the X and S are different where the doors close. The X has that trim and a seam under it. The S does not. I don't have a X, so I can't take pictures. Sorry.
 
Is there not a grommet on the firewall that already has wires going through it we can shove the front video cable into? Mine needs to terminate at the center of the floor behind the MSU and I would love to find a way to have the cable enter the cabin in that general area vs the A pillar.
 
okay, awesome, thanks! one last question i hope... since the rear camera connector on AP2.5 is on the right side of the APE, where/how did you mount the camera switcher since the rear camera cable is bundled with other cables and is so short? thanks!
 
Are you using only the front camera switcher? Or do you have bearbu’s hdmi kit as well?
00C0818A-B1F2-471A-8624-148BA422B081.jpeg


There’s enough room to the top right to wedge Artsci’s box, I tried and it worked for me.

If you manage to pair the remote - please document how you did yours... I still haven’t been able to successfully pair any 433mhz remote
 
Thanks again for all the help @Akikiki !

I ended up velcroing it behind the right dash panel and it fit pretty well. Pic below.

I paired the remote by pushing the button on the camera switcher (you need to unscrew the case to get to the button). A red LED near the button will turn on. Then press a button on the remote. The red LED on the camera switcher will then blink and turn off. That’s it.

On that note, with the included remote, only the D button works to make the switch. Is there a way to make the A or B buttons work?

2E50B70F-35B4-4047-A47F-D8283A789808.jpeg
 
okay, awesome, thanks! one last question i hope... since the rear camera connector on AP2.5 is on the right side of the APE, where/how did you mount the camera switcher since the rear camera cable is bundled with other cables and is so short? thanks!
I see you have added another post since your question. That's the right idea. Velcro works great. It keeps it from bouncing around after everything's closed up.

For that 4 button remote only the D button works. But if you back up a a few pages and look for a post from Hanklloydright, he talks about getting some round simple one button remotes and pairing to them. I did too. Works great. And he also describes while the box is apart to drill a small hole in line with the button. That way you can close the box up and use a blunt instrument to push the button without opening it.

Nice work. Best to you.
 
A quick update and then I need to get back to finishing the job:

With @appleguru help I was able to get the camera switcher and giraffe/panda working on my early AP1 Model X.

Here is a summary of what needs to take place:
  • You need to pull the rear camera feed out of the back of the MCU. Find someone with small hands.
  • You will need an extension cable M-F as I noted above (ebay) connected from the cable removed above to the Rear plug on the switch
  • Plug the F-F custom cable from @artsci into the back of the MCU and into the display/MCU port on the switch
  • Everything else is the same (panda connection, front camera etc)
Where I got hung up in the end was I thought something was supposed to be added to the car menu vs just pressing and holding the menu button to cause the device to switch. I ended up toggling to the front camera with the wire from the panda just so I could make sure it worked.

Now that everything is connected and I have cycled it manually the menu does work when held down and the gear shifter does switch appropriately too.

So next step is to decide where all the cables will be routed and put my car back together again. I will post some pictures of that when done.
 
Here are some pictures of my adventure. You can see the rear camera/MCU cable at the top.

I tried to find an alternative to routing the cable around the A pillar but came up short. No access in the AWD MX through a grommet and I poked at the foam extensively. At one point I think I got my rod down into the front kick panel but on the MX that is impossible to take off so I settled for just running it under the one gasket as pictured. I ran the panda cable from a hole adjacent and straight behind the MCU. You can see it over the top of the plastic dash support.

Next up is to get a battery so I can program the remote as a backup and then mount the switch. It is going to be placed behind the glovebox support on the left and mounted to the top of that AL truss bridge like support. I will coil the excess cables up and zip tie everything down to keep it from rattling hopefully.
 

Attachments

  • IMG_3760.JPG
    IMG_3760.JPG
    242 KB · Views: 66
  • IMG_3770.JPG
    IMG_3770.JPG
    316.9 KB · Views: 62
  • IMG_3773.JPG
    IMG_3773.JPG
    369.8 KB · Views: 62
  • IMG_3776.JPG
    IMG_3776.JPG
    342.8 KB · Views: 64
  • IMG_3764.JPG
    IMG_3764.JPG
    301.7 KB · Views: 66
  • sm_IMG_3780.JPG
    sm_IMG_3780.JPG
    232.7 KB · Views: 66
  • sm_IMG_3785.JPG
    sm_IMG_3785.JPG
    293.2 KB · Views: 61
Last edited:
I recommend you get a plastic bag and wrap it around and zip tie or duct tape the ends to seal that connector for the front camera where it connects the cam's cable to the long cable. Those are not water proof connectors. They have on at least one occasion corrupted and had to replace both cables.
 
  • Informative
Reactions: aesculus
Here are some pictures of my adventure. You can see the rear camera/MCU cable at the top.

I tried to find an alternative to routing the cable around the A pillar but came up short. No access in the AWD MX through a grommet and I poked at the foam extensively. At one point I think I got my rod down into the front kick panel but on the MX that is impossible to take off so I settled for just running it under the one gasket as pictured. I ran the panda cable from a hole adjacent and straight behind the MCU. You can see it over the top of the plastic dash support.

Next up is to get a battery so I can program the remote as a backup and then mount the switch. It is going to be placed behind the glovebox support on the left and mounted to the top of that AL truss bridge like support. I will coil the excess cables up and zip tie everything down to keep it from rattling hopefully.


Great job. I know you have been working on this a while now. Thank you and the rest of the leads on this project for blazing the trail!

It will really help me with my install (once it stops snowing!)
 
Now that I have had time to use this feature I am impressed by all the work that went into it from both @artsci and @appleguru . But my brain is not working as well at the kit. I can't seem to automatically flip the image from left to right and a couple of times found myself thinking all was OK because I was looking on the left side when the issue was on the right!

I know that it is next to impossible to "fix" this with post processing and way over the top but are any of these possible?
  • Changing the camera from the standard Tesla rear view camera to something that is plug compatible without the left-right flip?
  • A mirror that can be placed next to the camera that would flip the image?
  • Hypnosis that can force my brain to do the right thing when looking at the forward image?