


Welcome to Tesla Motors Club
Discuss Tesla's Model S, Model 3, Model X, Model Y, Cybertruck, Roadster and More.
Register
Install the app
How to install the app on iOS
You can install our site as a web app on your iOS device by utilizing the Add to Home Screen feature in Safari. Please see this thread for more details on this.
Note: This feature may not be available in some browsers.
-
Want to remove ads? Register an account and login to see fewer ads, and become a Supporting Member to remove almost all ads.
You are using an out of date browser. It may not display this or other websites correctly.
You should upgrade or use an alternative browser.
You should upgrade or use an alternative browser.
DIY Chrome Delete with Plasti Dip
- Thread starter KFORE
- Start date
-
- Tags
- chrome delete plasti dip
slade037
Member
About 6-7 hours. I had to redo the long top piece above the door. I was 90% done and opened the front door and ripped the vinyl. I also started the project with using my knife. I could probably shave an hour if i had started using the knifeless tape instead.Looks really good! How long did it take?
SlicedBr3ad
Member
Please document everything and share to help others (like meAbout 6-7 hours. I had to redo the long top piece above the door. I was 90% done and opened the front door and ripped the vinyl. I also started the project with using my knife. I could probably shave an hour if i had started using the knifeless tape instead.
") ).
).cmarshack
Member
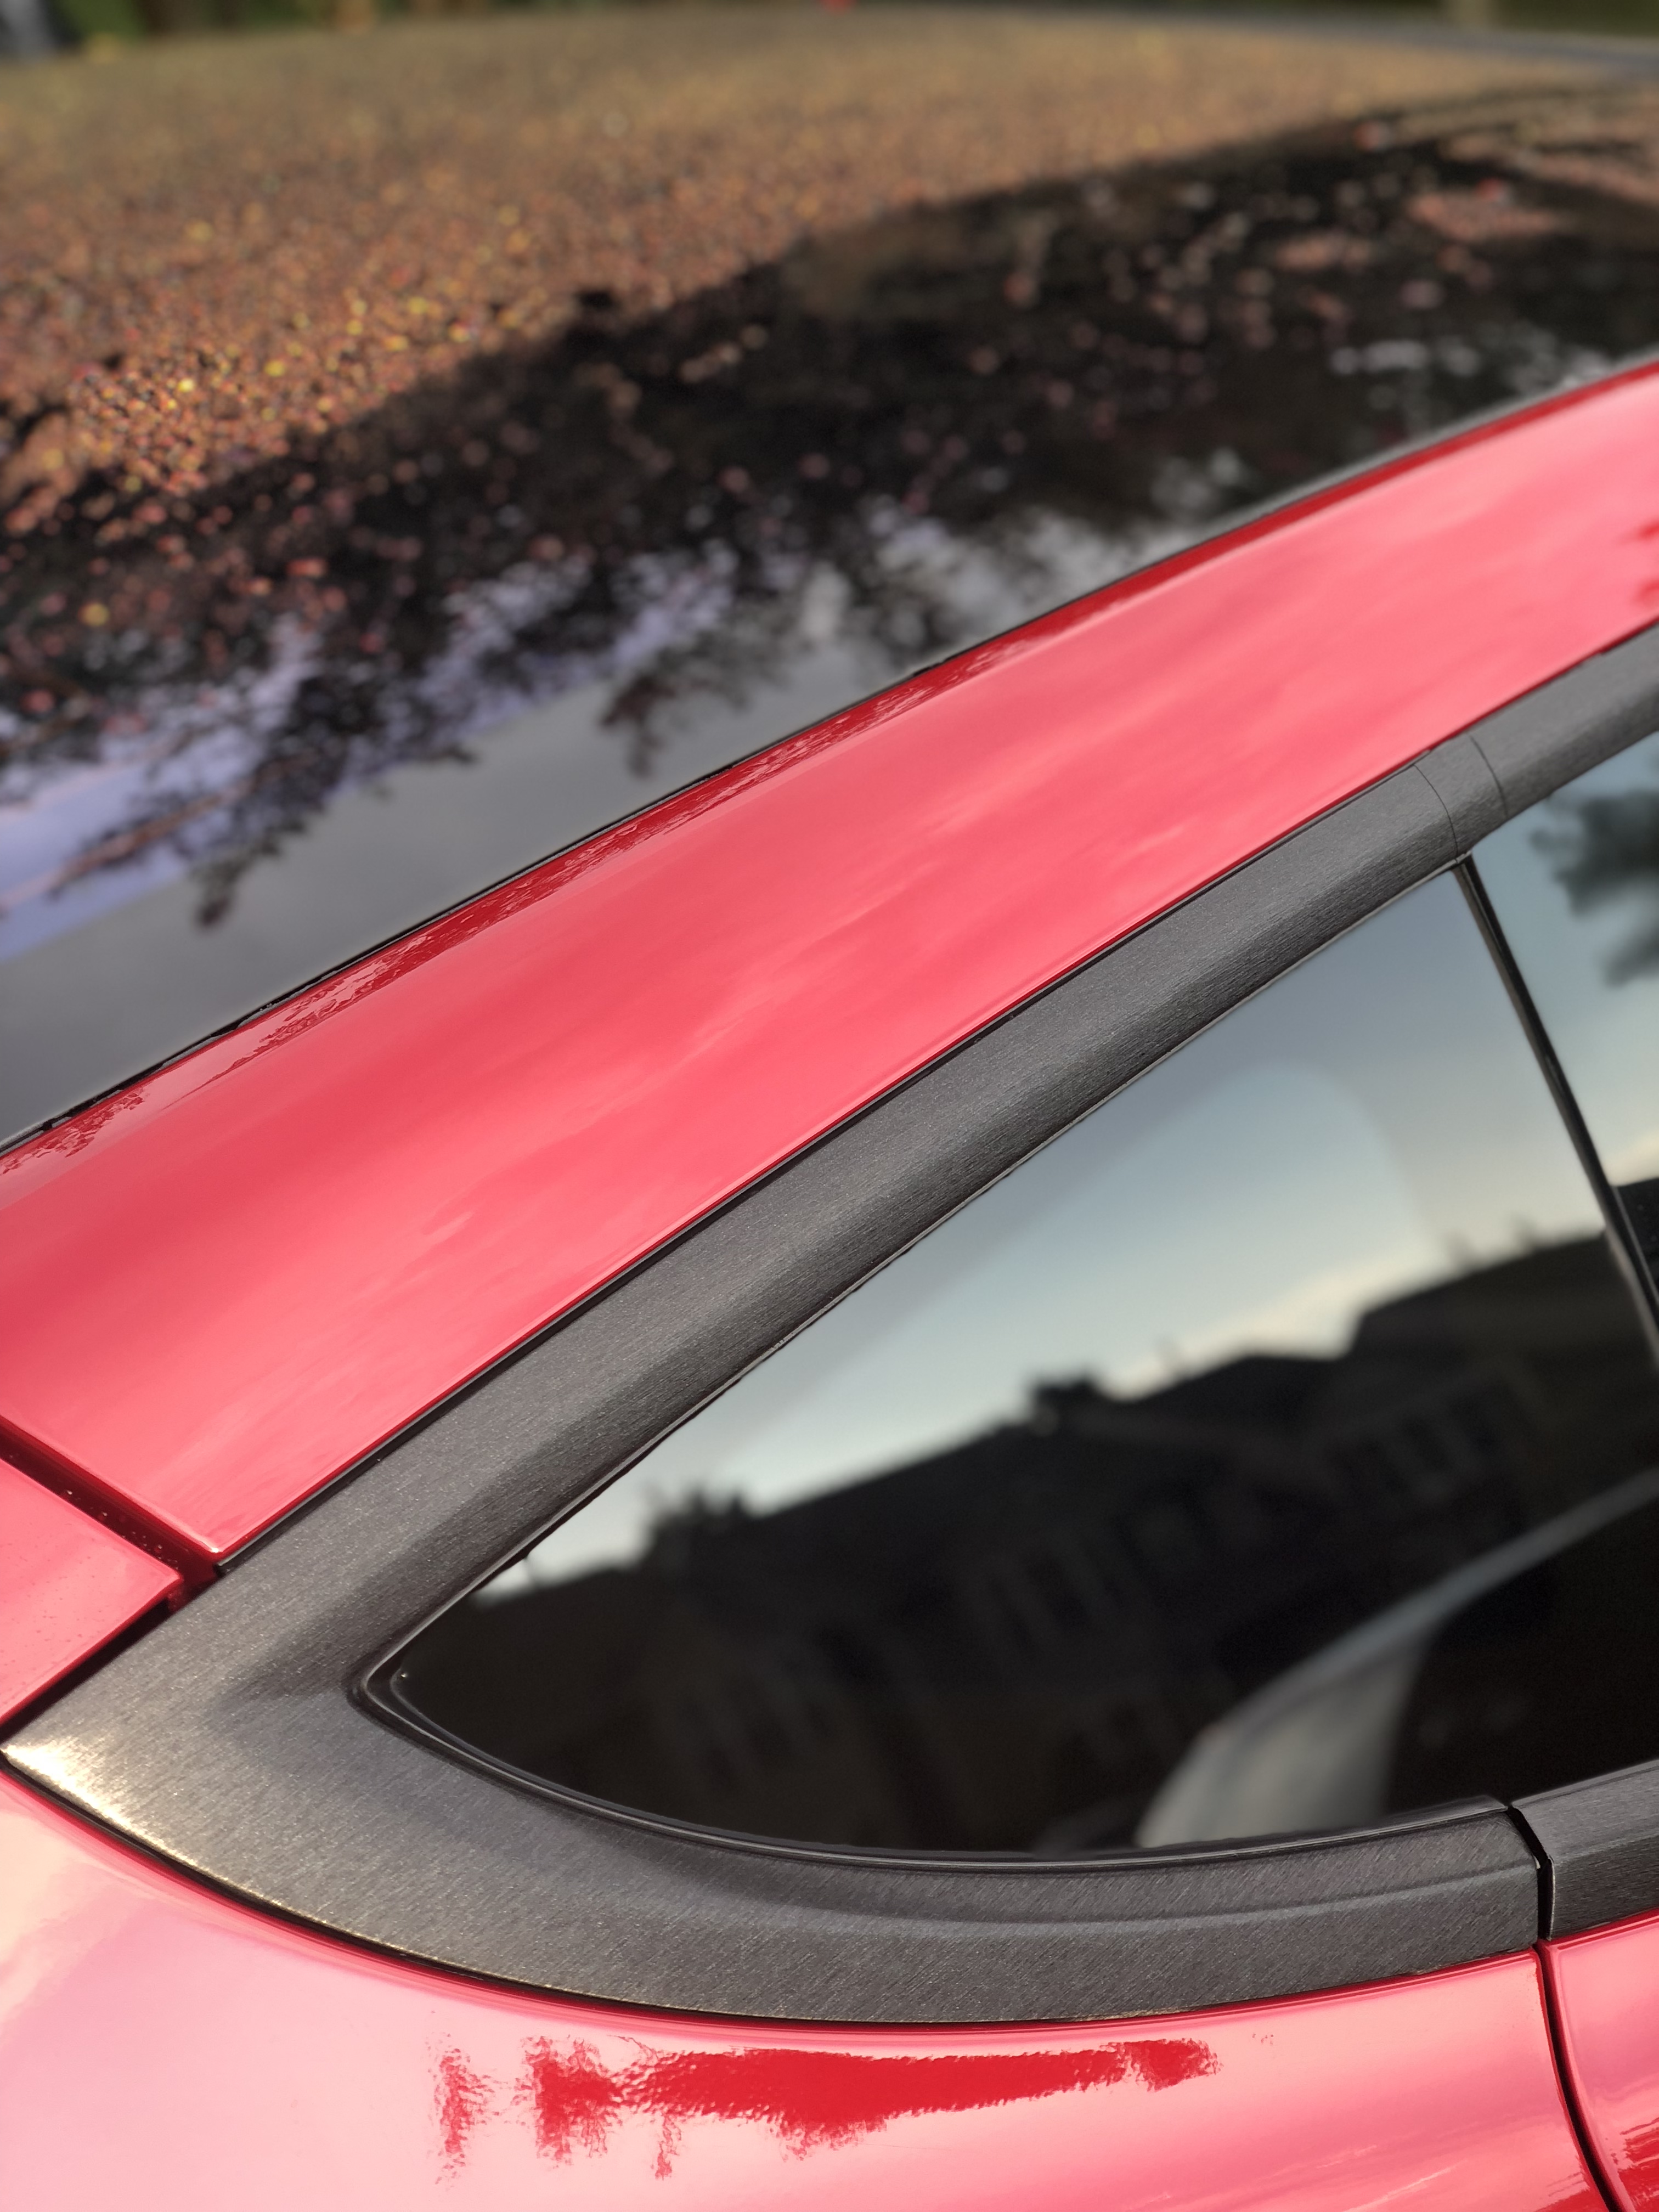
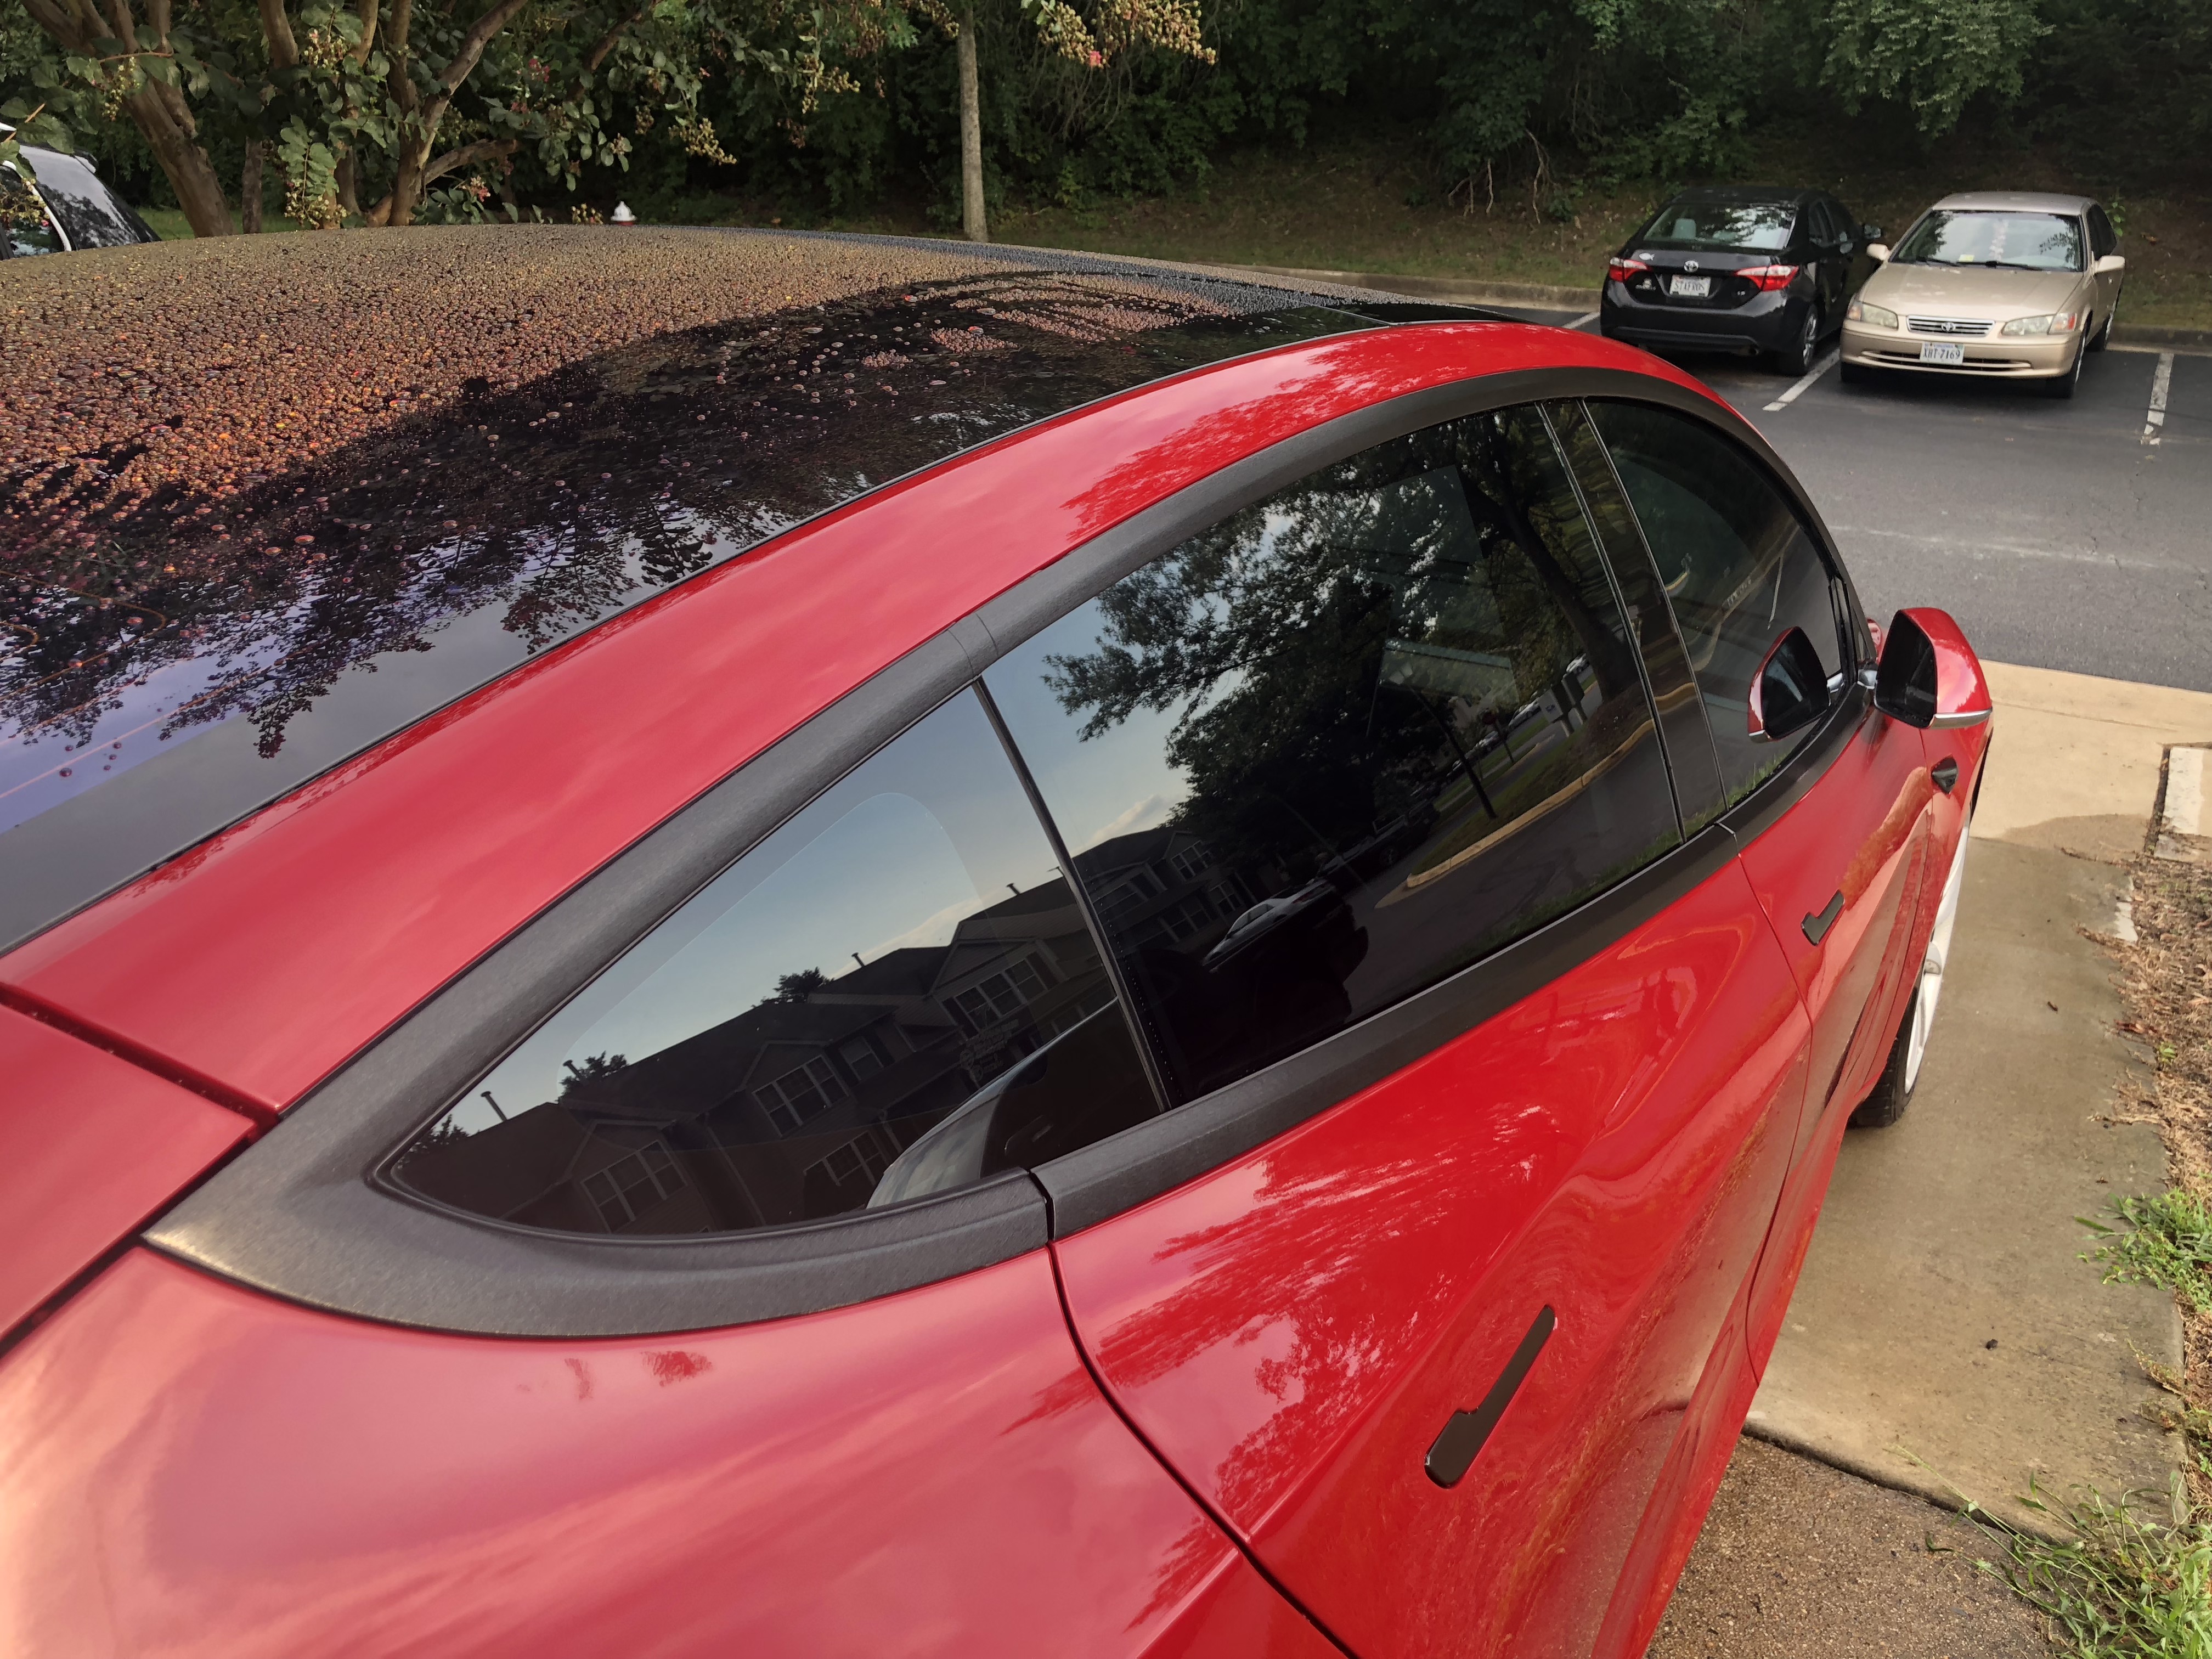
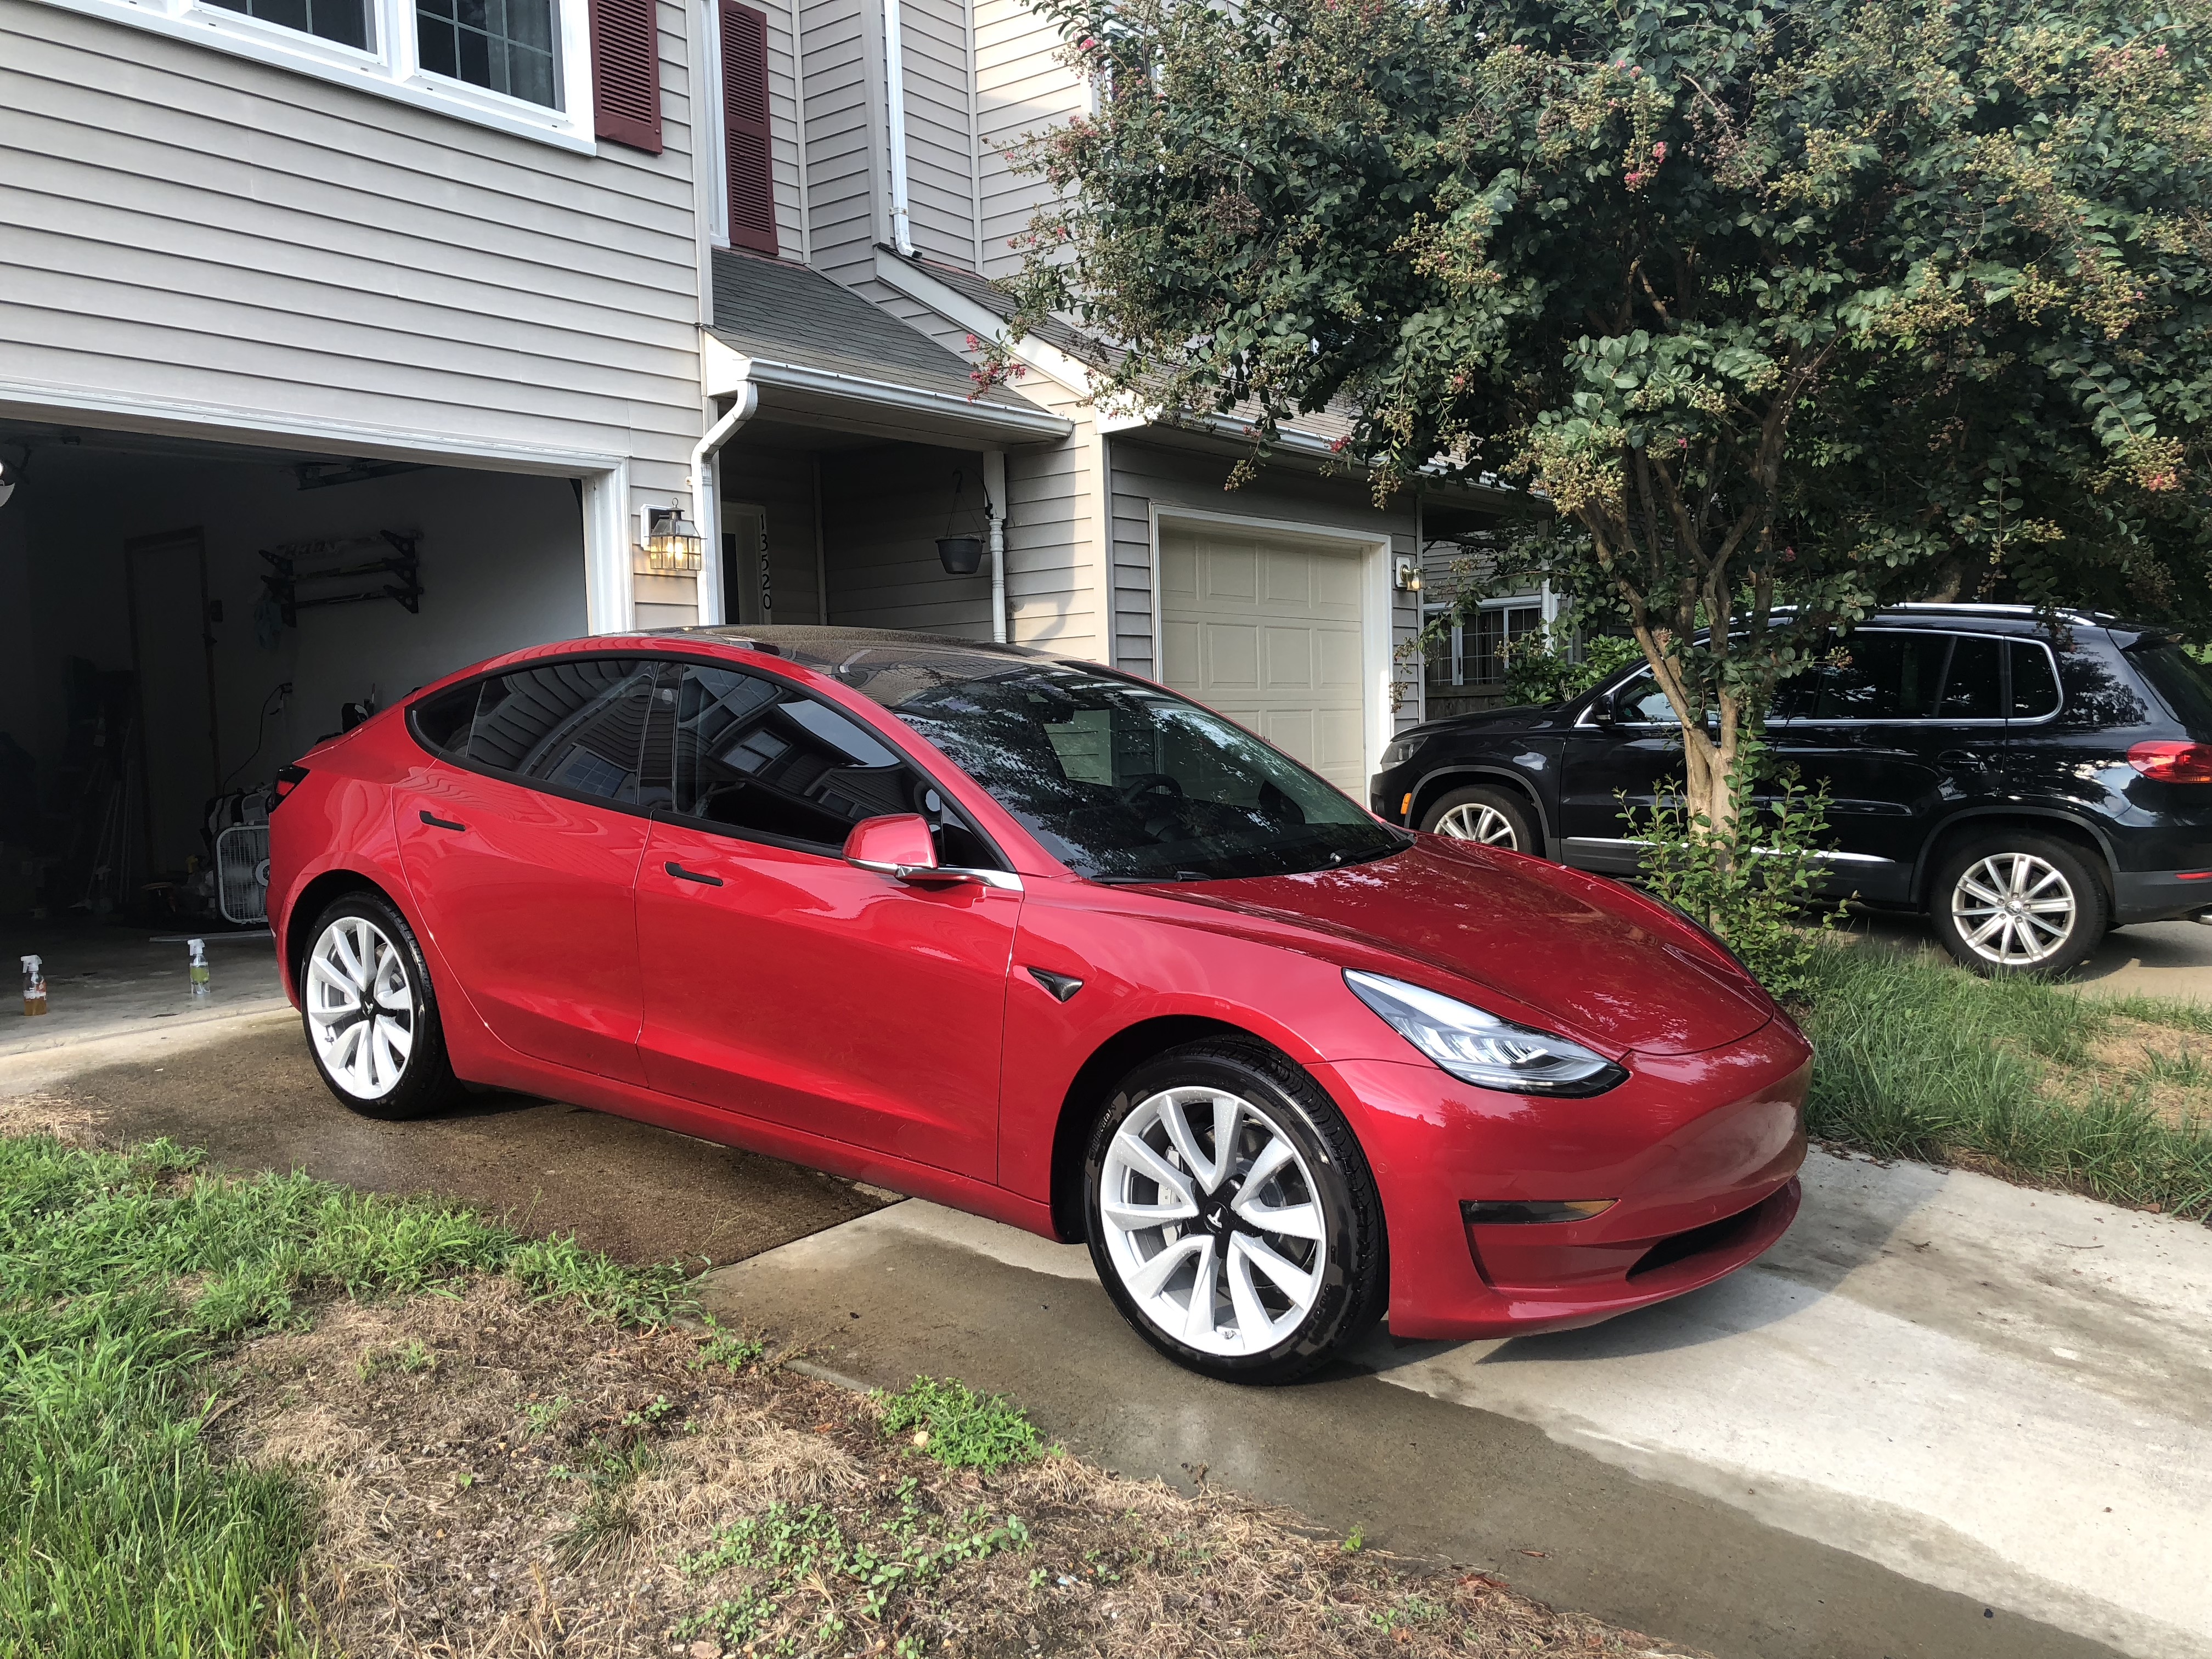
After receiving quotes upwards of $1,000 for a professional vinyl chrome delete, I decided to do my own with 2 cans of black plasti dip, some masking tap, and a few garbage/plastic bags. Total cost: $35. Total time: 6 hours.
Most of the effort is in the masking of the car, which took about 4 hours of total effort. I was being extra careful (probably too careful as plasti dip is very forgiving), and it was fairly tedious. It wasn't hard, just... time consuming.
Anyway, here are the results...
Great work! I did the same thing on my Model S. On two occasions it got ripped/pulled away and I had to re-spray/touch-up. The culprit is the rear corner of the trim on the Model S (looks very similar on the 3) and it is a sharp point. When you get your car washed, it is very difficult not to hit that edge with a towel when drying, and inevitably it will get pulled away in that spot.
I love the look and decided to pull the plastidip and get the trim vinyl wrapped. I still have dip on my nose cone surround and it looks great after a year.
KFORE, Plastidip is a good solution but does not last long and specifically is not susceptible to weather conditions, fortunately you have it on a EV car else it is also not gasoline resistant....
??? If you regularly spill gasoline on your window trim, you are doing it wrong...
slade037
Member
The chrome trim around the windows are pretty easy. I used 14"x9" piece for the back triangle. I used 2"x8' for the long chrome pieces. For the top long piece, you can easily bend the vinyl to conform to the shape of the chrome.Please document everything and share to help others (like me
I put the knifeless tape on the rubber trim. This would give me some vinyl to tuck into/underneath the rubber seals. You will need something thinner than a credit card for tucking the tighter seals. I used one of my plastic cards that the grocery store gives you for you keychain.
If you have any specific questions, I'll do my best to answer them for you. Unfortunately, this was a one man show and didn't find a great way to take any video. I'll try do my best and take some pics when I figure out how to do the mirrors.
Last edited:
hdAge
Member
Great work! I did the same thing on my Model S. On two occasions it got ripped/pulled away and I had to re-spray/touch-up. The culprit is the rear corner of the trim on the Model S (looks very similar on the 3) and it is a sharp point. When you get your car washed, it is very difficult not to hit that edge with a towel when drying, and inevitably it will get pulled away in that spot.
I love the look and decided to pull the plastidip and get the trim vinyl wrapped. I still have dip on my nose cone surround and it looks great after a year.
This is the point, plastidip is not the solution. With Autoflex I have used very high pressure hand washes and hit all kinds of edges, not a single crack and it stays put like OEM paint, actually better. And btw I wash my car very regularly. It also depends on how many coats of paint you got it applied and not all dealers do a good job. I had mine with 15 coats of autoflex paint including glossier and believe me there is only dealer in entire greater Los Angeles area that could do the job.
??? If you regularly spill gasoline on your window trim, you are doing it wrong...
Gasoline was just an example, autoflex is a professional high grade product that looks and feels so much better than plastidip. I would never do a plastidip on my Tesla.
SethCat
Member
We've been talking about the chrome delete on the model3 forum too. If you end up doing the mirrors, I'd love to hear how it goes and see any pictures as you do it. The video shows that you can pivot the mirror for better access. I'm a little worried about trying it though. DIY Chrome Delete
warrior15r
Member
Just finished Part 1 of the Chrome Delete. Bought 2 pieces of 3M black brushed vinyl. 12"X8' and 5'x3'. Spent about $100 on vinyl. I would highly suggest buying knifeless tape. It made the process so much easier. And you don't have to worry about cutting into the paint by accident. I still have the mirrors to take care of. Still trying to figure out how to tackle that. Let me know what you think!
Looks phenomenal! Would love to see how you did the mirrors. I've been going back and forth on if i want to DIY Vinyl or try the stuff www.getsuperwrap.com
If you figure out how to do the mirror with Vinyl wrap, I would really really appreciate if you document step by step or shoot a video as you are doing it. That would be SOOOO helpful.
slade037
Member
Looks phenomenal! Would love to see how you did the mirrors. I've been going back and forth on if i want to DIY Vinyl or try the stuff www.getsuperwrap.com
If you figure out how to do the mirror with Vinyl wrap, I would really really appreciate if you document step by step or shoot a video as you are doing it. That would be SOOOO helpful.
I started a new thread since this was dealing with plasti dip and didn't want to hijack it.
Chrome Delete Mirrors
Got a can of Plasti Dip to experiment on some small plastic parts. Overall it is very easy to apply and dries quite quickly. However, I'm not quite fond of the stickiness after it dries. It might be good for some application where it adds grip, but since I'm planning on applying it to the door handle I really don't want to have the extra "grip." Does the stickiness smooth out over time or it's just going to stay sticky forever (until peeled off)?
CrazyCoconut
Member
Paik4Life
Member
I didn't spray in the folded position yet. Plan on doing that this week. If the handles don't fare well over time, I'll just vinyl those.
Hi KFORE. Just following up on the mirrors. Did you spray them in the folded position yet? If so, how did it turn out? Did the old and the new blend together without lines, etc.?
I haven't sprayed the mirrors folded yet. I honestly don't mind the small sliver of chrome you see. It's sort of an indicator the car is locked
As an update to how the plasti dip has held up so far... absolutely no degredation so far, including the handles! It looks exactly like it does in the original photos. It's only been a few months, and the real test is Michigan's harsh winters, so I will update this during and after the winter to see how it fares.
As an update to how the plasti dip has held up so far... absolutely no degredation so far, including the handles! It looks exactly like it does in the original photos. It's only been a few months, and the real test is Michigan's harsh winters, so I will update this during and after the winter to see how it fares.
I haven't sprayed the mirrors folded yet. I honestly don't mind the small sliver of chrome you see. It's sort of an indicator the car is locked
As an update to how the plasti dip has held up so far... absolutely no degredation so far, including the handles! It looks exactly like it does in the original photos. It's only been a few months, and the real test is Michigan's harsh winters, so I will update this during and after the winter to see how it fares.
Cool. Thanks for the update. I plan on doing my red Model 3 when it arrives (9/28). Would you mind posting a few pics of the mirrors folded, so we can see the area that's not covered yet? A close up or two would be appreciated. Thanks again!
CrazyCoconut
Member
It's not really sticky. More of a grippy rubbery feel.@KFORE Do the handles (or all the surfaces sprayed with plastidip) stay sticky after a few months? I like the look, but not really fond of sticky surfaces. Thanks
Similar threads
- Replies
- 1
- Views
- 2K
- Replies
- 32
- Views
- 6K
- Replies
- 20
- Views
- 838